4. Template expression examples
Template expressions obviously
have a great deal of power built in, but how do you put it to use? Let's
look at some specific examples to help you get a better understanding
of template expressions in general, as well as to give you some useful
tools.
4.1. Alternating row background colors
If you have a data-filled table
of any significant size, alternating background colors for each row
greatly increases the readability of the data. Template expressions
provide a technique for specifying the two classes with different
background colors — and automatically applying the right color whenever a
new row is added in a repeating region. The key to this technique is
the conditional operator.
The conditional operator
has three parts: the condition and the two results. If the condition is
evaluated as true, the first result is applied; if it is not, the second
is applied. In this case, the condition that is examined involves the _index property, which returns the position of the current row. By combining the _index property with the bitwise AND operator, &, like this:
_index & 1
True is returned
every other row, starting with the second row. The full template
expression specifies the two classes as hexadecimal values; the second
value specified (here, oddRow, which has a background-color property with a light yellow value) is returned in the first row, the first value (evenRow, with a white background-color) in the following row, and so on:
@@((_index & 1) ? 'evenRow' : 'oddRow')@@
This template expression is entered as the class
attribute for the table row containing the data in a template's
repeating region. Note the use of the single quotes around the color
values; quotes are needed in the conditional operator syntax, and single
quotes are used here because Dreamweaver encloses the entire attribute
value with double quotes.
Here's the code for the entire
table in the template document. The tag containing the alternating row
background color is shown in bold:
<table width="100%" border="0" cellspacing="0" cellpadding="0">
  <tr>
    <th>Item</th>
    <th>SKU</th>
    <th>Price</th>
  </tr>
  <!-- TemplateBeginRepeat name="repeatRow"-->
 <tr class="@@((_index & 1) ? 'evenRow': 'oddRow')@@">
    <td><!-- TemplateBeginEditable name="itemEdit"-->itemEdit<!--
TemplateEndEditable--></td>
    <td><!-- TemplateBeginEditable name="skuEdit"-->skuEdit<!--
TemplateEndEditable--></td>
    <td><!-- TemplateBeginEditable name="priceEdit"-->priceEdit<!--
TemplateEndEditable-->
    </td>
  </tr>
  <!-- TemplateEndRepeat-->
</table>
You won't see any changes in
the template itself — for the full effect, you have to open up a
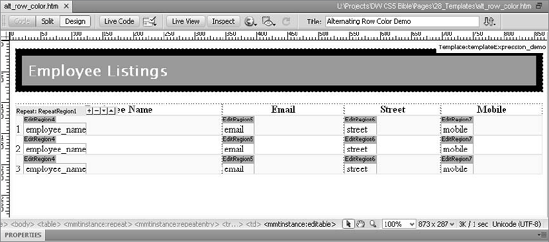
document based on the template and add a few rows. As you can see in Figure 4,
whenever another entry is added to the repeating region in the
template-based document, the alternating color is automatically applied.
|
As written, the code in
this technique alternates color every row. To alternate the color every
two rows, change the value in the condition from 1 to 2 so that the template expression reads:
@@((_index & 2) ? 'evenRow' : 'oddRow')@@
|
|

4.2. Automatic row numbering
In a template with a
repeating region, you often want the flexibility of adding as many rows
as required and adding a reference number to each row. The _index_index is a zero-based property and you add a 1 to have the correct row number displayed.
property of the template object model provides an easy way to number
rows automatically. The only trick to this technique is to remember that
Here's the template expression by itself:
@@(_index + 1)@@
This code should be entered
directly in Code view within the repeating region. You can combine this
with any other text, such as a following period or color or styles.
Here's an example, bolded, in a right-aligned table cell with several
non-breaking spaces trailing to create a decimal-aligned look:
<td align="right">@@(_index + 1)@@ </td>
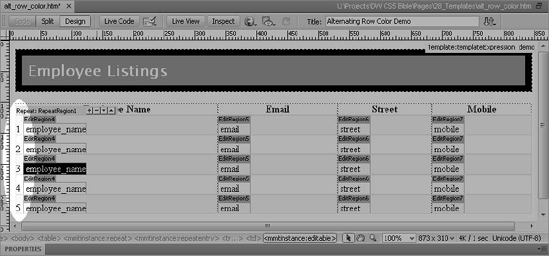
The right-align and non-breaking space combination keeps numbering in line when more than 10 entries are involved, as shown in Figure 5.

4.3. Computing values in a table
After a value has been entered
for a template expression variable, it can be used in calculations and
can also be used as a deciding factor in a multiple-if statement. For
example, each page of a template shows a catalog item and all the
relevant information. Included in that relevant information is the price
— an element that may fluctuate far more than the description or
picture of the item. Should the client want to offer a special discount
for higher quantities, template expressions can automatically calculate
the new price as well as the savings.
In this example, I've set up one template parameter, priceVar, and given it a default value of 100:
<!-- TemplateParam name="priceVar" type="number" value="100"-->
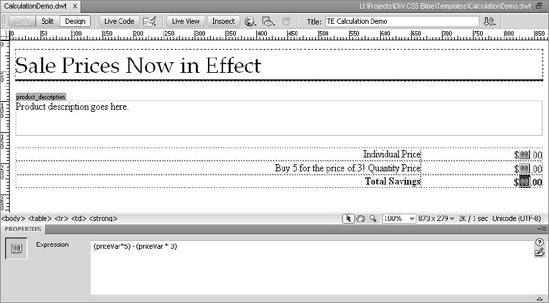
This code goes in the non-editable portion of the template's <head>. The example application, shown in Figure 6, uses three different template expressions. The first, @@priceVar@@, displays the parameter set with the Template Properties dialog box.
The second shows the quantity price — which, here, is the base price times 3:
@@(priceVar * 3)@@
The third expression
displays the savings a buyer could receive by buying in quantity. In
this example formula, the price times 3 is subtracted from the price
times 5:
@@((priceVar * 5) - (priceVar * 3))@@
Again, you can add whatever
text or styles are necessary. Here, a dollar sign is placed in front of
every expression that is followed by a decimal point and two zeros, as
you can see in Listing 1.

Example 1. Template expressions computing example
<table width="100%"  border="0" cellspacing="0" cellpadding="0">
  <tr>
    <td width="77%" align="right">Individual Price</td>
    <td width="23%" align="right">$@@(priceVar)@@.00</td>
  </tr>
  <tr>
    <td align="right">Buy 5 for the price of 3! Quantity Price</td>
    <td align="right">$@@(priceVar * 3)@@.00</td>
  </tr>
  <tr>
<td align="right"><strong>Total Savings</strong></td>
    <td align="right"><strong>$@@((priceVar * 5)@@ – (priceVar * i
))@@.00</strong></td>
  </tr>
</table>
|
Now the calculations on this
template are ready to be used for any product in the catalog, at any
price point, offering the same deal.
4.4. Sequential navigation links
Although much of the Web is
based on the principle that you can link to any page from any other
page, certain situations — such as help or instructional applications —
require sequential navigation. Numerous help applications use some form
of Previous and Next buttons, for example. If these files are named
sequentially — such as docFile10, docFile11, docFile12, and so on —
template expressions can be used to automatically code the links to the
prior and subsequent pages.
Rely on template
expressions for the capability to handle string concatenation to create
these auto-updating links. The first task is to set up a template
parameter to be used as the number of the current file in the series.
If, for example, you're creating docFile5.htm
from your template, the template parameter is set to 5. To accomplish
this task, use Dreamweaver's editable attribute facility to create the
template parameter. This example assumes that you are editing a template
with Previous and Next buttons already in place. Follow these steps:
Select the <a> tag surrounding the Previous button from the Tag Selector.
Choose Modify => Templates => Make Attribute Editable.
In the Editable Tag Attributes dialog box, click Add (+) and enter a dummy attribute name such as baseLink. Choose an attribute name that will be ignored by browsers rather than a real attribute.
Make sure that Make Attribute Editable is selected.
Choose Number as the Type of attribute from the drop-down list.
Enter a default number. This number is set for every file created, so the default value is merely a placeholder.
Now you can use the template parameter set up in a template expression. Follow these steps:
Click the Previous button or link on the template page.
In the Property inspector, enter code similar to the following in the Link field:
@@('cFile' + (baseLink − 1) + '.htm')@@
In this example, the sequential files are all within the same folder and named docFile1.htm, docFile2.htm, and so on. My template parameter, defined in the previous step, is called baseLink.
Click the Next button to perform a similar operation.
In the Link field, enter code like this:
@@('docFile' + (baseLink + 1) + '.htm')@@
Here, instead of subtracting a number from the base value, as you did for the Previous button link, you add one.
After the template is saved,
create a file based on the template. Now you're ready to specify the
template parameter. Follow these steps:
Choose Modify => Template Properties and select the editable attribute established in the template.
Enter the number value corresponding to the filename of the current sequentially named page. For example, if the file is named docFile5.htm, enter 5.
Click OK when you're finished.
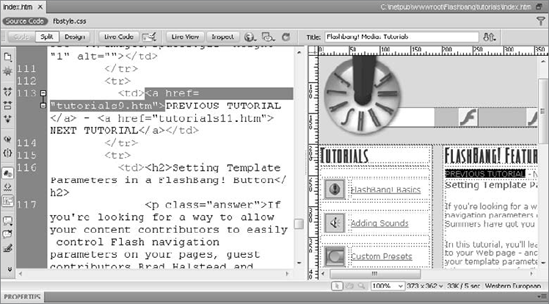
When you preview your page, notice that the Previous and Next buttons now link the proper pages in the sequence, as shown in Figure 7.

|
You can also use optional
regions to hide the Previous button when the template-based page is the
first in the series and the Next button when a page is the last in the
series. It's all in the power of template expressions. |