Our first project will be very basic: simply
displaying a moving graphic on the screen. We can use this as an
opportunity to see some of the basic functions of an XNA game and to
look at the development environment that XNA games all use.
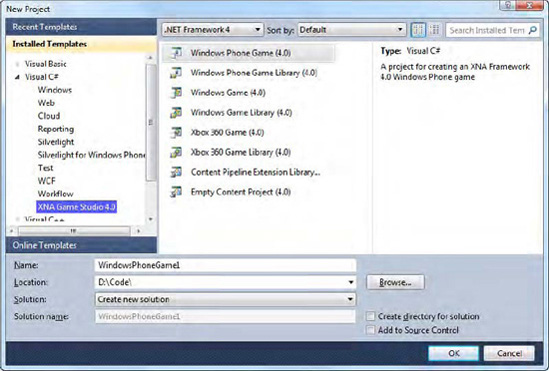
1. Creating the Project
To get things started, fire
up Visual Studio 2010 and select to create a new XNA Game Studio 4
Windows Phone Game project, as shown in Figure 1.
Give it a name and optionally uncheck the "Create directory for
solution" box (Visual Studio creates a lot of nested directories if this
is checked); then click OK to create the project.
The project will be created
by Visual Studio and opened in the IDE. The initial window that you will
be presented with after this is completed is the code window for the Game1.cs file, which, as you will see, already contains a fair amount of code.
You can, in fact, run the
project without doing anything more. The emulator will launch, and after
its initialization is complete (you may need to be a little patient),
the game will start. It doesn't do very much; it just displays an empty
blue screen.
The blue screen is actually
of some use, though: seeing the screen turn blue tells you that the
program actually is running and is managing to render to the screen.
Having a default that isn't black lets you know that the project is
operating normally and hasn't just crashed with a blank screen.
Now let's put something on the screen other than just a solid color.
2. Adding Some Content
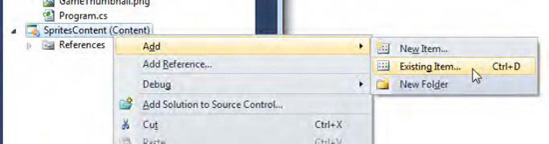
Click the Stop Debugging
button in Visual Studio to return your project to edit mode. Right-click
the Content project node; select Add and then Existing Item, as shown
in Figure 2.
In the file browser
window that appears, choose a graphic file that you wish to display on
the screen. Try to pick something that will actually fit on the screen.
|
Visual Studio will
automatically copy any content files that you select into the Content
project's directory, if they are not already present there. This means
that there is no need to manually copy files into this folder before
selecting them, nor is there a need to keep the files in their selected
locations on your hard drive after they have been added.
|
|
Once this has been done, the graphic file will appear within the Content project inside Solution Explorer, as shown in Figure 3.

3. Displaying the Graphic
With our graphic in place, we
can now amend the code to display it on the screen. This is very simple
and consists only of modifications to Game1.cs, so ensure that it is open in the code editor.
First of all, we need to add a class-level object into which our graphic image will be stored. The object type for this is Texture2D, and so we declare it, as shown in Listing 1, just below the existing spriteBatch declaration.
Example 1. Declaring the Texture2D object for the graphic
private Texture2D _smileyTexture;
|
The next step required is to load the graphic into the variable that we have created. This is performed in the class's LoadContent
procedure, which you'll find about halfway through the source code. In
addition to the existing code, we load the texture by calling the Content.Load function, as shown in Listing 2.
Example 2. Loading the graphic file into the Texture2D object
/// <summary>
    /// LoadContent will be called once per game and is the place to load
    /// all of your content.
    /// </summary>
    protected override void LoadContent()
    {
        // Create a new SpriteBatch, which can be used to draw textures.
        spriteBatch = new SpriteBatch(GraphicsDevice);

        // Use this.Content to load your game content here
        _smileyTexture = Content.Load<Texture2D>("SmileyFace");
    }
|
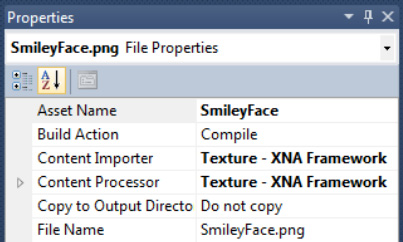
The Content.Load function uses .NET's generics feature to allow us to specify its return type. In this case, we want it to return a Texture2D object, and so we specify this type in the angle brackets in the function call. We then pass the parameter SmileyFace.
Note that this doesn't exactly match the file name that we added to the
Content project because the file extension is missing. The reason for
this is that the Content project automatically assigns an asset name
to each file that is added, defaulting this to the file name without
its extension. You can see this by selecting the graphic file in the
Content project and examining its properties, as shown in Figure 4. The Asset Name property is editable and can be modified if you wish.
The project is now loading
the graphic, and so the final step is to display it on the screen. This
is achieved by adding a few new lines of code to the Draw function at the bottom of the source listing. The modified function is shown in Listing 3.
Example 3. Drawing the graphic file to the screen
/// <summary>
    /// This is called when the game should draw itself.
    /// </summary>
    /// <param name="gameTime">Provides a snapshot of timing values.</param>
    protected override void Draw(GameTime gameTime)
    {
        // Clear the background
        GraphicsDevice.Clear(Color.CornflowerBlue);

        // Set the position for the sprite
        Vector2 position = new Vector2(100, 100);

        // Begin a sprite batch
        spriteBatch.Begin();
        // Draw the sprite
        spriteBatch.Draw(_smileyTexture, position, Color.White);
        // End the sprite batch
        spriteBatch.End();

        // Let the base class do its work
        base.Draw(gameTime);
    }
|
We first declare a position for the graphic using a Vector2 structure. This structure is very important in XNA and we'll look at it in more detail later on. Then we use the spriteBatch object that the default code created for us to begin drawing a series of graphics to the screen. The spriteBatch
object is then used once again to actually draw the graphic, specifying
the graphic that we wish to draw, the position to draw it at, and the
color to draw. The color is specified as white in this case; we will
look at the behavior of this parameter shortly. Once the image is drawn,
we call the spriteBatch.End method to tell XNA that we have finished drawing.
NOTE
The use of the word sprite
dates back to the old 8-bit computers of the 1970s and 1980s, whose
graphical capabilities were generally limited to moving only small 2D
graphics around the screen. These graphics were given the name sprites
in reference to their ability to make lively movements, as compared
with background images that were usually static. Hardware capabilities
are of course a world away in modern computer graphics, but the term has
stuck around as a way of referring to moving 2D graphical images.
You may also notice the call to GraphicsDevice.Clear in this listing, passing in the parameter Color.CornflourBlue.
It is this line of code that is responsible for the blue background
when the project is running. You can change this color to anything you
wish if you tire of the default color.
Example 4. Setting the back buffer size and orientation
// Set backbuffer size and orientation
        graphics.PreferredBackBufferWidth = 480;
        graphics.PreferredBackBufferHeight = 800;
|
Once the code has been added
to your project, run it; if all is well you should see your graphic
presented on the screen, as shown in Figure 5.
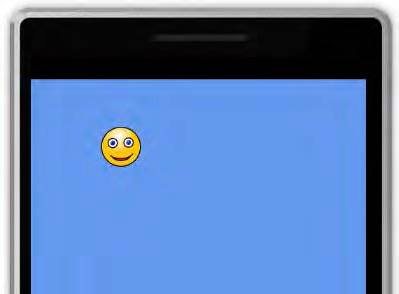
This is obviously a trivial
example (although one we will build on), but it hopefully demonstrates
the tiny amount of effort required to get a graphic to display on the
screen.