2. The Twitter Trends Application
Open Xcode and start a new iPhone Application project. Select the
View-based Application template, and name the project “TwitterTrends”
when prompted for a filename.
We’re going to need the JSON parser, so drag and drop the JSON
source folder into the Classes group in the Groups & Files pane of
your new project.
Note:
Remember to select the “Copy items into destination group’s
folder” checkbox in the pop-up window when copying the files in both
cases.
2.1. Refactoring
While we’re here, let’s do some refactoring. Open the
TwitterTrendsAppDelegate.h file, right-click on
the TwitterTrendsAppDelegate class
name in the interface declaration, and select Refactor. This will
bring up the Refactoring window. Let’s change the name of the main
application delegate class from TwitterTrendsAppDelegate to TrendsDelegate. Entering the new class name
and clicking Preview shows that three files will be affected by the
change. Click Apply and Xcode will propagate changes throughout the
project. Remember to save all the affected files (⌘-Option-S) before
you go on to refactor the next
set of classes.
Next, let’s refactor the TwitterTrendsViewController class, changing
the class name from TwitterTrendsViewController to the more
sensible RootController.
Open the TwitterTrendsViewController.h
file, right-click on the TwitterTrendsViewController class name, and
choose Refactor. Set the name to RootController. Click Preview, then Apply,
and the changes will again propagate throughout the project. However,
you’ll notice that Xcode has not changed the
TwitterTrendsViewController.xib file to be more
sensibly named, so you’ll have to make this change by hand. Click once
on this file in the Groups & Files pane, wait a second, and click
again; on the second click you’ll be able to rename it. Change its
name to “RootView.xib”.
Unfortunately, since we had to make this change by hand, it
hasn’t been propagated throughout the project. We’ll have to make some
more manual changes. Double-click the
MainWindow.xib file to open it in Interface
Builder. Click on the Root Controller icon in the main NIB window and
open the Attributes Inspector (⌘-1). The NIB name associated with the
root controller is still set to TwitterTrendsViewController, so set this to
RootView. You can either type the
name of the controller into the window and Xcode will automatically
carry out name completion as you type, or use the control on the right
of the text entry box to get a drop-down panel where you’ll find the
RootView NIB listed. Save and close
the MainWindow.xib file.
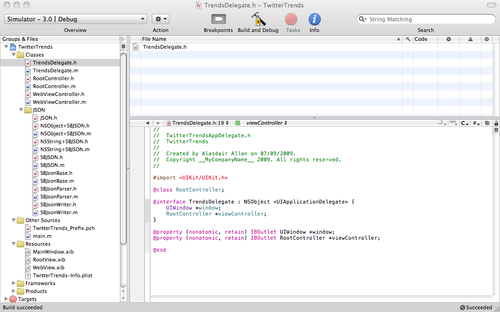
We’re done refactoring, and your Xcode main window should now
closely resemble Figure 1.
2.2. Retrieving the trends
Let’s start by writing a class to retrieve the trends using the
Twitter API and the NSURLConnection
class. Right-click (or Ctrl-click) on the Other Sources group in the
Groups & Files pane in Xcode, select Add→New File, and select the Objective-C class,
making it a subclass of NSObject.
Name the new class “TwitterTrends” when prompted and click
Finish.
Open the TwitterTrends.h interface file in
the Xcode editor. We’re going to need a method to allow us to make the
request to the Search Service. We’re going to trigger the request from
the RootViewController class. We’ll
need a reference back to the view controller so that we can update the
view, so we’ll pass that in as an argument. Add the lines shown in
bold:#import <Foundation/Foundation.h>
@class RootController;
@interface TwitterTrends : NSObject {
RootController *viewController;
NSMutableData *responseData;
NSURL *theURL;
}
- (void)queryServiceWithParent:(UIViewController *)controller;
@end
Now open the TwitterTrends.m implementation
file in the Xcode editor.
#import "TwitterTrends.h"
#import "RootController.h"

@implementation TwitterTrends

- (void)queryServiceWithParent:(UIViewController *)controller {
						    viewController = (RootController *)controller;
						    responseData = [[NSMutableData data] retain];
						    NSString *url =
						     [NSString stringWithFormat:@"http://search.twitter.com/trends.json"];
						    theURL = [[NSURL URLWithString:url] retain];
						    NSURLRequest *request = [NSURLRequest requestWithURL:theURL];
						    [[NSURLConnection alloc] initWithRequest:request delegate:self];
						}
						- (NSURLRequest *)connection:(NSURLConnection *)connection
						   willSendRequest:(NSURLRequest *)request
						   redirectResponse:(NSURLResponse *)redirectResponse
						{
						     [theURL autorelease];
						     theURL = [[request URL] retain];
						     return request;
						}
						- (void)connection:(NSURLConnection *)connection
						   didReceiveResponse:(NSURLResponse *)response
						{
						     [responseData setLength:0];
						}
						- (void)connection:(NSURLConnection *)connection
						   didReceiveData:(NSData *)data
						{
						     [responseData appendData:data];
						}
						- (void)connection:(NSURLConnection *)connection
						   didFailWithError:(NSError *)error {
						     // Handle Error
						}
						- (void)connectionDidFinishLoading:(NSURLConnection *)connection {
						    NSString *content = [[NSString alloc] initWithBytes:[responseData bytes]
						                                          length:[responseData length]
						                                          encoding:NSUTF8StringEncoding];
						    NSLog( @"Data = %@", content );
						}
						-(void)dealloc {
						    [viewController release];
						    [responseData release];
						    [theURL release];
						    [super dealloc];
						}

@end
OK, now that we have a class that can query the Twitter Search
Service, let’s use it. Inside the viewDidLoad: method of the
RootController.m file add the following two lines
of code (you must also uncomment the method by removing the /* before it and the */ after it):
TwitterTrends *trends = [[TwitterTrends alloc] init];
[trends queryServiceWithParent:self];
We also have to import the TwitterTrends.h
header file once these have been added, so add the following line to
the top of the file:
#import "TwitterTrends.h"
This is a good point to check our code. Make sure you’ve saved
your changes and click the Build and Run button in the Xcode toolbar
to compile and deploy your application in iPhone Simulator. We started
the asynchronous query of the Search service from the viewDidLoad: method, printing the results to
the console log when the query completes. So, once the application has
started and you see the gray screen of the default view, open the
Debugger Console (Run→Console) from
the Xcode menu bar. You should see something similar to Figure 2. You’ve
successfully retrieved the JSON trends file from the Twitter Search
Service.

2.3. Building a UI
Now that we’ve managed to successfully retrieve the trends data,
let’s build a UI for the application. Looking at the JSON file, the
obvious UI to implement here is a UITableView. The text in each cell will
be the trend name, and when the user clicks on the cell we can open
the associated Search Service URL using our WebControllerView.
Let’s start by modifying the RootController class; since this is a simple
bare-bones application, we’re going to use the view controller class
to both control our view and hold our data model. Open the
RootController.h interface file in the Xcode
editor and add the code shown in bold:
#import <UIKit/UIKit.h>

@interface RootController : UIViewController
  <UITableViewDataSource, UITableViewDelegate>
{
    UITableView *serviceView;
						    NSMutableArray *names;
						    NSMutableArray *urls;
}

@property (nonatomic, retain) IBOutlet UITableView *serviceView;
						@property (nonatomic, retain) NSMutableArray *names;
						@property (nonatomic, retain) NSMutableArray *urls;

@end
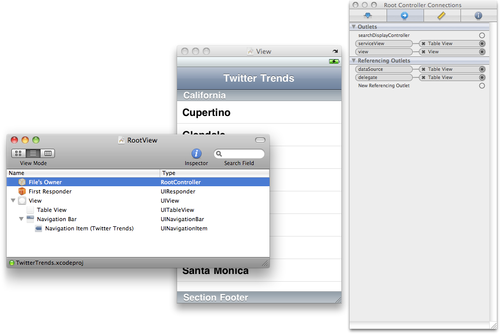
Make sure you’ve saved your changes, and double-click on the
RootView.xib file to open it in Interface
Builder. You’ll initially be presented with a blank view (if you don’t
see it, double-click on the View icon). Drag and drop a navigation bar
(UINavigationBar) from the Library
window into the View window and position it at the top of the view.
Double-click on the title and change it from “Title” to “Twitter
Trends”. Now drag and drop a table view (UITableView) into the View window, and
resize it to fill the remaining part of the view.
Click on File’s Owner in the main RootView NIB window and change
to the Connections Inspector (⌘-2). Click on the serviceView outlet and connect it to your
UITableView. Now click on the
UITableView and, again in the
Connections Inspector, click and connect both the dataSource and delegate outlets to File’s Owner.
That’s it; you’re done in Interface Builder, and you should be
looking at something similar to Figure 3.
After making sure you’ve saved your changes to the
RootView.xib NIB file, return to Xcode, open the
RootController.m implementation file in the Xcode
editor, and edit the code so that it looks like this:
#import "RootController.h"
#import "TwitterTrends.h"

@implementation RootController

@synthesize serviceView;
@synthesize names;
@synthesize urls;

- (void)viewDidLoad {
    names = [[NSMutableArray alloc] init];
    urls = [[NSMutableArray alloc] init];

    [UIApplication
       sharedApplication].networkActivityIndicatorVisible = YES;
    TwitterTrends *trends = [[TwitterTrends alloc] init];
    [trends queryServiceWithParent:self];

    [super viewDidLoad];
}

- (void)didReceiveMemoryWarning {
    [super didReceiveMemoryWarning];
}


- (void)dealloc {
    [names dealloc];
    [urls dealloc];
    [super dealloc];
}

@end
Now we need to implement the UITableViewDelegate
methods; we need to implement only three of the delegate methods. Add
the following methods to RootController.m:
- (NSInteger)tableView:(UITableView *)tableView
  numberOfRowsInSection:(NSInteger)section
{
    return names.count;
}

- (UITableViewCell *)tableView:(UITableView *)tableView
  cellForRowAtIndexPath:(NSIndexPath *)indexPath
{
    static NSString *CellIdentifier = @"Cell";
    UITableViewCell *cell =
     [tableView dequeueReusableCellWithIdentifier:CellIdentifier];
    if (cell == nil) {
       cell = [[[UITableViewCell alloc]
                initWithFrame:CGRectZero
                reuseIdentifier:CellIdentifier]
               autorelease];
    }

    cell.textLabel.text = [names objectAtIndex:indexPath.row];
    return cell;
}


- (void)tableView:(UITableView *)tableView
  didSelectRowAtIndexPath:(NSIndexPath *)indexPath
{
    // Add code to handle selection here.
    [tableView deselectRowAtIndexPath:indexPath animated:YES];
}
Click the Build and Run button to test your code. If all goes
well, you should still get the JSON document in the Console, but now
your view should be a blank table view. Why is it blank? Well, we
haven’t parsed the JSON and populated our data model yet. Let’s do
that now.
Note:
You may also have noticed that the activity indicator keeps
spinning. We’ll take care of that, too.
2.4. Parsing the JSON document
We need to modify the connectionDidFinishLoading:
method to parse the passed JSON document, populate the
view controller’s data model, and then request it to reload the table
view with the new data.
Parsing JSON is relatively simple, as you will have to work with
only one of two structures: either a single object or a list of
objects. These map onto an NSDictionary (a
key-value pair) or an NSArray,
respectively. Replace the implementation of connectionDidFinishLoading: in
TwitterTrends.m with the following:
- (void)connectionDidFinishLoading:(NSURLConnection *)connection {

    NSString *content = [[NSString alloc]
      initWithBytes:[responseData bytes]
      length:[responseData length]
      encoding:NSUTF8StringEncoding];

    SBJSON *parser = [[SBJSON alloc] init];
    NSDictionary *json = [parser objectWithString:content];
    NSArray *trends = [json objectForKey:@"trends"];

    for (NSDictionary *trend in trends) {
        [viewController.names addObject:[trend objectForKey:@"name"]];
        [viewController.urls addObject:[trend objectForKey:@"url"]];
    }
    [parser release];
    [UIApplication
        sharedApplication].networkActivityIndicatorVisible = NO;
    [viewController.serviceView reloadData];

}
At the top of TwitterTrends.m, add the
following:
#import "JSON/JSON.h"
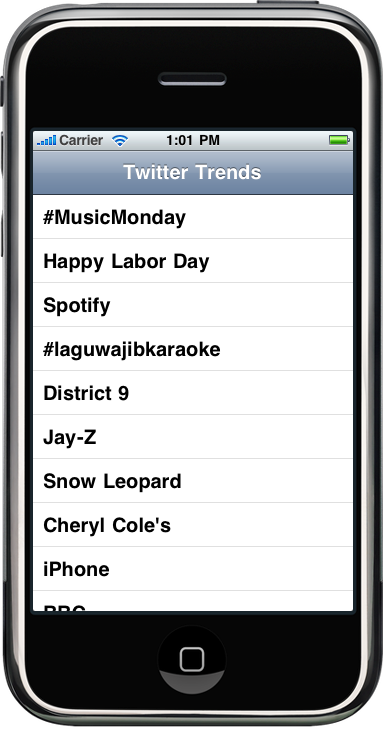
If you rebuild your application in Xcode and run it, you should
get something similar to Figure 4. The table view
is now populated with the current trending topics on Twitter.
However, clicking on individual cells doesn’t do anything yet,
so we need to modify the tableView:didSelectRowAtIndexPath:
method to use our WebViewController class. Replace the
tableView:didSelectRowAtIndexPath:
method in RootController.m with the
following:
- (void)tableView:(UITableView *)tableView
  didSelectRowAtIndexPath:(NSIndexPath *)indexPath
{
    NSString *title = [names objectAtIndex:indexPath.row];
    NSURL *url = [NSURL URLWithString:[urls objectAtIndex:indexPath.row]];
    WebViewController *webViewController =
      [[WebViewController alloc] initWithURL:url andTitle:title];
    [self presentModalViewController:webViewController animated:YES];
    [webViewController release];
    [tableView deselectRowAtIndexPath:indexPath animated:YES];
}
Now that you’re using the WebViewController class, you need to import
it into the view controller, so add the following to the top of
RootController.m:
#import "WebViewController.h"
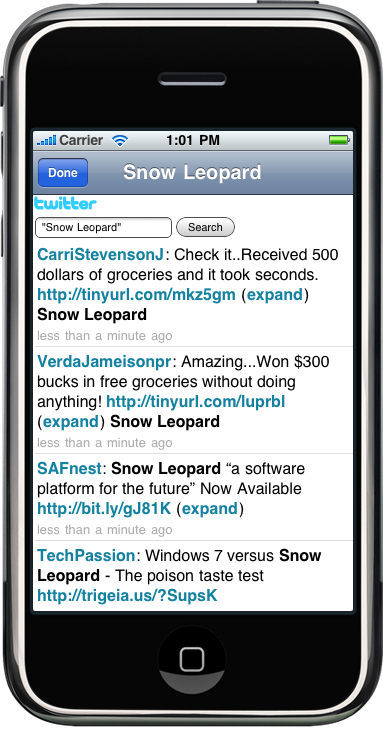
If you rebuild the application again and click on one of the
trending topics, the web view should open modally and you should see
something similar to Figure 5.
Normally, when the JSON parser fails, it will return a nil
value. However, we can add error handling when parsing the JSON file
relatively simply by passing an NSError object to the parser’s objectWithString:error: method. To do this, locate the connectionDidFinishLoading: method in
TwitterTrends.m and find the following
code:
NSDictionary *json = [parser objectWithString:content];
NSArray *trends = [json objectForKey:@"trends"];

for (NSDictionary *trend in trends) {
    [viewController.names addObject:[trend objectForKey:@"name"]];
    [viewController.urls addObject:[trend objectForKey:@"url"]];
}
Replace that code with the following:
NSError *error;
NSDictionary *json = [parser objectWithString:content error:&error];
if ( json == nil ) {
   UIAlertView *errorAlert = [[UIAlertView alloc]
     initWithTitle:@"Error"
     message:[error localizedDescription]
     delegate:self cancelButtonTitle:nil otherButtonTitles:@"OK", nil];
   [errorAlert show];
   [errorAlert autorelease];
} else {
   NSArray *trends = [json objectForKey:@"trends"];

   for (NSDictionary *trend in trends) {
      [viewController.names addObject:[trend objectForKey:@"name"]];
      [viewController.urls addObject:[trend objectForKey:@"url"]];
   }
}
Note:
You can verify that this error handler is working by replacing
http://search.twitter.com/trends.json in the
queryServiceWithParent:
method in TwitterTrends.m with a
URL that does not return a JSON-formatted response.
2.5. Tidying up
There are a few bits and pieces that I haven’t added to this
application but that you really should add if you are going to release
it. Most of it has to do with error handling; for instance, you should
do a reachability check before trying to retrieve the JSON document.
However, this example illustrated that retrieving and parsing JSON
documents is a relatively simple task.