The Core Location framework is an abstraction layer in front of several different
methods to find the user’s location (and, by extrapolation, her speed and
course). It can provide the latitude, longitude, and altitude of the
device (along with the level of accuracy to which this is known). There
are three levels of accuracy:
The least accurate level uses the cell network to locate the user (the process is
similar to triangulation, but more complex). This can quickly provide
a position to around 12 km accuracy, which can be reduced to 1–3 km
after some time depending on the tower density at your current
location.
The next accuracy level is obtained by utilizing Skyhook Wireless’s WiFi-based positioning system. This
is much more precise, giving a position to approximately 100 m.
However, it depends on the user being in range of a known wireless
hotspot.
The highest level of accuracy is obtained by using GPS hardware,
which should provide a position to less than 40 m.
Warning:
On the iPod touch, the user’s location is derived solely from WiFi
positioning. The original iPhone will use WiFi and cell tower
triangulation, and on the iPhone 3G and 3GS it will also make use of the
built-in GPS hardware.
The actual method used to determine the user’s location is
abstracted away from both the user and the developer. The only control the
developer has over the chosen method is by requesting a certain level of
accuracy, although the actual accuracy achieved is not guaranteed.
Further, the battery power consumed and the time to calculate the
position increase with increasing accuracy.
Warning:
Some users may choose to explicitly disable reporting of their
position. You should therefore always check to see whether location
services are enabled before attempting to turn on these services. This
will avoid unnecessary prompting from your application.
The Core Location framework is implemented using the CLLocationManager class. The following code will create an instance of this class,
and from then on will send location update messages to the designated
delegate class:
CLLocationManager *locationManager = [[CLLocationManager alloc] init];
locationManager.delegate = self;
if( locationManager.locationServicesEnabled ) {
    [locationManager startUpdatingLocation];
} else {
    NSLog(@"Location services not enabled.");
}
Note:
To use this code, you will need to add the Core Location
framework. In Groups & Files, right-click or Ctrl-click on
Frameworks and select Add→Existing
Frameworks. Add CoreLocation. You will also need to declare your class
as implementing the CLLocationManagerDelegate protocol and import
CoreLocation in your declaration or implementation with the following
code:
#import <CoreLocation/CoreLocation.h>
We can filter these location update messages based on a distance
filter. Changes in position of less than this amount will not generate an
update message to the delegate:
locationManager.distanceFilter = 1000; // 1km
We can also set a desired level of accuracy; this will determine the
location method(s) used by the Core Location framework to determine the
user’s location:
locationManager.desiredAccuracy = kCLLocationAccuracyKilometer;
The CLLocationManagerDelegate
protocol offers two methods. The first is called when a location update
occurs:
- (void)locationManager:(CLLocationManager *)manager
  didUpdateToLocation:(CLLocation *)newLocation
  fromLocation:(CLLocation *)oldLocation
{
   NSLog(@"Moved from %@ to %@", oldLocation, newLocation);
}
The second is called when an error occurs:
- (void)locationManager:(CLLocationManager *)manager
  didFailWithError:(NSError *)error {
    NSLog(@"Received Core Location error %@", error);
    [manager stopUpdatingLocation];
}
If the location manager is not able to ascertain the user’s location
immediately, it reports a kCLErrorLocationUnknown
error and keeps trying. In most cases, you can choose to
ignore the error and wait for a new event. However, if the user denies
your application access to the location service, the manager will report a
kCLErrorDenied
error. Upon receiving such an error, you should stop the
location manager.
1. Location-Dependent Weather
We can
use the Core Location framework to retrieve the user’s latitude and
longitude. However, the Google Weather Service, which we used to back
our Weather application, takes only city names, not latitude or
longitude arguments.
There are several ways around this problem. For instance, the
MapKit framework, offers reverse geocoding capabilities (which
turn coordinates into postal addresses). However, for this example, I’m
going to make use of one of the many web services offered by the GeoNames.org
site to carry our reverse geocoding to retrieve the nearest city from
the latitude and longitude returned by the Core Location
framework.
1.1. Using the GeoNames reverse geocoding service
One of the RESTful web services offered by GeoNames.org
will return an XML or JSON
document listing the nearest populated place using reverse
geocoding. Requests to the
service take the form
http://ws.geonames.org/findNearbyPlaceName?lat=<XX.X>&lng=<XX.X>
if you want an XML document returned, or
http://ws.geonames.org/findNearbyPlaceNameJSON?lat=<XX.X>&lng=<XX.X>
if you prefer a JSON document. There are several optional parameters:
radius (in km), max (maximum number of rows returned), and style
(SHORT, MEDIUM, LONG, and FULL).
Passing the longitude and latitude of Cupertino, California,
which is the location returned by Core Location in all cases for
iPhone Simulator, the JSON service would return the following JSON
document:
{
   "geonames":[
      {
         "countryName":"United States",
         "adminCode1":"CA",
         "fclName":"city, village,...",
         "countryCode":"US",
         "lng":-122.0321823,
         "fcodeName":"populated place",
         "distance":"0.9749",
         "fcl":"P",
         "name":"Cupertino",
         "fcode":"PPL",
         "geonameId":5341145,
         "lat":37.3229978,
         "population":50934,
         "adminName1":"California"
      }
   ]
}
1.2. Modifying the Weather application
Let’s modify our Weather application to make use of Core
Location and (optionally) give us the weather where we are, rather
than just for a hardwired single location. Open the Weather project in
Xcode and click on the WeatherAppDelegate.h
interface file to open it in the Xcode editor.
We’re going to use the application delegate to manage the
CLLocationManager.
I’ve highlighted the changes you need to make to this file in
bold:
#import <CoreLocation/CoreLocation.h>

@class MainViewController;

@interface WeatherAppDelegate : NSObject
  <UIApplicationDelegate, CLLocationManagerDelegate>
{
    UIWindow *window;
    MainViewController *mainViewController;

    BOOL updateLocation;
						CLLocationManager *locationManager;
}

@property (nonatomic, retain) IBOutlet UIWindow *window;
@property (nonatomic, retain) MainViewController *mainViewController;
@property (nonatomic) BOOL updateLocation;
						@property (nonatomic, retain) CLLocationManager *locationManager;

@end
You will also need to add the Core Location framework to the
project. In Groups & Files, right-click or Ctrl-click on
Frameworks and select Add→Existing
Frameworks. Select CoreLocation and click Add.
In the corresponding implementation file
(WeatherAppDelegate.m), we first need to
synthesize the new variables we declared in the interface file:
@synthesize updateLocation;
@synthesize locationManager;
After that, add the code shown in bold to the applicationDidFinishLaunching: method. This
creates an instance of the CLLocationManager class and sets the
delegate for the class to be the current class (the application
delegate).
- (void)applicationDidFinishLaunching:(UIApplication *)application {

    // Create instance of Main View controller
    MainViewController *aController =
      [[MainViewController alloc]
      initWithNibName:@"MainView" bundle:nil];
    self.mainViewController = aController;
    [aController release];

    // Create instance of LocationManager object
						self.locationManager =
						[[[CLLocationManager alloc] init] autorelease];
						self.locationManager.delegate = self;

    // Create instance of WeatherForecast object
    WeatherForecast *forecast = [[WeatherForecast alloc] init];
    self.mainViewController.forecast = forecast;
    [forecast release];

    // Set the main view
    mainViewController.view.frame = [UIScreen mainScreen].applicationFrame;
    [window addSubview:[mainViewController view]];
    [window makeKeyAndVisible];
}
Finally, we have to make sure the CLLocationManager instance is released in
the dealloc:
method, and implement the two CLLocationManagerDelegate
methods we’re going to need. Make the changes shown in
bold:
- (void)dealloc {
    [locationManager release];
    [mainViewController release];
    [window release];
    [super dealloc];
}

#pragma mark CLLocationManager Methods
						- (void)locationManager:(CLLocationManager *)manager
						didUpdateToLocation:(CLLocation *)newLocation
						fromLocation:(CLLocation *)oldLocation {
						NSLog(@"Location: %@", [newLocation description]);
						if ( newLocation != oldLocation ) {
						// Add code here
						}
						}
						- (void)locationManager:(CLLocationManager *)manager
						didFailWithError:(NSError *)error {
						NSLog(@"Error: %@", [error description]);
						}
We’re going to modify the (currently unused) flip side of the
Weather application and add a switch (UISwitch). This will
toggle whether our application should be updating its location.
However, let’s modify the FlipSideViewController interface file before
we go to the NIB file, adding both a switch and a switchThrown: interface builder action that
we’ll connect to the switch. I’ve also added a reference to the
application delegate. Make the changes shown in bold to
FlipSideViewController.h:
@protocol FlipsideViewControllerDelegate;

@class WeatherAppDelegate;

@interface FlipsideViewController : UIViewController {
    id <FlipsideViewControllerDelegate> delegate;
    IBOutlet UISwitch *toggleSwitch;
						WeatherAppDelegate *appDelegate;
}

@property (nonatomic, assign) id <FlipsideViewControllerDelegate> delegate;

- (IBAction)done;
- (IBAction)switchThrown;

@end
In the corresponding implementation
(FlipSideViewController.m), import both the Core
Location framework and the application delegate interface file:
#import <CoreLocation/CoreLocation.h>
#import "WeatherAppDelegate.h";
Then in the viewDidLoad:
method, we need to populate the reference to the application delegate
and use the value of the updateLocation Boolean declared earlier to
set the state of the UISwitch. Add
the lines shown in bold:
- (void)viewDidLoad {
    [super viewDidLoad];
    self.view.backgroundColor = [UIColor viewFlipsideBackgroundColor];

    appDelegate = (WeatherAppDelegate *)
						[[UIApplication sharedApplication] delegate];
						toggleSwitch.on = appDelegate.updateLocation;

}
In the done: method, which is
called when the user clicks on the Done button to close the flipside
view, we must set the same updateLocation Boolean variable in the
application delegate to be that of the state of the switch. If the
user has changed the switch state on the flip side, it will now be
reflected in the application delegate. Add the line shown in
bold:
- (IBAction)done {
    appDelegate.updateLocation = toggleSwitch.on;
    [self.delegate flipsideViewControllerDidFinish:self];
}
Next, provide an implementation of the switchThrown:
method that you’ll attach to the UISwitch in Interface Builder:
-(IBAction)switchThrown {
    NSLog(@"Switch thrown");
    if ( toggleSwitch.on ) {
        [appDelegate.locationManager startUpdatingLocation];
    } else {
        [appDelegate.locationManager stopUpdatingLocation];
    }
}
Finally, remember to release the toggleSwitch inside the dealloc: method:
- (void)dealloc {
    [toggleSwitch release];
    [super dealloc];
}
Now let’s add that switch to the flipside view. Make sure you’ve
saved all your changes and then double-click on the
FlipsideView.xib
file to open it in Interface Builder. Drag and drop a
label (UILabel) and a switch
(UISwitch) element from the Library
window into the Flipside View window. Position them and adjust the
attributes (⌘-1) of the label so that your layout looks like Figure 1.
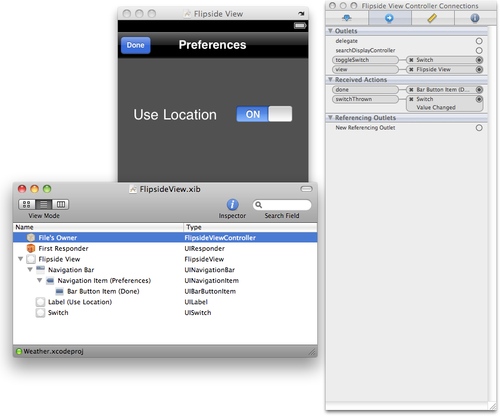
Click File’s Owner, open the Connections Inspector (⌘-2), and
connect the toggleSwitch outlet to the UISwitch. Then connect the switchThrown:
action to the UISwitch’s Value Changed event. While
you’re here, double-click on the navigation bar title and change the
text to “Preferences”. Save your changes; we’re done here.
We’ve reached a natural point to take a break and test the
application. Save FlipsideView.xib and return to
Xcode. Then click the Build and Run button in the Xcode toolbar to
compile and deploy the Weather application into the simulator. Once
it’s running, click the Info button to go to the flip side of the
application and toggle the switch. If you look at the Debugger Console
(Run→Console in the Xcode menu bar),
you should (after a small amount of time) see something that looks a
lot like Figure 2.
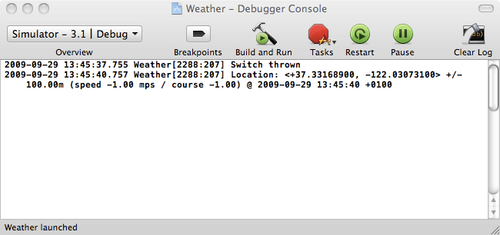
iPhone Simulator will always report its location as being at
Lat. +37.33168900, Long. –122.03073100, corresponding to 1 Infinite
Loop, Cupertino, CA.
Quit the simulator. Back in Xcode, click on the
MainViewController.h interface file to open it in
the editor. Since we’re now going to have multiple locations, we need
somewhere to store the name of the location that we’ll get back from
the reverse geocoder. So, add an NSString to
MainViewController.h (somewhere inside the
opening and closing curly braces after the @interface directive) to store the
location:
NSString *location;
Then expose this and the UIActivityIndicator
(we’re going to use that shortly) as properties. Add the
following just before the @end
directive:
@property(nonatomic, retain) UIActivityIndicatorView *loadingActivityIndicator;
@property(nonatomic, retain) NSString *location;
Since we’ve declared location
and loadingActivityIndicator as properties, go
back to the implementation file
(MainViewController.m) and add these lines to
synthesize those properties:
@synthesize loadingActivityIndicator;
@synthesize location;
Then in the viewDidLoad:
method, initialize the location string:
- (void)viewDidLoad {
    [super viewDidLoad];
    location = [[NSString alloc] init];
    [self refreshView:self];
}
Make sure it is released in the dealloc: method:
- (void)dealloc {
    [location release];
						... rest of the method not shown ...
}
Next, in the refreshView:
method, check whether the app is monitoring the device’s location so
that you know whether to query the Google Weather Service with the
default location (London, UK) or with the current location:
- (IBAction)refreshView:(id)sender {
    [loadingActivityIndicator startAnimating];

    WeatherAppDelegate *appDelegate =
						(WeatherAppDelegate *)[[UIApplication sharedApplication] delegate];
						if( appDelegate.updateLocation ) {
						NSLog( @"updating for location = %@", self.location );
						[forecast queryService:self.location withParent:self];
						} else {
        [forecast queryService:@"London,UK" withParent:self];
    }

}
Since we’ve made use of the application delegate, we need to
make sure we import it into the MainViewController implementation. Add this
line to the top of the file:
#import "WeatherAppDelegate.h"
Now we’re done with the view controller.
What’s left to do? First, we need to build a class to query the
GeoNames reverse geocoder
service, and then we need to pass the latitude and longitude to the
reverse geocoder service from
the CLLocationManager delegate
method locationManager:didUpdateToLocation:fromLocation:
in the application delegate.
Right-click on the Other Sources group in the Groups & Files
pane of the Xcode interface and select Add→New Files. In the New File pop up, make sure
Cocoa Touch Class (under iPhone OS) is selected. Next, choose
“Objective-C class”, a subclass of NSObject, and click the Next button. Name
the new class “FindNearbyPlace” when prompted and click Finish.Click on the FindNearbyPlace.h interface
file and modify the template so that it looks like the following
code:
#import <Foundation/Foundation.h>

@class WeatherAppDelegate;

@interface FindNearbyPlace : NSObject {
    WeatherAppDelegate *appDelegate;
    NSMutableData *responseData;
    NSURL *theURL;
}

- (void)queryServiceWithLat:(NSString *)latitude
  andLong:(NSString *)longitude;

@end
Modify the FindNearbyPlace.m implementation
file so that it looks like the following code. Apart from the connectionDidFinishLoading: method, it’s
almost identical to the Trends API code we wrote for the Twitter
Trends application:
#import "WeatherAppDelegate.h"
#import "MainViewController.h"
#import "FindNearbyPlace.h"
#import "JSON/JSON.h"

@implementation FindNearbyPlace

- (void)queryServiceWithLat:(NSString *)latitude
  andLong:(NSString *)longitude
{

    appDelegate = (WeatherAppDelegate *)
      [[UIApplication sharedApplication] delegate];
    responseData = [[NSMutableData data] retain];

    NSString *url = [NSString stringWithFormat:
      @"http://ws.geonames.org/findNearbyPlaceNameJSON?lat=%@&lng=%@",
      latitude, longitude];
    theURL = [[NSURL URLWithString:url] retain];
    NSURLRequest *request = [NSURLRequest requestWithURL:theURL];
    [[NSURLConnection alloc] initWithRequest:request delegate:self];

}

- (NSURLRequest *)connection:(NSURLConnection *)connection
  willSendRequest:(NSURLRequest *)request
  redirectResponse:(NSURLResponse *)redirectResponse
{
    [theURL autorelease];
    theURL = [[request URL] retain];
    return request;
}

- (void)connection:(NSURLConnection *)connection
  didReceiveResponse:(NSURLResponse *)response
{
    [responseData setLength:0];
}

- (void)connection:(NSURLConnection *)connection
  didReceiveData:(NSData *)data
{
    [responseData appendData:data];
}

- (void)connection:(NSURLConnection *)connection
  didFailWithError:(NSError *)error
{
    // Handle Error
}

- (void)connectionDidFinishLoading:(NSURLConnection *)connection {
						NSString *content =
						[[NSString alloc] initWithBytes:[responseData bytes]
						length:[responseData length]
						encoding:NSUTF8StringEncoding];
						NSLog(@"Content = %@", content);
						SBJSON *parser = [[SBJSON alloc] init];
						NSDictionary *json = [parser objectWithString:content];
						NSArray *geonames = [json objectForKey:@"geonames"];
						NSString *city = [[NSString alloc] init];
						NSString *state = [[NSString alloc] init];
						NSString *country = [[NSString alloc] init];
						for (NSDictionary *name in geonames) {
						city = [name objectForKey:@"name"];
						state = [name objectForKey:@"adminCode1"];
						country = [name objectForKey:@"countryName"];
						}
						[parser release];
						NSLog( @"Location = %@, %@, %@", city, state, country );
						NSString *string = [NSString stringWithFormat:@"%@,%@", city, state];
						appDelegate.mainViewController.location = string;
						[appDelegate.mainViewController.loadingActivityIndicator
						stopAnimating];
						[appDelegate.mainViewController refreshView: self];
						}

-(void)dealloc {
    [appDelegate release];
    [responseData release];
    [theURL release];
    [super dealloc];
}

@end
Now we have the class to query and parse the reverse geocoder
service; we just need to write the code in the locationManager:didUpdateToLocation:fromLocation:
delegate method.
Click on the application delegate implementation file
(WeatherAppDelegate.m) to open it in the Xcode
editor and import the geocoder class by adding this line at the
top:
#import "FindNearbyPlace.h"
Next, in the didUpdateToLocation: method, add the code
shown in bold:
- (void)locationManager:(CLLocationManager *)manager
  didUpdateToLocation:(CLLocation *)newLocation
  fromLocation:(CLLocation *)oldLocation
{
    NSLog(@"Location: %@", [newLocation description]);

    if ( newLocation != oldLocation ) {

        [self.mainViewController.loadingActivityIndicator
						startAnimating];
						FindNearbyPlace *find = [[FindNearbyPlace alloc] init];
						NSString *latitude = [NSString stringWithFormat:@"%f",
						newLocation.coordinate.latitude];
						NSString *longitude = [NSString stringWithFormat:@"%f",
						newLocation.coordinate.longitude];
						[find queryServiceWithLat:latitude andLong:longitude];
    }
}
Here we simply retrieve the latitude and longitude from the
CLLocation object, and we pass them
to our FindNearbyPlace class to
resolve. There the connectionDidFinishLoading: method takes
care of updating the main view controller.
We’re done. Save your changes and click Build and Run to compile
and deploy the application in iPhone Simulator. Once it’s running,
click the Info button to go to the flip side of the application and
toggle the switch. Click the Done button and return to the main view.
After a little while the activity indicator in the top-righthand
corner should start spinning and the weather information should change
from being for London to being for Cupertino, California.
1.3. Tidying up
Don’t be fooled. The application has many dangling loose ends to
clean up before it can be considered “ready for release.” For
instance, in the FindNearbyPlace
class we concatenate the city and state to create the location we pass
to the Google Weather Service:
city = [name objectForKey:@"name"];
state = [name objectForKey:@"adminCode1"];
NSString *string = [NSString stringWithFormat:@"%@,%@", city, state];

appDelegate.mainViewController.location = string;
While this works for U.S. locations (Cupertino, CA), it fails for British locations where
you end up with a string of the form London,ENG, which the Weather service can’t
understand.
However, as it stands, it’s a nice starting point for
integrating multiple web services into a single application.