Adding a Create Card View Controller
We now have the complete view
for using the flash cards, but users also need to be able to create new
cards. When users press the Add button in the top toolbar, we’ll show
them another view to capture the question and answer for the new flash
card. This new view will have its own controller and NIB.
Select the Classes group and then select File, New File; then the UIViewController
subclass template. Make sure the Targeted for iPhone and With XIB for
User Interface check boxes are selected, and click the Next button. Name
the controller CreateCardViewController,
make sure the Also Create CreateCardViewController.h check box is
selected, and click the Finish button. Drag the new
CreateCardController.xib file from the Classes group to the Resources
group to keep the project tidy.
Preparing the Second View Controller
The new view controller needs
outlets to access the two text fields that’ll be on the view that will
contain the question and answer the user typed. It also needs a delegate
to call back to the FlashCardsViewController
object when the user wants to save a new card or just dismiss the view.
There will be an action for each of the user’s two options: save and
cancel.
Click the CreateCardViewController.h file in the Classes group. Add a CreateCardDelegate protocol with two methods: didCancelCardCreation and didCreateCardWithQuestion:answer. Both arguments to the second method are NSString objects. Add the save and cancel actions and add an outlet and property for the question and answer text fields and a property for the CreateCardDelegate. After you’ve added the delegate, outlets, actions, and properties, your CreateCardViewController.h file should look like Listing 4.
Listing 4.
#import <UIKit/UIKit.h>

@protocol CreateCardDelegate <NSObject>

-(void) didCancelCardCreation;
-(void) didCreateCardWithQuestion:(NSString *)question
                           answer:(NSString *)answer;

@end

@interface CreateCardViewController : UIViewController {

    IBOutlet UITextField *question;
    IBOutlet UITextField *answer;
    id cardDelegate;
}

@property (nonatomic, retain) UITextField *question;
@property (nonatomic, retain) UITextField *answer;
@property (nonatomic, assign) id<CreateCardDelegate> cardDelegate;

-(IBAction) save;
-(IBAction) cancel;

@end
|
Sorry to bug you about this, but you know what to do. Edit the CreateCardViewController.m file to include the necessary @synthesize lines for the properties:
@synthesize cardDelegate;
@synthesize question;
@synthesize answer;
Modify dealloc to include the objects that were retained:
- (void)dealloc {
    [question release];
    [answer release];
    [super dealloc];
}
Now, the user interface for creating cards.
Creating the User Interface
Open Interface Builder by
double-clicking the CreateCardViewController.xib file in the Resources
group. Then complete the following steps to lay out the UI and connect
the outlets and actions:
1. | Open the Library (Shift+Command+L) and drag a toolbar to the very top of the view.
|
2. | Click
the Item button until just the button is selected, open the Attributes
Inspector (Command+1), and choose Save from the Identifier Properties
drop-down list.
|
3. | From the Library, drag one Bar Button item to the top toolbar.
|
4. | Click
the new button until just the button is selected, open the Attributes
Inspector (Command+1), and choose Cancel from the Identifier Properties
drop-down list.
|
5. | Within the Library, search for “space.” Drag a Flexible Space Bar Button item to the leftmost position in the top toolbar.
|
6. | Drag two text fields onto the view below the toolbar.
|
7. | Position
one of the text fields under the top toolbar and against the
left-alignment guide. Size the label wider to the right- and
left-alignment guides and about one-third of the view. Click the text
field, open the Attributes Inspector (Command+1), and change the Text
attribute to Question?; change the
alignment to centered, change the Border attribute to the leftmost
style, and change the Correction Text Input Traits attribute to No.
|
8. | Position
the second text field under the first and against the left-alignment
guide. Size the label wider to the left and right-alignment guides and
about one-third of the view. Click the text field, open the Attributes
Inspector (Command+1), and change the Text attribute to Answer.;
change the alignment to centered, change the Border attribute to the
leftmost style, and change the Correction Text Input Traits attribute to
No. Your UI should now look like Figure 5.
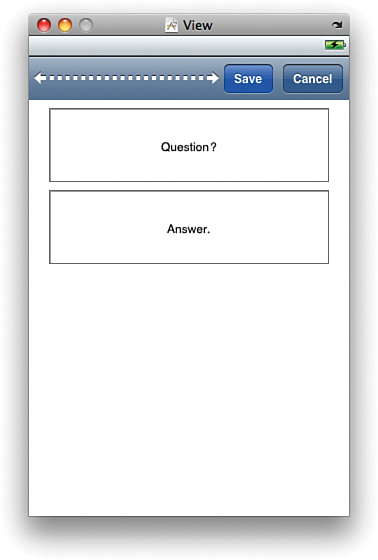
|
9. | Connect the two label outlets, question and answer, to the respective labels.
|
10. | Connect the two actions, cancel and save, to the respective buttons in the view. Save the XIB file, quit Interface Builder, and return to Xcode. |