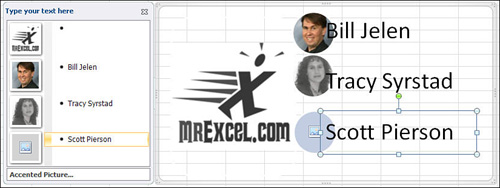
Some SmartArt layouts include image placeholders, as shown in Figure 1.
To insert an image, click the image placeholder and browse to the
desired image. When an image in the SmartArt is selected, the Picture
Tools tab becomes visible and you can use any of the picture tools on
the image.
To change the image, select it and go to Picture Tools, Format, Change Picture.
You cannot delete the accompanying text placeholder, but if you do not need it, enter a space in the field.
Inserting SmartArt with Images
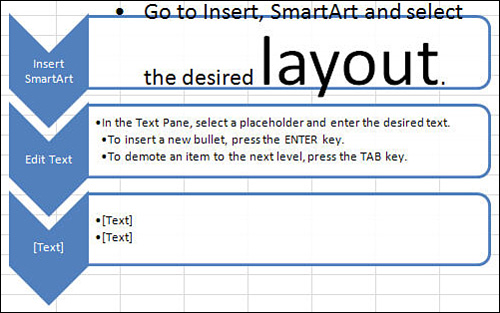
To insert a SmartArt layout that includes images, follow these steps:
1. | Go to Insert, SmartArt, and select a layout that includes image placeholders.
|
2. | Click the image placeholder and the Insert Picture dialog opens. Browse to the desired image and click Insert.
|
3. | Use the options on the Picture Tools tab to make any required changes to the image.
|
4. | If you do not want any text in the image’s accompanying text placeholder, enter a space in the text’s placeholder.
|
5. | Repeat steps 2 through 4 as many time as required.
|
Selecting SmartArt
Selecting SmartArt must be done carefully. If you
have the incorrect frame selected, you will move the component instead
of the entire SmartArt frame. You can tell if a component is selected
because the frame around it will become visible. Only the frame around
the entire SmartArt diagram is visible when you’ve selected the entire
diagram. Also, nothing will be selected in the Text pane when the entire
diagram is selected.
If a component is selected, move your cursor over the
frame until it turns into four arrows, then click on the frame and the
entire diagram will be selected. When the frame is selected, you can
move it to a new location, resize it, or delete it.
- When moving or resizing the diagram, the Text pane will momentarily disappear.
- To move the diagram, place the cursor on the frame until it turns into four arrows; then click and drag it to a new location.
- To
resize the diagram, place the cursor in any corner or place it in the
center of any edge until it turns into a double arrow. You can then
click and drag the diagram to a new size.
Adding and Deleting Shapes
Use Add Shape to add a new shape to the SmartArt
diagram. The new shape will be added above the selected shape or at the
bottom if the entire diagram is selected.
To delete a shape, select it so you see the frame around it and press the Delete key.
Adding a Shape in the Middle of the Diagram
To add a new component shape in the middle of the diagram, follow these steps:
1. | Select the component where you want the new shape.
|
2. | Go to SmartArt Tools, Design, Create Graphic, and select Add Shape.
|
3. | The component selected in step 1 will be moved down and the new shape inserted in its location.
|
4. | If
the new shape is not in the correct location, select level 1 of the
component and go to SmartArt Tools, Design, Create Graphic, and choose
Move Up or Move Down.
|
Reorder Components
To move a component to a new location, use Move Up
and Move Down found under SmartArt Tools, Design, Create Graphic. Move
Up and Move Down refer to the order of the items as shown in the Text
pane, not their actual configuration in the diagram. To move an item to a
new component, it must be cut from its current location and pasted to
the new location.
Any customized formatting of a component will move with the component.
Each level can be moved individually, with any sublevels moving with their parent level.
A
level can be moved only within its group, it cannot be moved beyond its
group. So if an item is level 2, it cannot be moved past its level 1
parent.
Reordering Components in a Diagram
To change the order of components, follow these steps:
1. | In
the Text pane, place your cursor in the text of the level to be moved.
Any children of the selected level will move with the parent. So if
you’re moving an entire component, select level 1. If a level 2 item
includes level 3 items, place your cursor at level 2 and the level 3
items will also move.
|
2. | Go
to SmartArt Tools, Design, Create Graphic, and choose Move Up to move
the select item up the Text pane or Move Down to move the item down the
Text pane.
|
3. | If an item needs to be moved to an entirely different component group, highlight the text in the Text pane.
|
4. | Press Ctrl+X to cut the text out of the Text pane.
|
5. | Place your cursor in the new location for the text.
|
6. | Press Ctrl+V to paste the text to the new location.
|
Formatting the Selected Layout
The
text formatting options found in the Font group of the Home tab can be
applied to any selected item in SmartArt. If you select a component, the
formatting will be applied to all text entries in the component. If you
select a single word, the formatting will apply to just that word.
The exception to this formatting is font size.
Selecting a single item in a component, such as just one word in a
sentence, will have unexpected results, as shown in Figure 2. But you can change the font size of all the text in a selected component.
Changing the Selected Layout
You can change the layout of the current diagram to a
new layout by going to the Layouts group of the SmartTools, Design tab.
The drop-down will show the available layouts of the current diagrams
category, but you can access all the categories and their layouts by
selecting the More Layouts option at the bottom of the drop-down. This
will open the Choose a SmartArt Graphic dialog with all available
categories and layouts. Existing levels and text will transfer over to
the new layout.
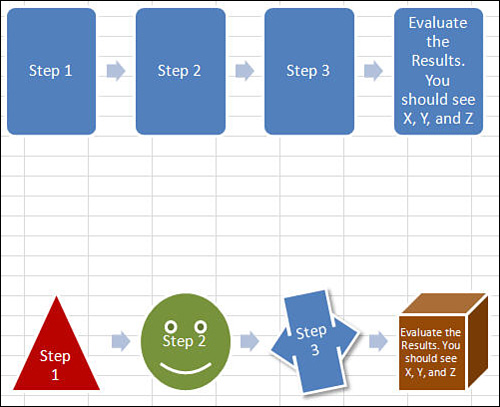
Changing an Individual Component
You can change the shapes of individual components in
a diagram by selecting the component and going to SmartTools, Format,
Shapes, Change Shape, and selecting a new shape in the drop-down. Every
component in the diagram can be replaced, as shown in Figure 3.