1. Sharing a Notebook
You can share notebooks on a network, in a folder at Windows Live, or on a Microsoft SharePoint website:
If your computer is connected to a network, you can share OneNote 2010 notebooks on a network folder.
Windows
Live is an online service from Microsoft for emailing, storing files,
and sharing files. Signing up with Windows Live costs nothing. You can
share notebooks with other Windows Live users by placing notebooks in a
SkyDrive folder on Windows Live.
Microsoft
SharePoint is a software product designed to help people share files.
Users can share OneNote notebooks on a SharePoint website. For
information about SharePoint, visit http://sharepoint.microsoft.com.
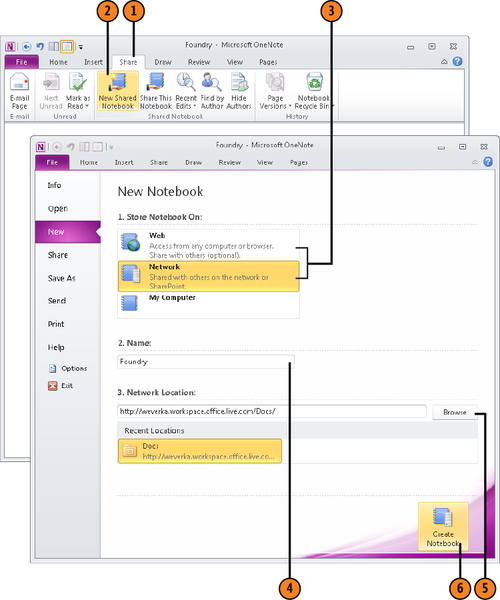
To create a new notebook and share it with others, go to the Share tab and click the New
Shared Notebook button (or click the File button and choose New). In
the New Network window, choose Web or Network, enter a name for your
notebook, designate a web location or network location, and click the
Create Notebook button.
To share a notebook you already created, go to the Share tab and click the Share
This Notebook button. In the Share Notebook window, choose Web or
Network, designate a web location or network location, and click the
Share Notebook button.
1.1. Share a Notebook
Click New Shared Notebook (or Share This Notebook to share a notebook you already created).
Choose Web to share the notebook on Windows Live or Network to share it on a network or SharePoint website.
Enter a name for your notebook.
Choose a shared folder on Windows Live or a network location.

2. Finding Unread Notes
When you open a notebook that you share with others,
notes written by others since the previous time you opened the notebook
are highlighted. What’s more, in the page tabs, the names of pages with
unread notes appear in bold letters.
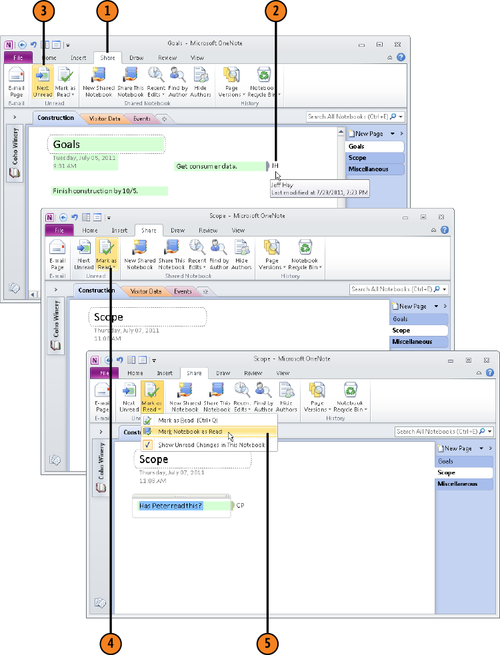
To open the next page in a notebook with notes you haven’t read, go to the Share tab and click the Next Unread button.
On the Share tab, use these techniques to indicate
that you’ve read notes entered by others since the previous time you
opened a notebook:
Click the Mark
As Read button (or press Ctrl+Q) to show that you have read new notes
on a page. After you click this button, new notes on the page are no
longer highlighted; in the page tabs, the page’s name is no longer shown
in bold letters.
Click the Mark As Read
button and choose Mark Notebook As Read to show you’ve read all new
notes in a notebook. All new notes are no longer highlighted; no names
in the page tabs are shown in bold.
If you change your mind about marking the notes on a page as read, click the Mark As Read button and choose Mark As Unread (or press Ctrl+Q).
2.1. Find Unread Notes (and Mark Them as Read)
Hover the pointer over an author’s initials, and note the author’s name and note modification date in the ScreenTip.
Click Next Unread to go to the next page with unread notes.
Click the Mark As Read button to show you read the notes on this page.
Open the gallery on the Mark As Read button and choose Mark Notebook As Read.
Tip:
If unread notes are not highlighted, and the names of
pages with unread notes are not bold in the page tabs, click the Mark
As Read button and choose Show Unread Changes in This Notebook.
