1. ANATOMY OF THE VBA EDITOR
You can access the VBA Editor in several ways. From
anywhere in Microsoft Access, press Alt+F11 or choose from several
places on Access's new Ribbon: Create, Macros, Modules, Database Tools,
or Visual Basic. You can also open the VBA Editor by double-clicking a
module name in the Navigation Pane or from any form or report. From the
Properties dialog box, click the Events tab, select the event that
you're interested in, click the Ellipses button (...), and choose Code
Builder. When you first view the VBA Editor, you might be a little
overwhelmed by the number of components on the screen. Take a look at
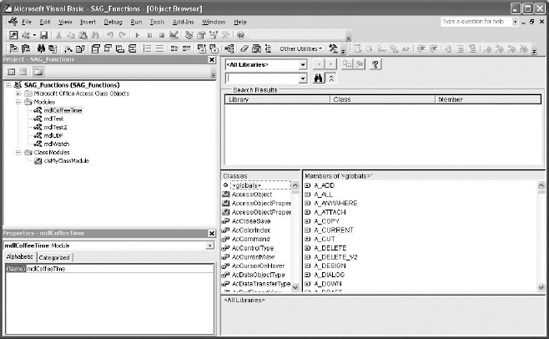
the VBA Editor within a user-created module, as shown in Figure 1.
The VBA Editor has the following components:
Three types of modules:
Form or report modules, listed under the Microsoft Access Class
Objects, class modules, and standard modules. Each type of component has
its own icon. The Project Explorer, shown in Figure 5-1,
contains a class module, five standard modules, and two source forms.
The VBA project carries the same name as the current database. If the
Project Explorer isn't visible when you display the VBA Editor, press
Ctrl+R to display it.

The Properties window:
Typically shown in the bottom-left corner of the VBA Editor, the
Properties window lists all properties for the currently selected
object. The object could be a module or a class module. Although the
Properties window is quite helpful for working with user forms in Visual
Basic, chances are you won't use it very often when coding in Access.
However, it is a handy way to see all the properties for an object, so
it's worth checking out — you may find it useful. By clicking the
drop-down list you can scroll through the alphabetical listing of the
properties for that object.
The Code window:
This is where you write your code. The Code window displays by default
all the subs and functions within the current module. You can limit the
display of the code window to only the currently selected procedure by
selecting Tools  Options and, in the Window Settings frame of the Editor tab, clearing
the Default to Full Module View checkbox. Click OK to save your changes.
Several components are in the Code window, such as the Object list on
the upper left and the Procedure list on the upper right.
Options and, in the Window Settings frame of the Editor tab, clearing
the Default to Full Module View checkbox. Click OK to save your changes.
Several components are in the Code window, such as the Object list on
the upper left and the Procedure list on the upper right.
The Object list box:
Provides you with the options to choose from different objects. When
you're writing code inside a standard module, the list box contains only
the (General) option. When you're writing code in a class
module associated with a form or re-port, the Object list box contains
an entry for every object (text box, combo box, label, and so on) within
that form or report.
The Procedure list box:
Displays the items corresponding to the type of module you're viewing.
When you're viewing a class module associated with a form or report, the
Procedure list box shows every event associated with the selected
object. For example, if you choose a text box on your form, you will see
in the Procedure list box entries for events such as the Click, Enter, Keydown, and Undo, among others.
If
you're viewing a standard module, the list box displays an entry for
every sub or function in your module, even the ones that you write or
rename. Using the drop-down list is a quick way to select the specific
procedure you need to edit. You can then click on the name to open the
procedure in the Code window to edit the code behind it.
When
working with a module with lots of objects and procedures, scrolling
through the Code window to find the desired procedure can be a
time-consuming task. Selecting the object and then clicking the
Procedure drop-down box will allow you to quickly navigate to that
procedure. Although your code may not list the subs and/or functions
alphabetically, you will see that they are listed in ascending order in
the drop-down box. You can also use the Procedure drop-down list to jump
directly to the General Declaration section.
In addition to these visible components, you can
display a number of other components that will help you to write your
code and to work with the Access 2010 objects. Most of these components
are available under the VBA Editor's View menu.
You might wonder about the correlation
between a VBA project and your database. Quite simply, the database with
forms and reports is what you see, and the VBA project contains the
instructions to make it work. Although you won't see a separate file, a
VBA project exists for every database created in Access. The objects in
the Project Explorer shown in Figure 5-1
are present no matter where the code is used in your database. Whether
you are writing code behind a form or report or in a module, you see the
same objects listed in the Project Explorer.
2. USING THE OBJECT BROWSER
The Object Browser is probably one of the most
powerful tools you'll use when writing VBA code. You can display it in
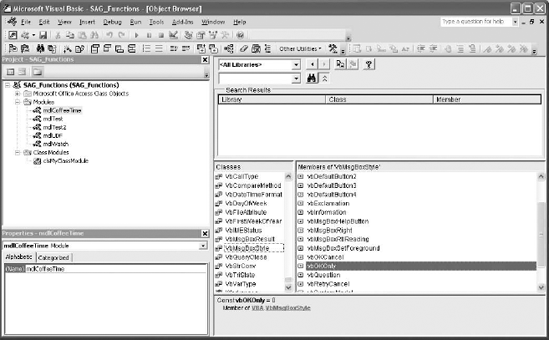
the VBA Editor by selecting View => Object Browser or by clicking F2. The Object Browser, shown in Figure 2, has a number of components.
2.1. Object Browser Components
When you load the Object Browser, you can still view
the Project Explorer and the Properties window. The Object Browser
appears directly over the Code window. You can return to the Code window
at any time by selecting View =>
Code. When multiple Code windows are open, you can navigate to the
desired window by choosing Window from the menu and then selecting the
Code window that you want, or press F7 to move the cursor to the Code
window. The following are some of the most commonly used components of
the Object Browser:
The Project/Library box:
Shows all the available type libraries. You can choose All Libraries or
a specific type library from the drop-down box. The type library you
choose impacts which objects you can browse with the Object Browser.
The Search box:
Use the Search box to search for selected type libraries. After you've
entered the search terms click the Search button (the binoculars icon).
The results of your search are displayed in the Search Results pane.
The Search Results pane:
The results of your search are listed in the Search Results pane. You
can show or hide it by clicking the Show/Hide icon (two up or down
arrows) next to the Search button. The Search Results pane lists the
relevant library, class, and member of any object returned by your
search. If you click on the object, the full information will be
displayed in the Details pane.
The Classes list:
All the objects, enumerations (enums), and collections in the currently
referenced library are displayed in the Classes list. Scrolling through
the Classes list you can click to select any of the listed items. After
you make the selection, its details appear in the Members Of list and
in the Details pane.
The Members of classname list:
Displays the properties, methods, events, and constants associated with
the object currently selected in the Classes list. See the details of a
member by selecting it in the Members of classname list.
The Details pane of the Object Browser:
Information such as the type of object, its data type, the arguments it
needs, and the parent library or collection is shown in the Details
pane. For example, in Figure 3, the Details pane informs you that the constant vbOKOnly is a member of the enum vbMsgBoxStyle, which is a member of the VBA Object Library. Its value is 0; the other members of the enum vbMsgBoxStyle include vbInformation, vbOKCancel, and vbYesNo.
When a Help file is associated with the currently
selected object, you can display a Help topic by selecting the item in
either the Classes or Members list, and then pressing F1 or clicking the
Help button in the upper-right corner of the Object Browser.
Use the buttons next to the Project/Library box to scroll through the previous or next members of the current collection.
One of the advantages of the Object Browser is that
you can actually use it to take you to anywhere in the code that the
current object is declared. For example, in Figure 3 the current database's Object Library (SAG_Functions) is searched for the procedure CoffeeTime. The Search Results pane lists the library, class, and member for the CoffeeTime
sub. You can click the View Definition button (the fourth button from
the left, next to the Project Library drop-down box) to return to the
Code window and display the CoffeeTime sub.
2.2. Show Hidden Members
You can show the hidden members in the Object Browser
by right-clicking on the Object Browser and selecting Show Hidden
Members. When listed, the Hidden Members will appear in a light gray
text
because they are not intended for you to use within your code. However,
when you want or need to know more about them, the Object Browser can
be a convenient resource. By selecting one of the objects, you can get
more information about it, such as what library it belongs to, the
members of the class, and the argument and data type (listed in the
bottom of the window).
To hide them again, you merely right-click on the Object Browser, and deselect Show Hidden Members from the pop-up menu.