2. Using the Connector Tool
You’ve
just seen that you can connect Visio shapes using either the
AutoConnect arrows or the Connector tool. AutoConnect is convenient
because it saves you the trouble of switching tools. In some situations,
though, you’ll want to use the Connector tool.
Using the Connector Tool Can Be Faster
Sometimes you want to connect a bunch of shapes that
are already on the page. While you can drag connectors out of the blue
arrows to do this, it can be slow, because you have to pause and wait
for the AutoConnect arrows to appear each time. If you’ve been drinking a
lot of coffee, the pausing can try your patience.
Switching to the Connector tool (Ctrl+3) allows you
to work more quickly. With the Connector tool, you can create many
connections very quickly, without pausing and waiting for the user
interface to catch up. You can work faster and with less mouse
precision—a perfect combination for the caffeinated!
AutoConnect Won’t Always Be There for You
If AutoConnect is turned off, you don’t see the blue
arrows at all. AutoConnect can be turned on and off via the View menu,
in the Visual Aids group. Because some templates have AutoConnect turned
off by default, you might find it quicker to create a few connections
with the Connector tool instead of switching AutoConnect on, making
connections, and then switching it back off again.
A common scenario occurs when superimposing wiring
schematics on top of space plans and office layouts. While drawing
walls, windows, and doors and laying out furniture, you don’t
want those AutoConnect arrows popping up all the time. For this reason,
the Office Plan template has AutoConnect turned off by default. At some
point, however, you might place PC and telephony icons on the plan and
link them back to the server room. In this case, AutoConnect might come
in handy, but it’s just as easy to get the Connector tool in this
situation.
Also, if a shape is already connected, you don’t see
any blue arrows on the sides where there are connectors. If you need to
have multiple connectors to a shape, you have to get the Connector tool.
Multimode Tools Eliminate the Need for Switching
You might be concerned about having to switch tools a
lot while creating connected drawings. This is one reason the
AutoConnect arrows were invented in the first place, but most Visio
tools have a bit of overlapping functionality.
With
the Connector tool, you can move and resize shapes in addition to
connecting to them. Pay attention to the cursor as you mouse over a
shape. An S-shape with an arrow at the end means connect mode.
Crosshairs indicate that you can move the shape. If you see the diagonal
double-ended arrow while over a selection handle, you can resize the
shape.
Similarly, the Pointer tool can be used to reconnect
connectors, change the position of bends in the connector, or move the
whole connector altogether. You do not have to use the Connector tool to
modify existing connectors.
3. Connectors Are Shapes, Too!
Connectors straddle the line between built-in,
special-purpose Visio features and plain old Visio shapes. Visio adds
pizzazz to connectors by automatically assisting with inserting,
deleting, splitting, gluing, and routing. And, of course, you have a
dedicated Connector tool for creating them. The end result is still a
shape on the page that you can manipulate just like other Visio shapes.
Here are a few ways in which connectors behave as regular shapes:
You can format the line color, weight, pattern, and arrowhead style of a connector, just as you would any other line in Visio.
When
connectors are created, they are actually an instance of a master named
Dynamic Connector. In fact, you might see it as a master in stencils,
ready for dragging and dropping. If you’ve made a connection in your
diagram, you will see the Dynamic Connector master in the local Document
Stencil. Whether you use the Connector tool or the AutoConnect arrows,
the result is that a connector shape is added to your drawing.
You
can select connectors with the Pointer tool (or any tool) and
manipulate their various handles. You can change the position of bends
in the connector or drag the ends and glue them to other shapes.
You
can add text to them by selecting and typing. When a connector has
text, a little yellow control handle appears. It enables you to
reposition the text easily without resorting to the Text Block tool.
Flowchart fans can quickly label the connectors emanating from Decision
shapes with “Yes” and “No” text, and the text follows along when the
connectors reroute.
Connectors are shapes of the 1D variety. Remember that 1D shapes are adjusted by their begin and end handles.
You can copy, cut, paste, and duplicate connectors. They don’t even have to be glued to other shapes.
You
can alter a connector’s style by right-clicking. You’ll see options for
right-angle, straight, curved geometry, plus an option for resetting to
the drawing’s default connector style.
|
You can easily type text on a connector and
reposition it using the yellow control handle. But what happens to the
text when the connector gets rerouted? Depending on the position of the
shapes at either end, a connector might be horizontal, vertical, or all
bent up!
When you reposition the text block on a connector,
Visio makes a note of how far along the connector the text is, from
beginning to the end. Say you position the text near the arrowhead, 90%
along the way from beginning to the end. When the connector gets
rerouted, even if it has a bunch of turns, Visio preserves the location,
placing it at 90% of the way along the line.
|
4. Connecting to Shapes versus Points on Shapes
You’ve briefly seen how connectors can be glued to
shapes or points on shapes. With dynamic glue, connectors attach to a
shape in general, and find the side of a shape that is nearest to the
other end of the connector. With point-to-point glue, the connector is
glued to a specific point on the shape, which may result in more
complicated, less efficient routing.
Figure 5
contrasts the behavior of these two types of glue, which becomes
apparent when shapes are rearranged. The open and filled dots were added
to indicate point-to-point glue and dynamic glue, respectively.
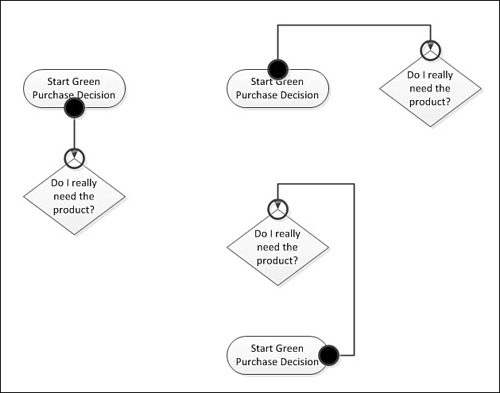
If you are creating a connector with the Pointer
tool, or reconnecting an end of a connector, Visio provides red box
highlights to help you decide which type of glue to create.
Creating Dynamic Glue
When you mouse over a shape with the Connector tool,
or drag an end of a connector over the middle of a shape, you see a
bright red box around the entire shape, as shown at left in Figure 6.
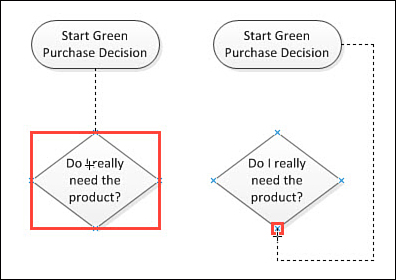
Note that when you use the AutoConnect arrows to create connections, the connectors are dynamically glued by default.
Creating Point-to-Point Glue
Some
shapes come prebuilt with connection points to help you connect to
specific points. They are often found at the midpoints on each side and
in the center of a shape.
Connection points aren’t always visible, but they are
easy to locate while connecting. If you mouse around a shape while
making a connection, you discover small red squares, as shown on the
right in Figure 4.6. If you don’t find them, then the target shape probably doesn’t have any predefined connection points.
You can make connection points more visible by going
to View, Visual Aids, Connection Points and checking the check box. Now,
when you connect to a shape, the connection points for that shape
appear. They are small, hard-to-see blue Xs. You might just be able to
make them out in Figure 4.6.
|
Sometimes you want to dynamically glue, but it seems
as though Visio won’t let you! The mouse cursor needs to be far enough
away from a connection point so that Visio knows you want to make a
dynamic glue connection. If a shape has a lot of points, or you are
zoomed way out, however, finding a clear area of the shape can be
difficult and frustrating.
If the little red squares are getting in the way of
the big red rectangle, just hold down the Ctrl key while connecting.
This tells Visio to ignore the connection points altogether and makes
dynamic gluing possible.
|
Deciding Between Dynamic Glue and Point-to-Point Glue
Dynamic glue keeps your diagrams cleaner because it
minimizes the routing paths of connectors. Dynamically glued shapes are
more easily laid out in different arrangements.
Connectors establish relationships and give specific
meaning to diagrams. For some shapes, connection points represent
particular inputs and outputs, as shown in Figure 7.
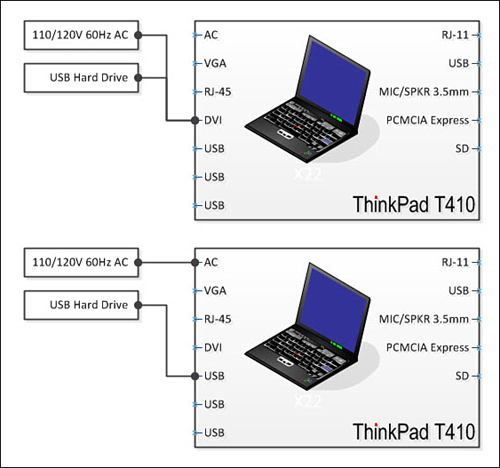
Dynamic glue is used in the top example, and you can
see that it is very bad: it connects both the power source and the USB
hard drive to the video-input terminal.
Convention might also play a part in your
connected diagrams. Most of the flowcharts that I’ve seen run from top
to bottom, and decision shapes often send the “Yes” and “No” branches
off to the right or down. To enforce this convention, you might want to
use point-to-point glue when connecting Decision diamonds in your
flowcharts.