Changing the Date or Time Stamp on a Page
You’ll notice that OneNote
stamps every new page with the date and time when the page was created.
This is especially useful when searching your notes. For example, if
you’re looking for specific information a year from now, you’ll have a
record of when the information was added to your notes.
To modify the creation date and time stamp on a page, follow these steps:
1. | To
change the creation date of a page, click the date stamp under the page
title, click the small calendar icon that appears next to it (see Figure 3), and then select the date you want.

|
2. | To
change the creation time of a page, click the time stamp under the page
creation date, click the small clock icon that appears next to it (see Figure 4.7), and then select the time you want.
|
|
If you prefer, you can
remove the creation date or time of a particular page entirely. This can
be useful when you’re distributing a set of notes whose creation date
and time is not important. To delete the date stamp of a page, click to
select it, and then press the Del key on your keyboard. Likewise, to
delete the time stamp of a page, click to select it, and then press the
Del key. Again, you should only do this if you’re really sure that you
won’t need this information. Deleting the date and time stamps from your
notes pages prevents you from using this information in your notebook
searches, which is the fastest and most effective way for OneNote to
help you find information again.
|
There’s another kind of date
and time stamp available in OneNote, and that’s the kind that lets you
insert the current date and/or time as text in your notes. This is
useful if you use OneNote for chronological call logs, time sheets, or
to update to-do lists. To insert this kind of time stamp, click the
Insert tab on the ribbon. In the Time Stamp group, click any of the
three available buttons—Date, Time, or Date & Time—to insert that
information into your notes.
Moving a Page Tab to a Different Location
Like section tabs, page tabs
in OneNote can be easily rearranged. This is useful when you want to
reorganize or prioritize information within your notebook.
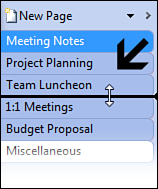
To move a page tab, follow these steps:
1. | Click the page tab you want to move and hold the left mouse button while dragging the tab up or down.
|
2. | When the tab marker (a thick, black line) appears in the location you want, release the mouse button (see Figure 4).

|
Quickly Minimizing or Maximizing Page Tabs
When you minimize the page
tabs, the titles on the tabs appear truncated, but the page titles are
not actually shortened. You can freely minimize the page tabs and
restore them again to their full size whenever you want.
To minimize and maximize page tabs, follow these steps:
1. | At
the top of the page tabs, locate the two small arrows to the right of
the New Page button. The first is pointing downward, and the one next to
it is pointing to the right.
|
2. | Move
the mouse pointer over the second arrow that’s pointing toward the
right. A ToolTip appears that reads Collapse Page Tabs. Click this
button to shrink the page tabs (see Figure 5).

|
3. | To
restore the tabs to their original size, move the mouse pointer over
the same arrow (which now points toward the left). A ToolTip appears
that reads Expand Page Tabs. Click this button to restore the page tabs
to their original size.
|
Manually Changing the Size of Page Tabs
If the quick page tabs
display toggle in the previous steps isn’t to your liking, you can
manually adjust the width of your page tabs. This is beneficial whenever
many or all of your page titles begin with an identical word, phrase,
or prefix and the pages can be told apart only by the end of their
titles. For example, if your pages are each titled “Daily Call Log,”
followed by a series of dates, you may want to expand the width of the
page tabs so you can see the full page titles at all times (“Daily Call
Log 10/10/2010,” “Daily Call Log 10/11/2010,” and so on).
To manually change the size of page tabs, follow these steps:
1. | Make sure that the page tabs are currently expanded. See the previous steps for instructions.
|
2. | Slowly
move the mouse pointer over the vertical line that separates the left
side of the page tabs and the right side of the page canvas to the left
of the page tabs.
|
3. | When
the mouse pointer changes to a horizontal line with a left and right
arrow on its sides, click and hold the left mouse button, and slowly
drag the line to the left.
|
4. | When the page tabs are wide enough for you to read the page titles, release the mouse button.
|
|
After manually resizing page
tabs, you can still use the quick method to minimize and maximize page
tabs when needed. Click the Collapse Page Tabs arrow on the far right of
the New Page button to minimize the page tabs. When you click the same
arrow to expand the page tabs again, OneNote will remember the custom
page tab size that you selected in the previous steps.
|
Deleting a Page
If you no longer need a
particular page in your notebook, you can delete it. When you delete a
page, all the objects and inserted items on that page are also deleted.
To delete a page, follow these steps:
1. | Right-click the tab of the page you want to delete.
|
2. | On the menu that appears, click Delete. |