The ribbon, first introduced in some of the Office
2007 programs, is common to all Office 2010 programs. The ribbon extends
across the top of the program window, directly under the title bar, and
consists of a set of tabs that change depending on the currently active
module, item, or content. Clicking a tab name displays the associated
set of commands.
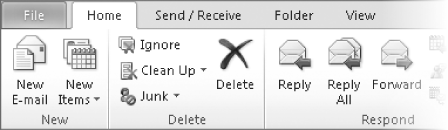
The Mail module tabs. The active tab is white.
1. The Backstage View
The leftmost ribbon tab, labeled File
and identified in Outlook by an orange tab (the File tab color in each
Outlook 2010 program window matches that of the program icon) isn't
actually a tab at all. Clicking the File tab displays the Backstage
view, a new feature that is common to all Office 2010 programs.
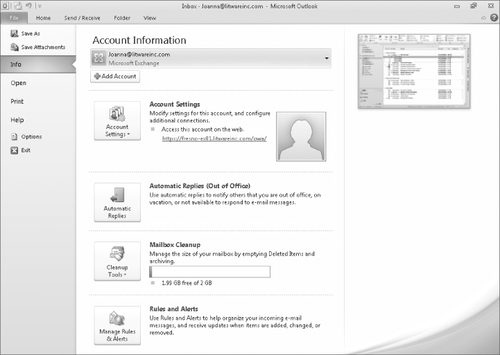
The Backstage view of the Outlook 2010 program window.
Tip:
The contents of the Backstage
view when opened from the program window are identical regardless of
which module you're working in.
You access commands
in the Backstage view from the left pane. Simple file-management
commands that interact with the Windows operating system are available
at the top of the left pane. These commands change depending on the
active module or item and include Save, Save As, Save Attachments, and
Close.
Categories of commands related to managing Outlook and Outlook accounts (rather than items and item content) are organized on pages, which you display by clicking the page tabs in the left pane. The Outlook 2010 Backstage view includes the following pages:
Info From this page, you can manage account settings, automatic replies, mailbox size, rules, and alerts. Open
From this page, you can open an external calendar file, Outlook data
file, or other Outlook user's folder in Outlook, and you can import
files, settings, and RSS feeds into Outlook. Print
From this page, you can select a printer, set print options, preview
the effect of the applied options, and print the selected item. Help
From this page, you can access information about your Outlook or Office
installation, manage product activation and product keys, and access
support resources, program options, and program updates.
2. Module and Item Tabs
Commands related to working
with the content of Outlook items are represented in function-specific
groups on separate feature-specific tabs of the ribbon.
The ribbon in each module includes four standard
tabs: Home, Send/Receive, Folder, and View. The Home tab changes to
reflect the commands necessary to manage items within the current
module. The
ribbon in each new Outlook item window includes an item-specific tab
such as Message, Appointment, Contact, or Task. It also includes the
Insert, Format Text, and Review tabs. The ribbon might also contain
additional tabs specific to an item type, to a program installed on your
computer, or to customizations you've made in the Outlook Options
dialog box.
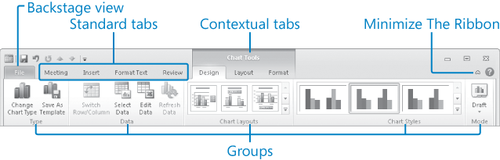
When certain types of item content (such as tables, charts, and graphics) are active (selected), additional contextual tabs appear at the right end of the ribbon. These contextual
tabs are indicated by colored headers and a colored bottom border, and
they contain commands that are specific to working with the selected
content. For example, when the cursor is in a table, two Table Tools
contextual tabs—Design and Layout—appear to the right of the Review tab.
When a chart or chart element is selected, three Chart Tools contextual
tabs—Design, Layout, and Format—appear to the right of the Review tab.
Each of the available contextual tab groups has a unique color so you can easily differentiate between them.
Tabs and groups on the ribbon.
Tip:
Don't
be alarmed if your ribbon has tabs not shown in our graphics. Office
2010 allows other programs to add their own tabs to the ribbon.
To the right of the ribbon tab names, below the Minimize/Maximize/Close buttons, is the Minimize The Ribbon button. Clicking this button hides the commands
but leaves the tab names visible. You can then click any tab name to
temporarily display its commands. Clicking anywhere other than the
ribbon hides the commands again. When the full ribbon is temporarily
visible, you can click the button at its right end, shaped like a
pushpin, to make the display permanent. When the full ribbon is hidden,
you can click the Expand The Ribbon button to redisplay it.
Note:
Keyboard Shortcut Press Ctrl+F1 to minimize or expand the ribbon.
Clicking the Microsoft Outlook Help
button at the right end of the ribbon displays the Outlook Help window,
in which you can use standard techniques to find information.
Note:
Keyboard Shortcut Press F1 to display the Outlook Help window.
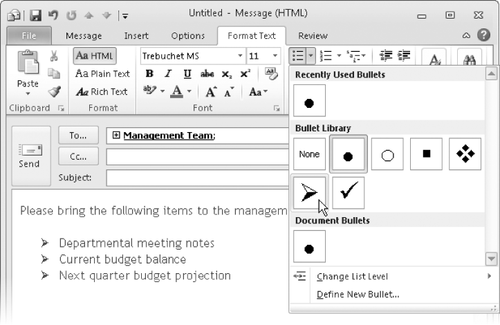
On
each tab, buttons representing commands are organized into named
groups. The groups that appear on each tab, and the buttons that appear
in each group, vary based on the active module or item.Depending
on your screen resolution and the size of the program window, the
commands in a group might be displayed as labeled buttons, as unlabeled
icons, or as one or more large buttons that you click to display the
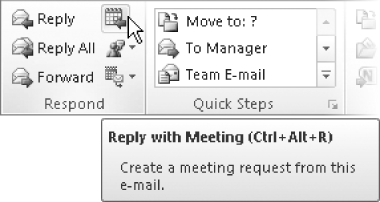
commands within the group. If a button label isn't visible, you can display
the command, a description of its function, and its keyboard shortcut
(if it has one) in a ScreenTip by pointing to the button.
ScreenTips provide helpful information about unlabeled buttons.
Tip:
In
the Outlook Options dialog box, you can control the display and content
of ScreenTips from the User Interface Options area of the General page,
and change the language of ScreenTip content from the Language page.
Related
but less common commands are not represented as buttons in a group.
Instead, they are available in a dialog box or task pane, which you
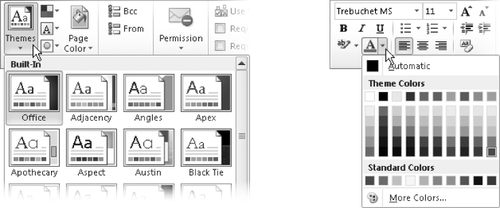
display by clicking the dialog box launcher located in the lower-right corner of the group. Some
buttons include an integrated or separate arrow. To determine whether a
button and arrow are integrated, point to the button or arrow to
display its border. If a button and its arrow are integrated within one
border, clicking the button displays a list of related actions or
options. If the button and arrow have separate borders, clicking the
button carries out the default action indicated by the button's current
icon. You can change the default action of the button by clicking the
arrow and then clicking the action you want.
The arrow of the Themes button is integrated, and the arrow of the Font Color button is separate.
The goal of the entire ribbon is to make working with Outlook items and item content as intuitive as possible. Commands for tasks you perform often are readily available, and even those you might use infrequently are easy to find.
For example, when a formatting
option has several choices available, they are often displayed in a
gallery of thumbnails. These galleries give you an at-a-glance picture
of each choice. If you point to a thumbnail in a gallery, Live Preview shows you what that choice looks like if you apply it to your document.
Live Preview shows the effect on the selected element of clicking the thumbnail to which you are pointing.
Tip:
You might find that obscure commands you used in previous versions of Outlook are not available from the ribbon. However, these legacy
commands are still available. You can make legacy commands accessible
by adding them to the Quick Access Toolbar.
|