IT tutorials
 
Office
 

Microsoft PowerPoint 2010 : Working with Animation and Transitions - Applying Animation to Objects

- Free product key for windows 10
- Free Product Key for Microsoft office 365
- Product Key Free : Microsoft Office 2019 – Serial Number
5/29/2013 4:34:51 AM

You can apply basic animation to objects such as shapes, text placeholders, text boxes, SmartArt graphics, and charts using the options available in the Animation group on the Animations tab, as shown in Figure 1.

Figure 1. The Animations tab offers numerous options for adding motion to your slides.

Animating Objects

To apply animations to objects, follow these steps:

1.
Select the object or objects you want to animate. If you select more than one object, PowerPoint applies the animation to both objects at the same time. If you want the animations to occur in sequence, you must apply animation separately.
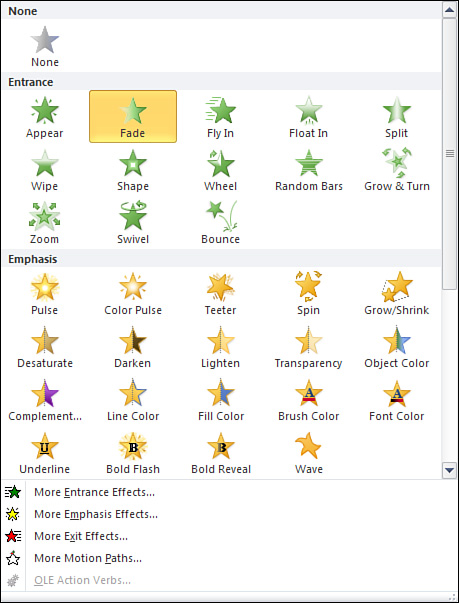
2.
On the Animations tab, select the animation you want to apply from the Animation group. Several options appear on the ribbon, but you can click the down arrow in the lower-right corner of the group and choose one of the options that appear in the gallery (see Figure 2).

Figure 2. Choose from a variety of animation effects in the gallery.


PowerPoint offers four categories of animations:

  • Entrance— Determine how the text or object enters the slide.

  • Emphasis— Add emphasis to the text or object.

  • Exit— Determine how the text or object exits the slide.

  • Motion Paths— Set a path that the selected text or object follows.

Select More Entrance Effects, More Emphasis Effects, More Exit Effects, or More Motion Paths in the gallery to open a dialog box with additional options.


3.
Click the Effect Options button to choose the direction to apply the animation. The options that appear here vary based on the animation you chose.

For example, if you choose the Fly In animation, this list includes eight options, including From Bottom or From Right. If the animation you selected doesn’t offer effect options, you can’t select this button.

4.
Click the Trigger button to specify what triggers this animation to start. Your choices include setting triggers based on the click of a specific object on the slide or on a bookmark.

5.
Click the down arrow to the right of the Start button to specify when to start the animation:

  • On Click— Start the animation when you click the mouse.

  • With Previous— Start the animation when the previous animation in the list starts.

  • After Previous— Start the animation after the previous animation in the list finishes.

6.
Select a Delay, in seconds, between each animation. If you don’t want a delay, select 00.00 in this field. Otherwise, you can specify delays in 0.25 increments.

7.
Select a Duration, in seconds, to determine how long the animation should last. The smallest duration you can choose is 00.01, which introduces, and ends, your animation almost instantly. Otherwise, you can specify durations in 0.25 increments. If you choose a long duration, be aware that this creates a slow motion effect.

8.
Click the Preview button to preview your animation choices.
 
Others
 
- Microsoft Excel 2010 : Collaborating with Colleagues - Protecting Workbooks and Worksheets
- Microsoft Excel 2010 : Collaborating with Colleagues - Tracking and Managing Colleagues’ Changes
- Microsoft Excel 2010 : Collaborating with Colleagues - Managing Comments
- Microsoft Word 2010 : Sharing Word Documents Online - Sharing a Document Through Email
- Microsoft OneNore 2010 : Housecleaning in OneNote - Restoring Pages and Sections from the Recycle Bin
- Microsoft OneNore 2010 : Housecleaning in OneNote - Deleting a Page, Deleting a Section
- Microsoft Outlook 2010 : Manage Scheduling (part 5) - Displaying Different Views of a Calendar
- Microsoft Outlook 2010 : Manage Scheduling (part 4) - Responding to Meeting Requests
- Microsoft Outlook 2010 : Manage Scheduling (part 3) - Scheduling Meetings
- Microsoft Outlook 2010 : Manage Scheduling (part 2) - Scheduling and Changing Events
 
 
Top 10
 
- Microsoft Visio 2013 : Adding Structure to Your Diagrams - Finding containers and lists in Visio (part 2) - Wireframes,Legends
- Microsoft Visio 2013 : Adding Structure to Your Diagrams - Finding containers and lists in Visio (part 1) - Swimlanes
- Microsoft Visio 2013 : Adding Structure to Your Diagrams - Formatting and sizing lists
- Microsoft Visio 2013 : Adding Structure to Your Diagrams - Adding shapes to lists
- Microsoft Visio 2013 : Adding Structure to Your Diagrams - Sizing containers
- Microsoft Access 2010 : Control Properties and Why to Use Them (part 3) - The Other Properties of a Control
- Microsoft Access 2010 : Control Properties and Why to Use Them (part 2) - The Data Properties of a Control
- Microsoft Access 2010 : Control Properties and Why to Use Them (part 1) - The Format Properties of a Control
- Microsoft Access 2010 : Form Properties and Why Should You Use Them - Working with the Properties Window
- Microsoft Visio 2013 : Using the Organization Chart Wizard with new data
Technology FAQ
- Is possible to just to use a wireless router to extend wireless access to wireless access points?
- Ruby - Insert Struct to MySql
- how to find my Symantec pcAnywhere serial number
- About direct X / Open GL issue
- How to determine eclipse version?
- What SAN cert Exchange 2010 for UM, OA?
- How do I populate a SQL Express table from Excel file?
- code for express check out with Paypal.
- Problem with Templated User Control
- ShellExecute SW_HIDE
programming4us programming4us