3. Cross-Project Linking Options and Showing Links Between Projects
The Options area in the backstage lets you control
how links are updated when files are opened, as well as whether external
links are displayed as ghost tasks, as shown in Figure 6. To get to these option settings, follow these steps:
Click the File tab to get to the backstage.
Click Options, and select the Advanced tab.
Scroll down to the Cross-Project Linking Options for This Project section.
The first two settings, Show External Successors and
Show External Predecessors, determine whether ghost predecessors and
successors are displayed as tasks or hidden in the current project. This
setting doesn't affect the predecessor and successor fields of the
linked internal task, which show the external links as text.

If you insert the parent project of an external task
into the active project, then the external task isn't displayed as a
ghost task but is instead displayed like any other task in an inserted
project.
If you select the Show 'Links Between Projects'
Dialog Box on Open option, then the Automatically Accept New External
Data option is disabled and unchecked. If Show 'Links Between Projects'
Dialog Box on Open isn't selected, then the Automatically Accept New
External Data option is enabled and can be turned on or off.
If the Show 'Links Between Projects' Dialog Box on
Open setting is selected, then Project displays the Links Between
Projects dialog box whenever the file is opened, but only if there has
been a change to an external task or link. If this setting is
deselected, then Project doesn't display the dialog box on file open
even if changes have been made to the external tasks or links. In that
case, you can display the dialog box at any time by going to Project tab => Properties group and clicking Links Between Projects.
If Automatically Accept New External Data is
selected, then Project automatically accepts any new external link
information without prompting you. If Project can't find the external
link (because the link was removed or the project file was moved), then
the external task is deleted.
3.1. Links Between Projects on Open
Suppose a link exists between a task in Class One
Project and a task in Class Two Project, and you open Class Two Project.
Here are two scenarios based on Class One Project being open or closed:
If Class One Project is already open in
memory, then the linked task in Class Two Project reflects the current
information from Class One Project, and the ghost tasks reflect the
current task data. Any open project reflects the current data of the
external tasks and links.
If Class One
Project isn't currently open, then Project looks for the external data
in the external project (which would cause the project to be loaded in
the background). If this external data is different from the current
data stored in the first project that's opened (Class Two Project), then
Project displays the Cross-Project Links dialog box, which shows all
external links. Links that have changed are shown in the Differences
column.
The Links Between Projects dialog box (see Figure 7)
displays all the cross-project predecessors and successors for the
current project, with information about what changed in the current
project. This dialog box also shows links whose source project can't be
found or whose source task can't be found. From this dialog box, you can
repair broken links, accept or refuse new data concerning a
cross-project link, and edit or delete cross-project links (and thus
ghost tasks as well).
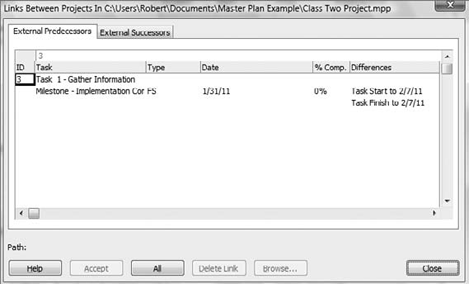
The dialog box has one tab that shows external
predecessor tasks and another that shows external successor tasks. The
following is a list of the fields in the Links Between Projects dialog
box:
Task
Shows the internal and ghost-task pair that
constitutes a cross-project link. The internal task is aligned to the
left and has an ID number. The ghost task is indented under it.
Type
Shows the link type and any lag or lead information about the external link.
Date
Either the start date or the finish date of the
external task. If the link is connected to the start date of the
external task, then the date is the start date. If the link is connected
to the finish date of the external task, then the date is the finish
date.
%Comp
Shows the % Complete value for the external task.
Differences
Provides information about what has changed in
the external task from the external project since it was last updated in
the internal project, or lets you know that the external task or
project file couldn't be found. If more than one piece of information
changed, then the changes are listed on separate lines.
You also may have some choices to make regarding external links:
The Accept button accepts all the changed information for the selected task.
The All button accepts the changed information for all links in the dialog box.
The Browse button lets you repair the path for an external project file that may have been moved or renamed.
The Delete Link button deletes the selected cross-project link and removes the external task from the current project.