You can also whip up a list
of indented tasks in Microsoft Word or Outlook, and then copy and paste
them into Project 2010. More of your team members are likely to be
familiar with Word or Outlook than with Project, so you're likely to get
project info from them in Word documents or emails. In Word and
Outlook, it's easy to indent, outdent, insert, move, and delete tasks.
Then, all you have to do is copy the text in either of those programs
and paste it into Project.
Note:
In Project 2007 and
earlier versions, you could build an outline in Word and import it into
a Project file. Project 2010 reduces that unwieldy process to a few
simple steps.
Here are techniques you can use to build a task list in Word or Outlook:
Promote a task. Position the cursor to the left of the task text and then press Backspace.
Demote a task. Position the cursor to the left of the task text and then press Tab.
Move tasks.
Select the task(s) you want to move, and then drag them to a new
position. Or, use Ctrl+X and Ctrl+V to cut and paste the tasks from one
position to another. If need be, demote or promote the tasks to the
correct level.
Delete tasks. Select the task(s) you want to delete, and then press Delete or Ctrl+X.
1. Pasting a WBS into Project
If
you paste a list of tasks from Word or Outlook into Project 2010, the
program is smart enough to transform the indents in Word documents or
Outlook emails into WBS levels in Project.
Suppose different teams use Word documents to define the tasks they plan
to perform. They can send them to you and all you have to do is open
the Word documents, copy the text, and paste it into Project. Here's
how:
Open the document in Word or, if the tasks are in an email in Outlook, open the email.
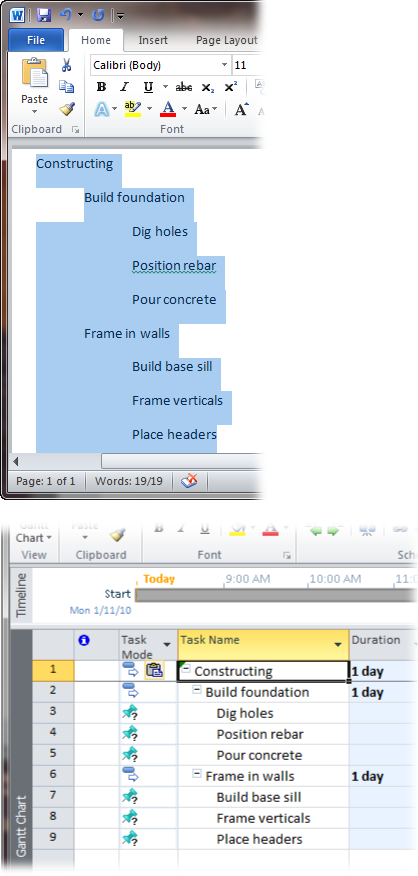
Select the tasks you want to paste into Project, as shown in Figure 4-6 (top), and then press Ctrl+C.
Switch over to Project and click the first blank Task Name cell where you want to paste the tasks; then press Ctrl+V.
Project
inserts the task names into the Task Name cells and indents the tasks
to the same level that they were at in the Word document or Outlook
email, as shown in Figure 1 (bottom).

Sticky
notes and an empty wall or whiteboard might be the best solution for
capturing tasks when a team is tossing around ideas. In fact, sticky
notes offer enough advantages that you might use them even when WBS
sessions proceed at a more leisurely pace.
Sticky
notes are a democratic way to collect tasks when several people
collaborate on a WBS. Team members can have their own pens and pads of
sticky notes so no one is stuck being the sole scribe. Moreover, anyone
can walk up to the WBS and move summary tasks and work packages around.
The hardest part of the sticky note approach could be too much
enthusiasm. If disagreements begin to break out over added or relocated
tasks, then it's time to jump in and take over sticky note maintenance
until things calm down.
Sticky notes are slick
when you're searching for the ideal project organization. You can peel
such a note off the wall and move it to wherever you want without mouse
clicks or keyboard shortcuts. And if you buy sticky flip charts, you can
use them for summary tasks and attach sticky notes representing work
packages to them.
One
drawback to sticky notes is that they lose their stickiness over time.
The safest approach is to record the contents of a sticky note WBS in
Project or another program before you leave the meeting room. If your
room reservation has expired, fold the pages carefully and transport
them to your office. For sticky notes stuck directly to the wall or
whiteboard, post a polite note asking others to leave your masterpiece
alone until you can come back and transcribe it.