WORD INCLUDES MANY FEATURES
designed to assist you in placing text on the page just the way you
want it. You can align text left to right using tabs or alignment
options, or you can adjust your text vertically using line spacing
options. Following are some of the available paragraph formatting
choices.
Aligning Text
Alignment arranges the text to line up at one or both
margins, or centers it between the margins. Alignment applies to entire
paragraphs. In other words, you can’t center align part of a paragraph
and left align another part of the same paragraph.
You can align text to the left, right, or center, or you can justify
your text, which means that the text becomes evenly spaced across the
page from the left margin to the right margin. Apply alignment options
by selecting the text you want to align, then choosing Home >
Paragraph and clicking one of the following alignment buttons:
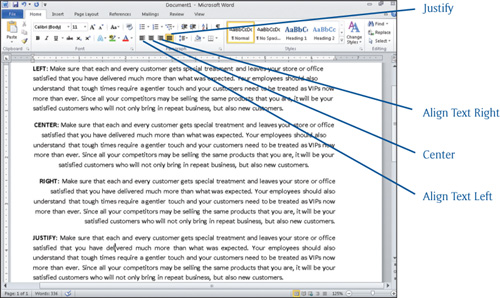
Align Text Left: The text aligns evenly at the left margin. This is the default choice.
Center: The text centers evenly between the left and right margins.
Align Text Right: The text aligns along the right document margin.
Justify: The text fills with micro spaces so it aligns evenly on both the left and right margins.
Figure 1 illustrates a document with text matching each alignment option.
Adding Paragraph Borders
Word includes borders that you can apply to any size
block of text, which draw the reader’s eye to specific areas for a
“quick read.” Use a border to place a frame around a word, phrase,
paragraph, or group of paragraphs to frame the text and call specific
attention to the areas. A border can encase the entire area or be any
combination of lines around the text, such as above and/or below the
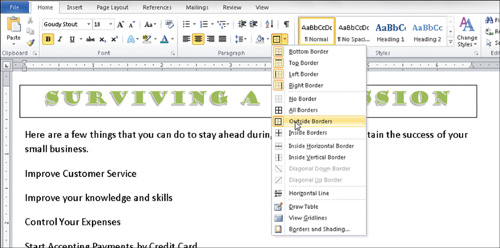
text. Select the text you want bordered and choose Home > Paragraph.
Click the drop-down arrow next to the Borders button, which displays a
list of options like the one you see in Figure 2. Choose the border option you want.
|
Word automatically adds a thin single-line border if
you type three dashes in a row and then press the Enter key. Typing
three underscore characters in a row and pressing Enter automatically
creates a thicker border line.
|
Shading Text
Shading helps you distinguish headlines and important passages, such as sidebars, by creating a screen,
which is typically light gray shading against the standard black text.
Screens can add contrast to and enhance the readability of your
document. Shading especially looks good when used in combination with a
border.
You may be wondering what the difference is between
shading and highlighting. Highlighting only covers the selected text and
not the entire paragraph. Also, you typically use a light color for
highlighting so you can still see the black text through it. When you
add shading, the shading covers the entire paragraph, and if you choose a
darker color, Word automatically changes the text color to one that
coordinates so you can still effectively read the text.
Tip
A great way to add enhancement is to use black or dark gray shading with white text.
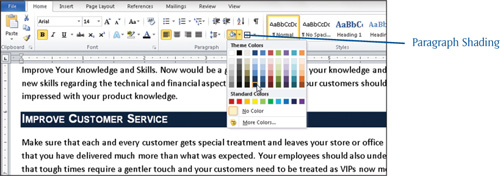
Click
anywhere in the paragraph you want shaded and choose Home >
Paragraph > Shading. Choose a color from the resulting Shading
gallery, as shown in Figure 3. In this figure, adding dark blue shading caused Word to change the font color to white.
Optionally, if you want to add a shading pattern
ranging from a light 5% shade to patterns, such as diagonal stripes or
polka dots, you can choose Home > Paragraph, and then click the
Borders drop-down arrow. From the list, select Borders and Shading,
which then displays the Borders and Shading dialog box. Click the
Shading tab then click the Fill drop-down arrow to select a fill color.
Choices are available in themes or standard colors. You can then click
the Style drop-down list to select a pattern.
Tip
Use caution with patterns. Using a busy pattern can be distracting or make your text very difficult to read.
Indenting Text
Typically, text runs between the left and right
margins, but you may want to indent particular paragraphs. Surprise!
Word contains a tool for indenting. Click anywhere in the paragraph you
want to indent, and then choose Home > Paragraph > Increase
Indent. Each click of the Increase Indent button indents the text
one-half inch from the left margin. Click the Decrease Indent button to
move the text back one-half inch.
If you want to indent from the right margin or you
want to manually set how much indentation Word applies, you can use the
Format Paragraph dialog box. Click the Paragraph Dialog Box Launcher,
which displays the Paragraph dialog box shown in Figure 4.
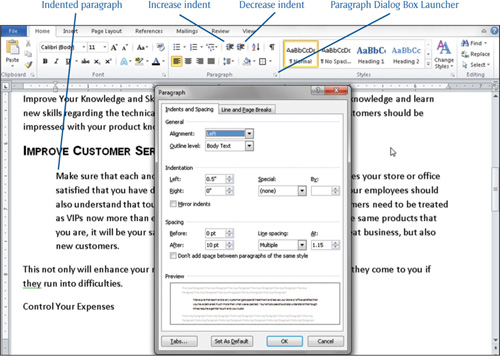
Click
the spinner arrows for the Left or the Right text boxes to specify the
number of inches to indent the left and right edge of the paragraph. The
Preview box at the bottom shows the effects of your settings.
Optionally, click the Special dropdown list and select an indenting
option:
First line: This option indents only the first line of the paragraph and leaves the rest of the paragraph even with the left margin.
Hanging: This option indents all lines except the first line of the paragraph.
Click OK after you finish making selections. Word applies the paragraph indentation settings you selected.
Another way to control indention is by dragging the indentation icons on the ruler:
Tip
If you don’t see the ruler, choose View > Show > Ruler.
 Left Indent
 Hanging Indent
 First Line Indent
 Right Indent
Tip
You can also change indentation by choosing Page Layout > Paragraph > Indent.