|
One of the first major assumptions you have to make
in any schedule is how much time is available to complete tasks. You
need to account for all holidays, vacation time, and all other
foreseeable nonworking time to build a schedule with any degree of
accuracy.
As previously mentioned, by default Project applies
a Standard calendar of 40 hours a week, Monday through Friday, 8:00
a.m. to 5:00 p.m., with an hour off for lunch. You can modify this
Standard calendar, and you can create additional project calendars as
well.
Tip It
is important to keep your organization’s working environment in mind
when constructing base calendars for projects. Choose a calendar so
that you can plan for success. If you simply accept the Standard base
calendar, you automatically run into an issue: Your people cannot spend
eight hours a day working only on your project. Your project schedule
ought to reflect reality. A resource might
typically spend six out of the eight hours in a day working on your
project, and the other two hours on administrative tasks or
miscellaneous activity. You could change your base calendar to reflect
six hours of working time in a day. However, it may be better to simply
keep in mind when you are creating your task list that an eight-hour
task may take a little more than an eight-hour day. For
most organizations, it is recommended that you keep your
eight–hour-a-day calendar or another calendar that reflects the general
start and finish working times of an average day/week, and instead
adjust the percentage of time that resources have available each day. |
Calendar Hierarchy
Project makes it possible to assign calendars at the
Project, Resource, and Task level. Tasks using Auto Schedule mode will
honor working and nonworking time according the following hierarchy of
calendars:
1. | The Task Calendar—
If a task has a specific calendar, Project honors the Task Calendar
unless a resource assigned to the task also has a specific Calendar; in
this case, Project will attempt to honor both
calendars. (It is also possible to check the Scheduling Ignores
Resource Calendars box in the Task Information window, Advanced tab. In
the event of a conflict, Project will display an error message, telling
you that it will default to this setting to resolve the conflict.) If
the task does not have a specific calendar....
| 2. | The Resource Calendar—
If a resource is assigned to a task and the resource has a specific
calendar assigned to it, Project honors that calendar. If the resource
does not have a calendar (which is common) and the Task does not have a
calendar....
| 3. | The Project Calendar— All tasks without specific calendars, lacking resources with specific calendars, will honor the Project Calendar.
|
This hierarchy is a very powerful scheduling
feature. Unfortunately, in past versions of Project, it often led to
confusion; Project Managers and schedulers found it difficult to
understand exactly why some tasks were scheduled to occur when they
were. With 2010, you can simply hover over the information column. The
driving calendar will be clearly identified, unless it is the project
calendar.
Modifying and Defining Base Calendars
Much
of your calendar modifications will occur on the Change Working Time
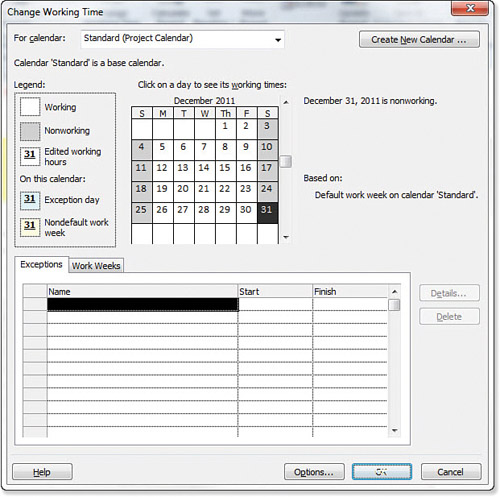
dialog box. To access it, click the Project tab, Change Working Time. Figure 1
shows the Change Working Time dialog box. The Change Working Time
dialog box contains a For Calendar field to define which calendar you
are viewing, a legend, a calendar, and two tab options (Exceptions and
Work Week) to modify the calendar. When you open the Change Working
Time dialog box, the current date is highlighted in bold on the
calendar.
Defining Exceptions
You can define exceptions individually, or you can
define a recurrence exception along with its recurrence pattern, so
each exception only has to be defined once.
For example, if Labor Day is always a nonworking day
at your company, you can tell Project to define every Labor Day as an
exception. To do this, follow these steps:
1. | Open the Change Working Time dialog box (Project tab, Change Working Time).
| 2. | Scroll to the month of September using the arrows on the right side of the calendar.
| 3. | Click on Labor Day, the first Monday of every September. In 2011, Labor Day is September 5th.
| 4. | Under the Exceptions tab, type Labor Day
in the Name column, and click Enter, or press the directional arrow to
the right. The Start and Finish columns will display the date of the
highlighted day in the calendar (in this case, 9-5-11). | 5. | Select
the cell in the Start column next to the exception name (in this case,
select the 9-5-11 cell in the Start column next to Labor Day) and click
the Details button.
| 6. | The Details dialog box will appear, as shown in Figure 2.
If Labor Day is a nonworking holiday, leave the Nonworking option
selected. If you want to define working hours (such as a half day),
select Working Times and enter the hours of working times for Labor Day.
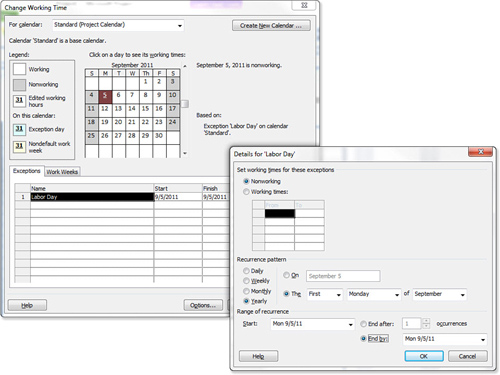
| 7. | Under Recurrence Pattern, select Yearly, because Labor Day happens once a year. Figure 2 shows this selection.
| 8. | Because
the date for Labor Day changes annually, select the The... option, and
then the First Monday of September is filled in automatically. Because
this is the appropriate description for Labor Day, you do not have to
change anything else.
| 9. | The
Range of Recurrence automatically fills the selected date from the
calendar in the Start field. Because this is the first Labor Day in
your project, you do not have to change this field. If you wanted the
exception to start on a different date, you can type in the date or use
the drop-down list to choose from a calendar.
| 10. | The
final step is defining the end of the range of the exception. You can
select End By and fill in a date (type it in or use the drop-down), or
you could select End After and fill in the number of occurrences you
want the exception to end after. Project supports information up until
12-31-2049, so the maximum number of occurrences you could enter is 39,
because there are 39 Labor Days between 9-5-2011 and 12-31-2049.
Tip The Recurrence Pattern options
are Daily, Weekly, Monthly, and Yearly. Click each option to
familiarize yourself with defining in detail the recurrence pattern
information for all four options. Information appears at the right of
the options and varies depending on which one you choose. |
| 11. | Click
OK. The date is now highlighted as an Exception Day (as defined in the
legend), and if you scroll through every month of September, you will
notice the same for every first Monday. Click OK again to close the
Change Working Time dialog box, or continue modifying your calendar.
|
Similarly, if you have a long meeting every Friday,
you can simply click on the Friday of the first meeting and repeat the
process. Define working hours around the meeting, select a Weekly
recurrence pattern on Friday, and define the end of the exception.
Note If you were defining a
nonworking day that occurs each year on the same date, such as
Christmas Eve, you would select the On option and type in the date. |
You can also define longer exceptions, such as
office closures for an extended period. For example, if your company
shuts down starting on Christmas until the end of the year, you can
define that entire time period as non-working time. To set this up so
that it occurs each year, the changes must be made one day at a time:
1. | Open the Change Working Time dialog box by selecting Tools, Change Working Time.
| 2. | Scroll to the month of December using the arrows on the right side of the calendar.
| 3. | Click on December 26th.
| 4. | Under the Exceptions tab, type Holiday
in the Name column, and click Enter, or press the directional arrow to
the right. The Start and Finish columns will display the date range of
the highlighted period in the calendar.
| 5. | To
set up the recurrence pattern for this date, click the Details button.
Under Recurrence Pattern, select Yearly, and the On (December 26, in
this case) option is automatically selected.
| 6. | Under
Range of Recurrence, you can either specify the number of years by
selecting the End After option and then entering the number (of years,
in this case) that this exception will apply to. Or you can also select
the End by option and select the specific date (in this case,
12/26/2011) until which the exceptions will apply. The date you provide
here is inclusive, so in this example, the last year the exception will
be applied is 2011. Click OK.
|
Repeat this process for each day in the closure
period, even if it falls on a weekend in the first year. This will
enable you to make sure that all days between 12/26 and 12/31 are
nonworking days, regardless of where they fall in the week. You can
verify that the change is correct by reviewing the number of
occurrences shown in the dialog box in Figure 3. In this example, the number is “3” because the recurrence time period was established as three years.
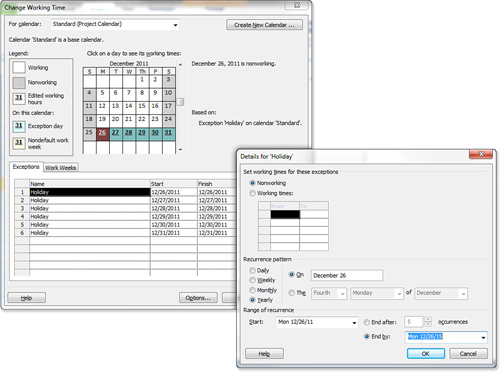
If you have successfully made an exception, the numbers on the dates of the exception will appear as defined in the legend.
Creating New Base Calendars
It is helpful to make exceptions to your base
calendar to account for small changes in working time. However,
sometimes it is more efficient to simply create a new base calendar
completely and apply that to your project. For example, assume that
your resources work 40 hours a week, but only four days a week. Rather
than going through and changing every Monday through Thursday to 10
hour days and making Friday a nonworking day, it is easier to just
create a new base calendar that more accurately depicts your standard
working time.
To do this, follow these steps:
1. | Open the Change Working Time dialog box by selecting the Project tab, Change Working Time.
| 2. | Click the Create New Calendar button at the top, which opens the Create New Base Calendar box.
| 3. | Type in a distinctive name in the Name field.
| 4. | Select
the Create New Base Calendar option if you want to start from scratch
on the standard 40-hour workweek, or select the Make a Copy Of option
if you want to use an existing base calendar as your template. Click OK.
Note Selecting Make a Copy Of changes your calendar name from what you named it to Copy of [name of calendar you are making a copy of]. If you still want to call it your original name, change it back. |
Notice that the For Calendar field at the top of the Change Working
Time dialog box has defined the new base calendar with the name you
gave it. Also, when you are finished creating the calendar, if you open
your Project Information dialog box (Project, Project Information), you
see the new base calendar listed as an option for the project base
calendar in the Calendar drop-down list. | 5. | After
you have defined your new base calendar, it is time to define your
workweek. Click the Work Weeks tab, and click the Details button or
double-click Default in the Name column. The Details dialog box
appears, in which you define your workweek (see Figure 4).
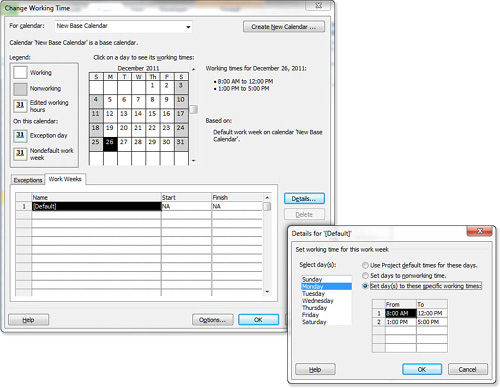
| 6. | To
define a 40-hour, four-day workweek (Monday–Thursday, 10 hours a day),
go through each day in the Details dialog box. Sunday is selected
first. Because this is a nonworking day, you can select either Set Days
to Nonworking Time or Use Project Default Times for These Days.
Tip To enter time for multiple
days simultaneously, hold down Shift and drag your mouse over the
multiple days you want to change. Alternatively, hold down Ctrl and
click each day individually. |
| 7. | Next,
highlight Monday. Select Set Day(s) to These Specific Times. In the
From and To columns, set the appropriate working hours. Be sure to
press Enter after each cell entry to save the information. For example,
you could type 8:00 a.m. in the From column, press Enter, and type 12:00 p.m. in the To column and press Enter. Then for afternoon hours, type 1:00 p.m. in the From column, press Enter, and type 7:00 p.m.
in the To column and press Enter. This will give you a 10-hour day with
an hour off for lunch. If you are satisfied with this schedule, repeat
the process for Tuesday, Wednesday, and Thursday.
Note You can enter time in 12-hour
clock format or 24-hour clock format (military time). If you’re using
the 12-hour format, noon is 12:00 p.m. and midnight is 12:00 a.m. If
the time is on the hour, you only have to enter the single number (5
p.m. for 5:00 p.m.). Be sure to define a.m. and p.m. Otherwise, Project
may misinterpret your times. Generally, only the
first four working hours boxes are defined: the top two for morning
hours and the bottom two for afternoon hours. Sometimes you will use
the remaining boxes to account for multiple breaks or meals, or for
other unusual work schedules. You must define the To and From fields as
pairs, and the From field must come later than the To field. |
| 8. | Finally, highlight Friday and select Set Days to Nonworking Times. Do the same for Saturday, and press OK.
|
Notice how the new calendar is created, with all
Fridays set as nonworking days, and the working times for Monday
through Thursday reflect what you defined.
When you have finished, click OK to close the Change Working Time dialog box, or click Cancel to exit without saving.
|