Calendar Options
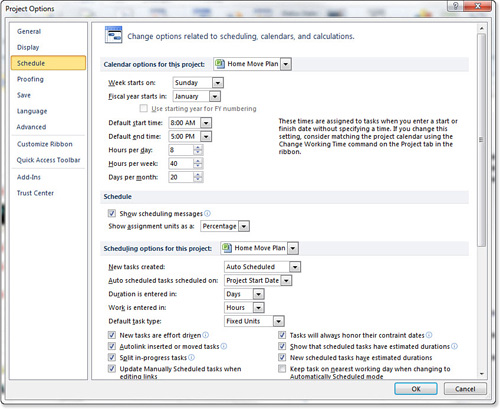
The Calendar options section is one of the more critical sections in the Options dialog box (see Figure 5).
All fields in the Calendar options section are file-specific; select
the All New Projects item if you want to use the information on all
future projects as well as the one you are working on.

The Hours Per Day, Hours Per Week, and Days Per
Month fields are crucial to the interpretation and display of your
estimates of task duration. Days, weeks, and months are the basic task
duration units. However, minutes are the fundamental time unit in
Project 2010. Thus, all durations are converted into minutes, and the
conversion is based on the information you enter on the Calendar tab.
If this information is inaccurate, your schedule will be inaccurate.
For example, if you define a day as 8 hours, Project calculates that
there are 480 minutes of working time in a day. If you define a day as
10 hours, Project calculates that there are 600 minutes of working time
in a day. Even though they are both one day, there is a big difference
in the amount of working time in that day.
To avoid confusion, make your estimates of the
amount of work in hours rather than in days and then validate that the
duration of the work matches what you expected it to be.
You can use the Week Starts On field at the top of
the Calendar tab to change the way that a week is displayed in
timescales and dialogs. It does not change any calculations for the
project. Similarly, the Fiscal Year Starts In field affects reports and
displays that show annual and quarterly information. The default
setting is the same as a calendar year, so this field should be changed
if your fiscal year does not begin in January.
The Default Start Time and Default End Time fields
define the start and end times of the normal working days.
Although you may assign tasks to begin on a certain
day, Project does not actually schedule the task until the start time
of that day. So, if your workday starts at 6:00 a.m., but you have not
changed the Default Start Time from 8:00 a.m., Project will schedule
that task to start two hours late. This also affects how you track a
task. If a task took a full eight-hour day from 6:00 a.m. to 3 p.m.
(accounting for an hour lunch break), and you mark the task as 100%
complete but still have 8:00 a.m. in the Default Start Time field,
Project shows the task as finishing later than it actually did.
If the information you defined in the Calendar tab
is the standard calendar information for your organization, select the
“All New Projects” item from the Calendar options for this project
drop-down.
In short, be sure to define your calendar options
accurately and realistically, and be sure that the Calendar tab on the
Options dialog box matches the information defined in the base calendar
you use for your project, created in the Change Working Time dialog box.
Schedule
Show scheduling messages causes Project to display
messages about scheduling inconsistencies, such as successor tasks
starting before the finish of predecessor tasks.
The Schedule section enables you to turn scheduling
messages on and off, and to show the assignment units as either a
percentage or a decimal (refer to Figure 5). This is a matter of personal preference.
Scheduling Options
The Scheduling Options section pertains primarily to tasks that are auto scheduled. However, there are two exceptions:
For New Tasks Created, choose whether you want new
tasks to begin on the project start date or on the current date, or as
mentioned, without dates in the case of manually scheduled tasks.
The next two fields enable you to enter the unit of
duration and work: minutes, hours, days, weeks, or months. Again, this
is a personal preference, depending on what is best for you and your
project. Be sure your working time and Calendar tab entries coincide;
if you enter duration in days, be sure you have defined the correct
number of hours in a day, and so on. Also, these fields will determine
the default units when entering tasks. For example, if you have Days
entered in the Duration in Entered In field, you could simply type 2
in the Duration field for 2 days. However, if you wanted to assign a
different time unit, you would have to enter the unit, such as 2 w for 2 weeks.
Choose the task type: Fixed Duration, Fixed Units,
or Fixed Work. The task type defines how Project will calculate the
schedule, work, and units (this will be described in great detail
later).
Caution
It is unwise to use
months as a duration unit because of the inconsistency of the length of
months throughout the year. Use hours, days, or weeks as the duration
unit. |
Auto-linking inserted or moved tasks enables Project to create finish to start dependencies automatically. Split In-Progress Tasks
enables project to discontinuously re-schedule unfinished portions of a
task when you Update the Project while selecting the Reschedule
Uncompleted Work option. Tasks Will Always Honor Their Constraint dates
is less significant
than it was before Manual Task mode was introduced. Tasks that do not
honor their constraint dates will be rescheduled to eliminate negative
slack. Show that Scheduled Tasks Have Estimated Durations merely
toggles off the indicator in the duration field. The Estimated column
serves the same purpose. New Scheduled Tasks Have Estimated Durations
applies only to auto-scheduled tasks. Finally, Keep Task on Nearest
Working Day When Changing to Automatically Scheduled Mode is
self-explanatory. Turning off this option when using Auto-Scheduled
mode is rarely a good idea because it will result in scheduling that
ignores calendars.