Every project is unique. Accordingly, Project 2010
enables the use of custom fields in addition to its extensive selection
of default fields.
The following sections discuss the tactics and logic behind customizing fields.
The Custom Fields Concept
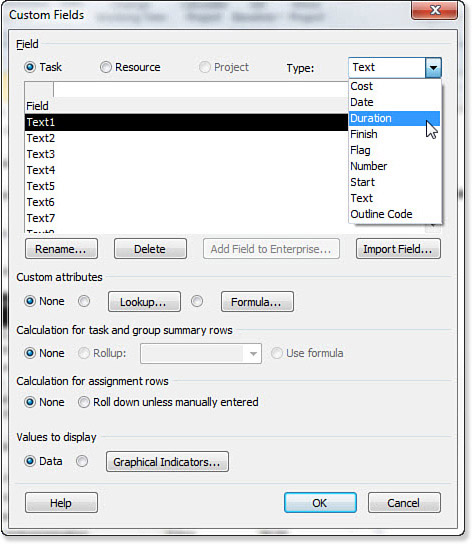
Project has dedicated predefined fields for the user
to customize in a variety of ways. All the fields are accessible on the
Project tab, Custom Fields. This command opens the Custom Fields dialog
box shown in Figure 1.
There are two categories of customizable fields: task fields and resource fields.
Note
Both Project Professional and
Project Standard contain custom fields that each project manager can
customize within his project. When connected to Project Server, Project
Professional also includes enterprise-level task and resource custom
fields (as well as a third class of project-level custom fields) that
allow an organization to standardize the fields they capture for all
projects. |
In each of these categories, you can do the following:
Rename the custom fields permanently so that the new name appears wherever the field name appears.
Add a value list to a custom field.
Add a formula to a custom field.
Designate graphic indicators to appear in a custom field in place of the data.
There are nine types of custom fields, as shown in
the Type drop-down list: Cost, Date, Duration, Finish, Flag, Number,
Start, Text, and Outline Codes. Within these types, there are
designated numbers of fields. These are detailed in Table 1.
Table 1. The Custom Fields Types (excludes Enterprise fields associated with Project Server)
| Type | Number of Available Fields | Description |
|---|
| Cost | 10 | Can contain currency data you want to enter in your project. |
| Date | 10 | Can contain dates you want to enter in your project. |
| Duration | 10 | Can contain duration or work values you want to enter in your project. |
| Finish | 10 | Can contain finish dates you want to enter in your project. |
| Flag | 20 | Can contain yes/no flags you want to enter in your project. |
| Number | 20 | Can contain numeric (positive or negative) values you want to enter in your project. |
| Start | 10 | Can contain start dates you want to enter in your project. |
| Text | 30 | Can contain textual information you want to enter in your project alphanumerically, up to 255 characters. |
| Outline Code | 10 | Create
an alternate structure for your project that you can use to sort,
filter, or group tasks or resources (in other words, alphanumeric
outline structures). |
Custom fields can be used in many, many ways.
Perhaps you need to identify the status of a task as something other
than percentage complete, such as approved/not approved. Perhaps you
want to create a stop-light style status field to show whether the
project is on schedule and on budget. The following section will
explain how to define custom fields for your project.
Note
Custom field names appear in
any drop-down list in which the predefined fields are accessible. For
instance, if you are inserting a new column on a table, the field
choices for the column include all the custom field names you define,
even if they have not yet been used for data storage. |
Using Custom Fields
All changes to a custom field are done in the Custom
Fields dialog box (Project tab, Custom Fields). To work with a
particular field, select the general type (Task or Resource) first.
Then select a particular category of custom field (such as Cost or
Duration) from the Type drop-down list. The list of available fields
for that particular category will appear in the box; click on the one
you want to customize.
Renaming, Deleting, and Importing Custom Fields
To avoid having to change the name label every time
you open a new table or display a custom field, you can give the
generic name provided in Project an alias that is a more accurate
description for your purpose. After you have selected your general type
and custom field category, highlight the custom field you want to
rename. If you have not renamed any of them yet, their names all appear
as the category type and a number after (such as Duration1).
When
you have the custom field highlighted, click the Rename button, which
opens the Rename Field dialog box. Type in the name you want, and click
OK. Notice that the new name appears in the box with the old name in
parentheses. The new name will now appear any place the custom field is
used instead of the generic custom field name.
If you want to delete a custom field alias, click the Rename button, highlight the alias, and click the Delete button.
You can also import a custom field from your
project, another project, or from a template. The imported custom field
is imported with all its attributes, such as formulas or indicators,
associated with it.
Click the Import Custom Field button to open the
Import Custom Field dialog box. From there you can import the custom
field using the drop-down list in the Project field as your source,
selecting the field type and the field. All open projects will appear
in the Project field drop-down list. The Field drop-down list displays
all available custom fields from the source you selected. Click OK to
import the custom field, or click Cancel to cancel.