As you are undoubtedly aware by now, Project
offers several options when categorizing, organizing, and working with
resources. Depending on your project, some methods will be of more use
to you than
others. The following pages discuss these different methods and will
give you a greater understanding of working with resources in Project.
1. Setting the Automatically Add New Resources and Tasks Option
Setting the Automatically Add New Resources and Tasks
option determines how Project reacts when you assign a resource to a
task that is not currently in your resource list.
When you assign a resource name to a task, Project
checks the resource list for the name you have entered. By default, if
Project does not find the resource, it adds it to the resource list
without asking your permission. This causes problems if you did not
intend to add a new resource, but rather typed in the wrong or
misspelled resource name accidentally.
Caution
All resource fields
for the new name receive default values, and you must remember to update
those fields later. You can end up with miscalculations in your costs
if you neglect to go back and fill in the data for the new resource,
because the default cost rates are usually zero (and by now you must
know that is inaccurate!). |
This feature can be dangerous because it enables you
to accidentally create multiple resource names for the same resource.
For example, suppose you have created a list of resources that includes
Matt, Maria, and Charles. As you are assigning resources to tasks, you
type in Marie instead of Maria as a typo. A new resource, Marie, is
added to the list of resources, so you then have Matt, Maria, Charles,
and Marie. You end up not having a comprehensive list of the assignments
for Maria, because they are split between the Maria and Marie
resources.
However, if the Automatically Add New Resources and
Tasks option (in the File tab, Options, Advanced) is disabled, Project
prompts you to choose whether it should add the new resource to the
resource list. If you did in fact type in a wrong or misspelled resource
name, disabling this feature allows you to double-check your possible
error.
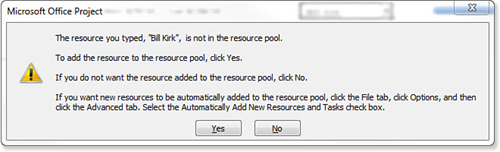
In Figure 8.12,
the resource name Bill Kirk was accidentally typed in an assignment,
and Project prompts you to decide whether this is a new resource you
want added to the list. If you confirm that you want to add the
resource, the resource is added, and you must remember to define the
rest of the resource fields. In this example, you would choose the No
button to avoid adding a misspelled version of Bill Kirk’s name to the
resource list.
Tip
It is a good idea to disable
the Automatically Add New Resources and Tasks option to avoid the
possibility of creating new resources unintentionally. If you are going
to leave the option enabled, you should avoid typographical errors by
always using the pick list of resource names that is available when you
assign a resource to a task. |
To disable or enable the Automatically Add
New Resources and Tasks option, select the File tab, Options, Advanced,
General Options for this project. Clear the check box Automatically Add
New Resources and Tasks to disable the feature, or check the box to
enable the feature.
Sorting Resources
The resource names in the Resource Sheet view are
normally listed according to ID number, which initially reflects the
order in which you enter the resources. Project enables you to
temporarily sort the resource list for analysis purposes. Also, after
you sort the resource list, you can permanently change the row ID
numbers to match the new order.
Note
Permanently changing the ID numbers does not change the unique ID that is assigned when you add a resource. |
For instance, after entering all the resources, you
could permanently sort the list so that all the work resources are
listed first in alphabetical order by name and the material resources
are listed below in order by name (see Figure 2).
Or, if you have used generic resource names, you might sort the list to
show the generic names first and then the actual names.
Caution
Never cut and paste to change
the order of the resource rows if you have already assigned resources to
tasks. Cutting deletes the original resource and its assignments are
deleted also. Therefore, the new resource you paste in will have a new
unique ID and will have no assignments. |
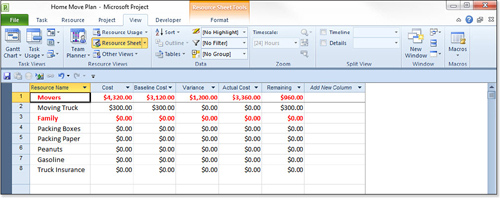
Another useful application of sorting is to see which
resources add the most cost to the project. In this case, you apply the
Cost table to the Resource Sheet view, to show the cost of all the task
assignments for each resource. Then you could sort the resource list by
the Total Cost field, in descending order (see Figure 3).
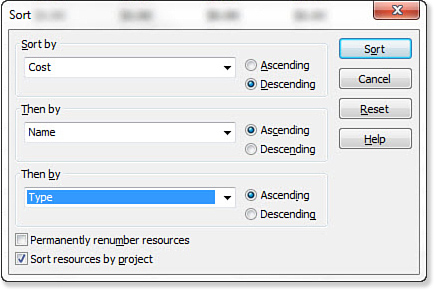
You can sort a table by up to three fields at a time.
Each of those fields can be sorted in ascending or descending order.
For example, to produce the sort of order in Figure 2,
you would sort first on the resource’s Type field, in descending order,
to put work resources before material resources alphabetically. Next
you would sort by the Resource Name field in ascending order to list the
names in alphabetical order.
Note
If you sort the resource table
by the Standard Rate field, Project sorts the work resources that have
been defined with annual cost rates using the hourly equivalent of the
annual amount, based on 52 weeks of 40 hours each. |
To sort resources, select the View tab, Sort to
display the Sort submenu. Sorting by cost, name, or ID is done so often
that these options appear on the submenu. Cost sorts in descending
order, but both Name and ID sort in ascending order by default. These
three choices use the current settings at the bottom of the Sort dialog
box.
If you choose Sort By at the bottom of the Sort
submenu, Project displays the Sort dialog box, where you can define up
to three fields to use for sorting, and each can be sorted in either
ascending or descending order, as shown in Figure 4.
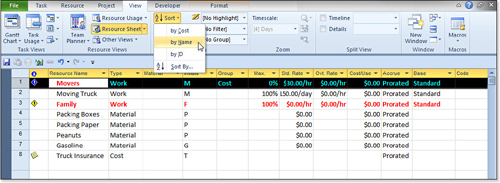
To produce the sort order by Type and then by Name, as illustrated in Figure 8.13, follow these steps:
1. | Display the Resource Sheet view by selecting it from the Quick launch.
|
2. | Select the View tab, Sort, Sort By to display the Sort dialog box.
|
3. | You
can sort a maximum of three fields, using the Sort By, Then By, and
Then By fields. Enter the first sort fields in the Sort By box. In the
example shown in Figure 8.15,
the field is the Type field. Use the drop-down arrow to display the
list of fields. Type the first letter of the field name (in this case, T), and Project highlights the first field that begins with that letter. Scroll down and select the Type field.
|
4. | Click
the Ascending button if you want the field sorted in normal order. In
this example, you click the Descending button to list work before
material resources.
|
5. | In the first Then By box, select the Name field.
|
6. | Select Ascending to sort the names in normal order.
|
7. | Select
the Permanently Renumber Resources check box if you want Project to
change all ID numbers to match the new sort order. See the following
Caution box if you elect to fill this check box.
Caution If you fill the Permanently
Renumber Resources check box in a sort operation, as soon as the sort is
completed, you should immediately open the Sort dialog box again, click
the Reset button, and then click Sort. The Reset button disables the
Permanently Renumber Resources option and sets the sort key to ID, and
does not interfere with the initial sort you just completed. If you do
not take this extra step, the Permanently Renumber check box remains
filled, and every future sorting using the Sort submenu renumbers your
resources until you clear the box. Also, future sorting of tasks
permanently renumbers the tasks. If you decide to
cancel a sort operation and you have already filled the Permanently
Renumber Resources check box, be sure to clear the check box (or click
the Reset button, which also clears it) before clicking the Cancel
button. |
|
8. | If
you have combined several project files into a consolidated display,
you can select the Sort Resources By Project box to keep the resources
for each project together and sort them within that grouping.
Tip If you have done a custom sort
previously in the same session and used three sort keys, click the Reset
button to clear the extra (second and third) sort keys if you no longer
need them. |
|
9. | When
all settings are ready, click the Sort button to execute the sort and
close the dialog box. Or, click the Cancel button to close the dialog
box without sorting the resources.
|
Note
You
can undo a sort operation, even after you permanently renumber the
resources. However, you must undo the sort operation before you make any
other changes. Just as a precaution, it is wise to save a copy of the
file before permanently renumbering the resources, just in case you want
to undo it later. You can put the rows back into
the order in which they were originally entered by sorting the Unique ID
field. This action puts the rows back in their original order. |
To return the list to the ID order, you can either
press Shift+F3 (which cancels the current sort order) or choose Project,
Sort, ID from the menu.
Tip
Press Ctrl+Shift+F3 to reapply
the last sort instructions. This is in case you have sorted the resource
list in a special order and have made changes that might make the order
of the resources no longer fit the sort order you defined. For example,
if you sorted by resource type and cost and then you make task
assignments or change some resource cost rates, the list might no longer
be in descending cost order within each type. You can press
Ctrl+Shift+F3 to sort by type and cost again. |
Note
If you frequently use a
custom sort order and would like to place it on the Sort submenu, you
can create a macro and customize the Sort menu to include that sort
order. |