Like its sibling, Excel 2007 received some
considerable grief when it was unleashed to an unsuspecting public. Those who
used Word just grumbled about the horrible Ribbon UI, and the fact that it
looked different; however, those who used Excel on a regular basis suddenly
found themselves staring at the screen and not knowing quite what to do.
Everything seemed to have been moved, macro’s stopped working and the layout
all added to the utter confusion.
Saying that, though, we’re a hardy bunch,
and the office workers of 2007 knuckled down and re-learned their way around
Microsoft’s spreadsheet application. Good for them! Although I, like every good
manager, admittedly allocate responsibility for all things Excel onto my poor
wife, there’s really little excuse not to get to grips with some worthy tips,
tricks and tweaks for Excel 2007.
Manual Calculations
Excel is rather like that clever kid at
school, you know, the one who could sums in his (or her) head and somehow
manage to keep the answers there without being distracted by a passing seagull.
Nevertheless, there are times when even Excel can get its knickers in a twist,
those times usually being when there’s thousands of calculations going on in
real time; after a while the grind begins to show, and Excel slows to the
mathematical skills of a three year old. The solution to this is to disable
automatic calculation, and here’s how:
Click on the ‘Formulas’ tab in the Ribbon.
In the ‘Calculation’ section, click on the down arrow under ‘Calculation
Options’. In the drop-down menu, select ‘Manual’.
When you input data, you will now have to
press ‘F9’ to update the calculations, and Excel will have a sudden spurt of
life.
Copy As Picture
Copying a chart, graph or a set of cells to
an application outside of Excel can have some disastrous effects. Formatting
goes all wonky (a technical term), the sections of the nicely presented 3D pie
chart end up looking like the left-over’s from the Micro Mart lunch trolley and
you begin to foam at the mouth. Never fear, though, simply consider copying the
item as a picture instead.
Select the chart, graph or cell range. In
the ‘Home’ tab, click the down arrow under ‘Paste’. Scroll down the drop-down
menu until you reach ‘As Picture’, then extend the sub-menu and select ‘Copy As
Picture’.
You can now paste into other applications
without fear of bringing down the wrath of the formatting god.
A Change of Order
Normally, when entering data into Excel
after pressing the Enter key, you move down to the cell below. This is great
for when you’re entering data in a column, but what about when you need to
enter data in rows?
Click the Office button (the round button
in the top left). Click on the ‘Excel Options’ button at the bottom of the new
window. Click the ‘Advanced’ link, and using the drop-down menu under the first
item, ‘After pressing Enter, move selection Direction’, choose from Up, Down,
Left or Right.
Custom Autofill
The Autofill function is great for
completing rows or columns of sequential data; simply enter the first two
values into the initial cells, select the cells and drag the fill handle to
extend the rest of the cells. But, instead of just 1, 2, 3, and so on, you can
add your own custom lists by doing the following:
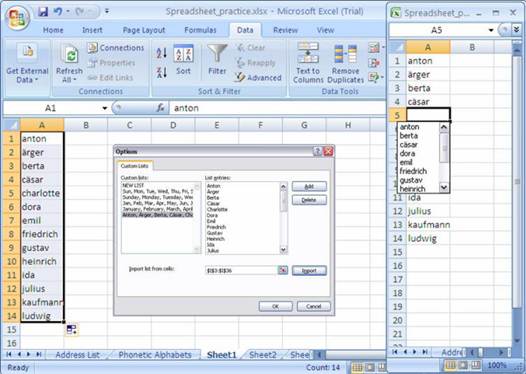
Again, click the Office button, followed by
‘Excel Options’ at the bottom. Select the ‘Popular’ link, and in the first
section click on the ‘Edit Custom Lists...’ button. Select ‘New List’ from the
left window, and click in the ‘List entries’ box.
Start typing your new sequence, pressing
Enter after each entry. When you’ve finished, click on the ‘Add’ button,
followed by ‘OK’
There you have it, a custom sequential
Autofill list, ready for you to use.
Creating A Named Range
You can quickly create a named range for a
group of cells by doing the following: Highlight the cells you want named and
click in the left of the Formula bar, and start typing in a name for the range.
The named range for those group of cells is
now assigned and can be called via macro, or other function.
Developer Ribbon
If you’re into playing around with macro’s
and form authoring tools, then you’re going to need to activate the Developer
Ribbon. It’s really easy to do, and offers a wealth of otherwise hidden
options. Here’s how:
Click on the Office button, followed by
‘Excel Options’. Select the ‘Popular’ link, and in the first section, tick the
‘Show Developer tab in the Ribbon’ box.
And there you have it, the Developer
Ribbon, containing Form Controls, ActiveX Controls, XML Source and a Visual
Basic Editor. Not for the faint of heart, but interesting nonetheless.
Add Hidden Features To The Quick Access
Toolbar
Excel has a number of extra hidden features
that are, by default, invisible to the Quick Access Toolbar - which is that bit
along the very top of the Excel window. To include any, or all, of these hidden
features, do the following:
Click on the Office button, followed by
‘Excel Options’, then select the ‘Customize’ link (American spelling, I know!).
In the drop-down menu, ‘Choose commands
from’, select ‘Commands not in the Ribbon’ and pick the commands you’d like to
include in you customization, followed by the ‘Add’ button in the middle of the
two screens.
Besides creating new icons on the Quick
Access Toolbar, adding these can help improve your productivity somewhat. Or,
at the very least, give you access to a more personalized Excel experience.
Clipboard Pane
Another helpful boost for productivity is
activating the Office Clipboard Task Pane. Once launched, it sits in the left
hand side of the Excel window and gives you access to the entire contents and
history of the clipboard, which is handy for multiple copy and pastes.
Select the ‘Home’ tab in the Ribbon then,
in the ‘Clipboard’ section, click on the little diagonal arrow, located in the
bottom right of the section. This will launch the Clipboard Pane and give you
access to the set of options that lie within.
Excel At Spreadsheet Creation
As with all the office products, there are
volumes of weighty tomes devoted to the ins and outs of the various features
and offering extensive ‘how to’ guides. If you’re interested consider having a
look at the likes of Step by Step Office Excel 2007 from Microsoft, or the
Excel 2007 Bible by John Walkenbach. Both are available from Amazon, or any
high street bookshop, and contain many useful guides and advice.
Other than that, go for good old trial and
error, and the ever helpful, Google search. mm
Keyboard Shortcuts
Nothing impresses an onlooker like whizzing
through the functions of Excel using only the keyboard. Of course, it also
usually means you’ll end up being given more work, since you’re so cocky and
you appear to know what you’re doing. Never mind, though. Here are a number of
useful keyboard shortcuts, courtesy of Microsoft’s wonderful employees, that
are guaranteed to get you noticed around the office. Maybe.
|
Ctrl+Shft+(
|
Unhides any hidden rows within the
selection
|
|
Ctrl+Shft+)
|
Unhides any hidden columns within the
selection
|
|
Ctrl+Shft+&
|
Applies the outline border to the
selected cells
|
|
Ctrl+Shft_
|
Removes the outline border from the
selected cells
|
|
Ctrl Shft ~
|
Applies the General number format in
Microsoft Excel
|
|
Ctrl+Shft+$
|
Applies the Currency format with two
decimal places (negative numbers in parentheses)
|
|
Ctrl+Shft+%
|
Applies the Percentage format with no
decimal places
|
|
Ctrl+Shft+^
|
Applies the Exponential number format
with two decimal places
|
|
Ctrl+Shft+#
|
Applies the Date format with the day,
month, and year
|
|
Ctrl+Shft+!
|
Applies the Number format with two
decimal places, thousands separator, and minus sign (-) for negative values
|
|
Ctrl+Shft+*
|
Selects the current region around the
active cell (the data area enclosed by blank rows and blank columns). In a
PivotTable, it selects the entire PivotTable report
|
|
Ctrl+Shft+:
|
Enters the current time
|
|
Ctrl+Shft+”
|
Copies the value from the cell above the
active cell into the cell or the Formula Bar
|
|
Ctrl+Shft+Plus (+)
|
Displays the Insert dialogue box to
insert blank cells
|
|
Ctrl+Minus (-)
|
Displays the Delete dialogue box to
delete the selected cells
|
|
Ctrl+;
|
Enters the current date
|
|
Ctrl+`
|
Alternates between displaying cell values
and displaying formulas in
the worksheet
|
|
Ctrl+'
|
Copies a formula from the cell above the
active cell into the cell or
the Formula Bar
|
|
Ctrl+1
|
Displays the Format Cells dialogue box
|
|
Ctrl+2
|
Applies or removes bold formatting
|
|
Ctrl+3
|
Applies or removes italic formatting
|
|
Ctrl 4
|
Applies or removes underlining in
Microsoft Excel
|
|
Ctrl+5
|
Applies or removes strikethrough
|
|
Ctrl+6
|
Alternates between hiding objects,
displaying objects, and displaying placeholders for objects
|
|
Ctrl+8
|
Displays or hides the outline symbols
|
|
Ctrl+9
|
Hides the selected rows
|
|
Ctrl+0
|
Hides the selected columns in Microsoft
Excel
|