IT tutorials
 
Technology
 

Microsoft Lync Server 2010 : Enterprise Voice - Call Admission Control (part 1) - Bandwidth Policy Profiles , Associate Bandwidth Policy Profile

8/28/2013 11:37:41 AM
- Free product key for windows 10
- Free Product Key for Microsoft office 365
- Malwarebytes Premium 3.7.1 Serial Keys (LifeTime) 2019

After network regions, sites, and subnets have been created, Call Admission Control can be configured and enabled. Be sure to create all the necessary objects prior to proceeding with the Call Admission Control configuration. Call Admission Control enables clients to determine whether an audio or video call can actually be established based on available network bandwidth.

1. Bandwidth Policy Profiles

After creating the required network objects, the next step in configuring Call Admission Control is to create bandwidth policy profiles. Each bandwidth policy profile defines the total bandwidth limit for a site or region and the bandwidth limit per session for both audio and video.

Use the following steps to create a new bandwidth policy profile:

1.
Open the Lync Server 2010 Control Panel.

2.
Click Network Configuration.

3.
Click Policy Profile.

4.
Click the New button.

5.
Enter a Name for the profile. Usually this is indicative of the link speed of the network to which it is applied.

6.
Enter an Audio limit in kbps. This is the cumulative limit of all audio sessions.

7.
Enter an Audio session limit in kbps. This is the limit applied to each audio session.

8.
Enter a Video limit in kbps. This is the cumulative limit of all video sessions.

9.
Enter a Video session limit in kbps. This is the limit applied to each video session.

10.
Enter a Description for the bandwidth policy profile.

11.
Click Commit.

Alternatively, a new bandwidth policy profile can be created using the Lync Server Management Shell:

New-CSBandwidthPolicyProfile –Identity <Name of profile> -Description
<Profile description> -AudioBWLimit <Total audio limit in kbps>
-AudioBWSessionLimit <Audio limit per session in kbps> -VideoBWLimit <Total
video limit in kbps> -VideoBWSessionLimit <Video limit per session in kbps>

2. Associate Bandwidth Policy Profile

After creating the required bandwidth policy profiles, they must be associated with network sites. To use the Lync Server Control Panel to perform this task, use the following steps:

1.
Open the Lync Server 2010 Control Panel.

2.
Click Network Configuration.

3.
Click Site.

4.
Highlight an existing site, click the Edit button, and select Show Details.

5.
Select a Bandwidth policy from the selection box.

6.
Click Commit.

7.
Repeat these steps to associate each site with a bandwidth policy profile. Figure 1 shows a sample bandwidth policy based on a 5 Mb WAN link.
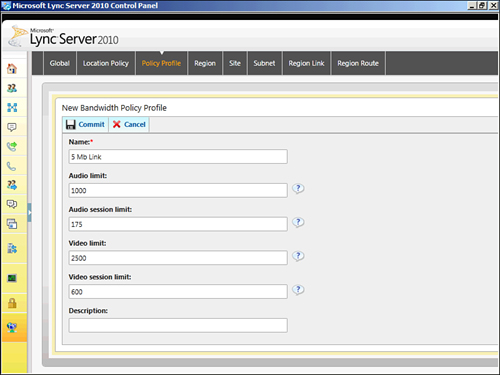
Figure 1. Bandwidth Policy Profile

Alternatively, to use the Lync Server Management Shell to associate a bandwidth policy profile with a site, use the following:

Set-CSNetworkSite –Identity <Network Site Name> -BWPolicyProfileID <Bandwidth
policy profile ID>
 
Others
 
- Microsoft Lync Server 2010 : Enterprise Voice - Network Configuration - Network Regions, Network Sites, Network Subnets
- Microsoft Lync Server 2010 : Enterprise Voice - Voice Features - Call Park, Unassigned Numbers
- Microsoft Lync Server 2010 : Enterprise Voice - Publishing Changes
- Exchange Server 2010 : Managing User Accounts and Mail Features (part 6) - Changing a User's Web, Wireless Service, and Protocol Options
- Exchange Server 2010 : Managing User Accounts and Mail Features (part 5) - Adding Mailboxes to Existing Domain User Accounts
- Exchange Server 2010 : Managing User Accounts and Mail Features (part 4) - Understanding Logon Names and Passwords - Creating Domain User Accounts with Mailboxes
- Exchange Server 2010 : Managing User Accounts and Mail Features (part 3) - Understanding Logon Names and Passwords - Creating Mail-Enabled User Accounts
- Exchange Server 2010 : Managing User Accounts and Mail Features (part 2) - Finding Existing Mailboxes, Contacts, and Groups
- Exchange Server 2010 : Managing User Accounts and Mail Features (part 1) - Accessing and Using the Exchange Control Panel
- Exchange Server 2010 : Understanding Users and Contacts, Understanding the Basics of E-Mail Routing
 
 
Top 10
 
- Microsoft Visio 2013 : Adding Structure to Your Diagrams - Finding containers and lists in Visio (part 2) - Wireframes,Legends
- Microsoft Visio 2013 : Adding Structure to Your Diagrams - Finding containers and lists in Visio (part 1) - Swimlanes
- Microsoft Visio 2013 : Adding Structure to Your Diagrams - Formatting and sizing lists
- Microsoft Visio 2013 : Adding Structure to Your Diagrams - Adding shapes to lists
- Microsoft Visio 2013 : Adding Structure to Your Diagrams - Sizing containers
- Microsoft Access 2010 : Control Properties and Why to Use Them (part 3) - The Other Properties of a Control
- Microsoft Access 2010 : Control Properties and Why to Use Them (part 2) - The Data Properties of a Control
- Microsoft Access 2010 : Control Properties and Why to Use Them (part 1) - The Format Properties of a Control
- Microsoft Access 2010 : Form Properties and Why Should You Use Them - Working with the Properties Window
- Microsoft Visio 2013 : Using the Organization Chart Wizard with new data
Technology FAQ
- Is possible to just to use a wireless router to extend wireless access to wireless access points?
- Ruby - Insert Struct to MySql
- how to find my Symantec pcAnywhere serial number
- About direct X / Open GL issue
- How to determine eclipse version?
- What SAN cert Exchange 2010 for UM, OA?
- How do I populate a SQL Express table from Excel file?
- code for express check out with Paypal.
- Problem with Templated User Control
- ShellExecute SW_HIDE
programming4us programming4us