1. Starting a Conference
Web conferences can be initiated either through the direct sharing
of a monitor or by scheduling a meeting and including a web conference.
However, the simplest way to initiate a conference is through the Meet
Now option.
In the top menu of the Lync client, when you click Meet Now, the
following three options for joining an Audio meeting are offered:
• Do not join audio
• Use Lync (integrated audio and video)
• Call me at:
This creates a conference with only the initiating user in it. From here, use the People menu to perform the following tasks:
• Invite by Name or Phone Number
• Invite by Email
• Mute Audience
• Make Everyone an Attendee
• Play Entry and exit Announcements
• Remove Everyone and End Meeting
When inviting by name or phone number, Lync displays the existing
contacts to simplify adding an attendee who is already known to the
meeting organizer. Highlighting the contact and clicking OK sends an
invite to the contact. The person is notified by a pop-up box and can
opt to either join the conference or set her status to Do Not Disturb.
From this point, the normal IM, audio, video, and application sharing
functions are available. If authorized to do so, attendees can also
send invitations to the conference.
2. Adding a Web Conference to a Meeting
Most commonly, people add web conferences through Lync Server 2010
to meeting invitations. You can either initiate this through the Lync
client, by right-clicking a contact and choosing Schedule a Meeting, or
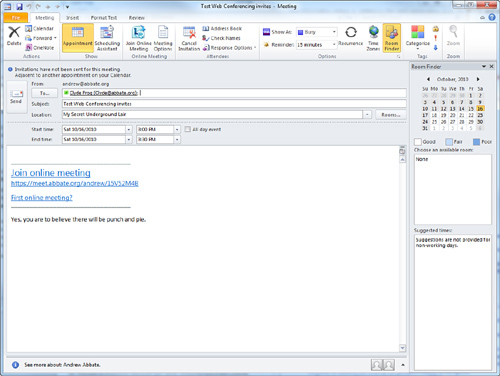
by creating a normal meeting invite through Outlook and clicking the
Online Meeting button. Clicking this button adds a link to the invite
to allow recipients to join the online meeting as shown in Figure 1.
Figure 1 The Call Window
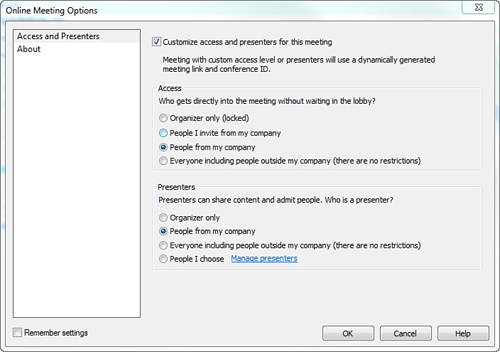
Clicking the Meeting Options button enables you to configure
behaviors for dealing with meeting access and identifying who can be a
presenter, as shown in Figure 2.
Figure 2. Access and Presenters
After it is sent, the meeting request appears in the recipient’s
mailbox where it can be accepted. Opening the calendar item, the user
is able to click the web link for the meeting.
Note
Note that the link received points to Meet.domain.com/sender/meetingID. This means that if you haven’t created an A record or a CNAME for “meet” yet, your link does not work.
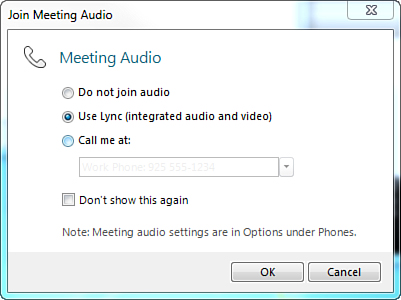
When the link is clicked, the client is presented with options for how to join the audio conference:
• Do not join audio
• Use Lync (integrated audio and video)
• Call me at:
Although any of the options are valid, for this example, select Use Lync and click OK as shown in Figure 3.
Figure 3 Choosing Audio and Video
From here, the familiar Lync window displays
that shows the conference call is starting. In the top of the window is
a link for Join Information and Meeting Options. Clicking this link
identifies the Conference ID and the Meeting link. This can be sent to
additional attendees that you want to add after the fact. There are
also two buttons:
• Copy All Information—This places the information on the screen into the clipboard where it can be later pasted into some other program.
• Meeting Options—This
enables participants to view the Access and Presenter information that
was set easier for the meeting. The meeting creator can use this button
to modify the access and presenter settings after the meeting has
already started.
3. Sharing Information in a Meeting
With the web conference up and running, participants who were
allowed to become presenters based on the meeting options can use the
Share tab in the Lync client to add resources to the conference. These
options include
• Main Monitor
• Secondary Monitor
• All Monitors
• Program
• PowerPoint Presentation
• New Whiteboard
• New Poll
When a presenter chooses to share something, the stage displays for
all users. If your client doesn’t list Main, Secondary, and All
monitors, it’s likely because you have only one monitor, in which case
these options are replaced with Desktop.
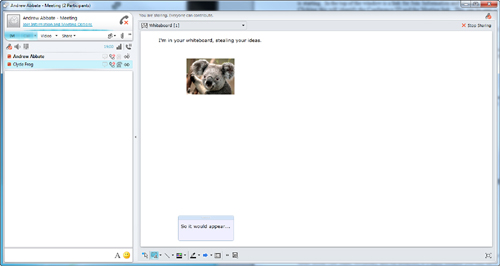
Sharing something, such as the Whiteboard, enables participants to
type into text boxes as well as to draw or to place images into the
Whiteboard, as shown in Figure 4.
Figure 4. Using the Whiteboard
Sharing monitors or applications enables participants to
follow along with what the presenter views. This makes it easy for
participants to see what you are talking about on the audio portion of
the conference. Choosing to share a program gives presenters a view
into which programs are currently running on their system. When they
choose a program to share, they receive a warning making sure they know
that everyone else is about to see what they are sharing. This warning
helps ensure that you’ve picked the correct application.