After you’ve set up one or more
websites—either by adding folders to the Windows Home Server default
website or by creating your own websites using the IIS Manager—you may
need to adjust certain site properties. For example, you may need to
change the website identification (IP address, port number, or host
header), modify the website location, adjust the site permissions, and
so on. All of these options and many more are available using the
website’s property sheet. The next few sections take you through some
of the more common and useful properties.
1. Modifying the Website Bindings
If you’ve added your own website to IIS, you may
need to adjust the site bindings, which include the IP address, port
number, and host header. You can modify one or more of these bindings.
Here are the steps to follow:
1. | Log on to Windows Home Server and launch IIS Manager.
|
2. | Open the SERVER, Sites branch (where SERVER is the name of your Windows Home Server PC).
|
3. | Click the website you want to work with.
|
4. | In the Actions pane, click Bindings to open the Site Bindings dialog box.
|
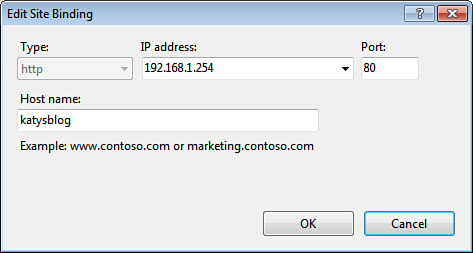
5. | Select the current binding, and then click Edit. The Edit Site Binding dialog box appears, as shown in Figure 1.
|
6. | Use one or more of the following techniques to modify the website identity:
- To change the site’s IP address, use the IP Address list to
select a different address that has been assigned to Windows Home
Server.
- To change the site’s port, use the Port text box to specify a different port number.
Caution
If
you assign the site a new port, you also need to set up a Windows
Firewall exception on Windows Home Server to allow data through that
por. If you or others will be accessing the site
from the Internet, be sure to configure your router to forward the port
to the site’s IP address.
- To change the site’s host header, type the new host header in the Host Name text box.
Caution
If you give the site a new host header, you must modify the hosts file to map the host header to the site’s IP addressr.
|
7. | Click OK.
|
8. | Click Close to put the new identity into effect.
|
2. Giving a Website Multiple Identities
There’s no rule that says a website must use only a
single identity. In fact, you can assign as many separate identities as
you like to a single website. These identities can be any combination
of IP address, TCP port, and host header, although each combination
must be unique.
Why use multiple identities for a single website?
One common reason is that you want to change the site’s current
identity, but you don’t want to go through the hassle of letting other
users know about the change (or reconfiguring their PCs to handle the
change). In this case, you can leave the existing identity intact so
that users who know that identity can still use it. You can then create
a second identity and supply that identity to any new users who need to
access the site.
Here are the steps to follow to add another identity to a website:
1. | Launch IIS Manager.
|
2. | Open the SERVER, Sites branch (where SERVER is the name of your Windows Home Server PC).
|
3. | Click the website you want to work with.
|
4. | In the Actions pane, click Bindings to open the Site Bindings dialog box.
|
5. | Click Add. The Add Site Binding dialog box appears.
|
6. | Use one or more of the following techniques to set up the new website identity:
- Use the IP Address list to select an address that has been assigned to Windows Home Server.
- Use the Port text box to specify a port number.
Caution
If you assign the site a port other than 80, you
also need to set up a Windows Firewall exception on Windows Home Server
to allow data through that port. If you or others will be accessing the site
from the Internet, be sure to configure your router to forward the port
to the site’s IP address.
- Use the Host Name text box to type the site’s host header.
Caution
If you give the site a host header, you must modify the hosts file to map the host header to the site’s IP address
|
7. | Click OK.
|
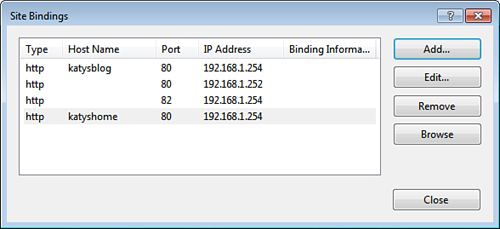
8. | Click Close to put the new identity into effect. Figure 2 shows a site with several identities.
|