3. Consuming ADO.NET Data Services in Silverlight
In order to test ADO.NET services in a Silverlight
XAP, go ahead and create a Visual Studio 2010 Empty SharePoint Project
called SLRESTApp. This project can be
a sandbox solution because all it will do is deploy a XAP file to the
content database. Even though the XAP file itself was deployed as a
sandbox solution, the XAP however, can make WCF calls to the server to
the same server. The XAP could also make calls to a different web
server, as long as cross-domain policy allows it. To read more about
cross-domain policy, and Network Security access restrictions in
Silverlight, please see http://msdn.microsoft.com/en-us/library/cc645032(VS.95).aspx.
Also, note that with Silverlight 4.0, you have the ability of creating
trusted out of browser Silverlight applications, which can do even
crazier things such as instantiate word objects on the client machine.
Even they can be deployed as sandbox solutions. Remember, the purpose of
sandbox solutions is to keep the server safe! Deploying trusted
out-of-the-browser Silverlight applications is something sandbox
solutions can easily do.
Also add the new Silverlight project called SLRest
inside your solution. Because I will be deploying and debugging this
inside of SharePoint, I didn't create a new web site for testing the
Silverlight app. However , I did copy over the XAP file into a module in the
SLRESTApp. I named the Module SilverlightModule. Also ensure that the
SLRest.xap file is included in the SLRESTApp project's SilverlightModule
module. This will ensure that the SLRest.xap file gets deployed to the
SharePoint content database.
My postbuild action command on the SLRest project is shown here:
copy $(TargetDir)\SLRest.XAP $(SolutionDir)\SLRESTApp\SilverlightModule
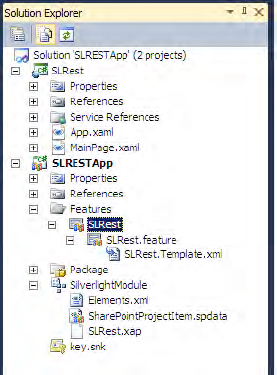
Finally rename the automatically added feature to SLRest. My final project structure looks like Figure 8.

With your basic project structure set up, now we're
ready to start writing Silverlight code that consumes ADO.NET Data
Services. As in the console application earlier, add a service reference
to http://sp2010/_vti_bin/listdata.svc. Name this reference RESTReference.
With the project structure fully set, we can finally
begin writing some Silverlight code. Edit the grid in the MainPage.xaml
as shown in Listing 3.
Example 3. MainPage.xaml for the SLRest App
<Grid x:Name="LayoutRoot" Background="White">
  <Grid.ColumnDefinitions>
    <ColumnDefinition Width="*"/>
    <ColumnDefinition Width="80"/>
  </Grid.ColumnDefinitions>
  <ListBox Grid.Column="0" x:Name="songsList">
    <ListBox.ItemTemplate>
      <DataTemplate>
        <TextBlock Text="{Binding Path=Title}"/>
      </DataTemplate>
    </ListBox.ItemTemplate>
  </ListBox>
  <StackPanel Orientation="Vertical" VerticalAlignment="Center" Grid.Column="1" Margin="10 0
10 0">
    <Button x:Name="queryItems" Content="Query" Margin="0 10 0 10" Click="queryItems_Click"/>
    <Button x:Name="insertItem" Content="Insert" Margin="0 10 0 10" Click="insertItem_Click"/>
    <Button x:Name="deleteItem" Content="Delete" Margin="0 10 0 10" Click="deleteItem_Click"/>
  </StackPanel>
</Grid>
|
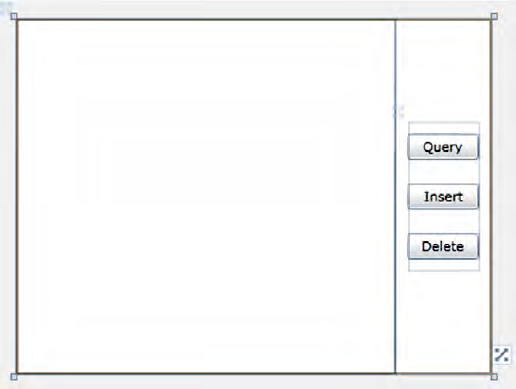
This will cause the user interface to look like Figure 9.

By clicking the query button, I will fill the list
box with some data. So let's look at the method handler for the query
portion first. This method handler can be seen in Listing 4. Also note that in Listing 4, the "Test" part of TestDataContext is the title of the site you are targeting; yours might be different.
Example 4. Silverlight Code Used to Query Data from ADO.NET Data Services
private void queryItems_Click(object sender, RoutedEventArgs e)
{
  TestDataContext ctx = GetContext();

  var songsQuery = (from item in ctx.Songs
           where item.Artist.Title == "George Michael"
           select item) as DataServiceQuery<SongsItem>;

  songsQuery.BeginExecute(
    (IAsyncResult asyncResult) => Dispatcher.BeginInvoke(() =>
      {
        songsList.ItemsSource = songsQuery.EndExecute(asyncResult);
      }), songsQuery
    );
}
|
I'm creating a new TestDataContext. GetContext is a static method:
private static TestDataContext GetContext()
{
  TestDataContext ctx =
    new RESTReference.TestDataContext(
    new Uri("http://sp2010/_vti_bin/listdata.svc"));

  return ctx;
}
Then I write a simple LINQ query to query all artists
with title = "George Michael". So far, it is absolutely the same as the
.NET console application written earlier. But now is when things become
different. In a Silverlight app, I need to execute the query
asynchronously. Thus I execute that query asynchronously and I bind
results to the list box. In order to get the actual results, I need to
call the EndExecute method. You can see the data binding syntax in Listing 5-19.
Go ahead and build and deploy the Silverlight application to
SharePoint, and use the out-of-the-box Silverlight WebPart to host the
XAP file. You should see the Silverlight application running in
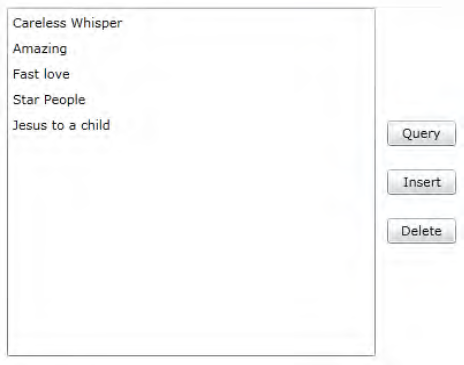
SharePoint as shown in Figure 10.

Next let's examine the code for inserting a new item. The code for inserting a new item can be seen in Listing 5.
Example 5. Code for Inserting a New Item Using ADO.NET Data Services
private void insertItem_Click(object sender, RoutedEventArgs e)
{
  TestDataContext ctx = GetContext();
  ctx.AddToArtists(
    new ArtistsItem() { Title = "Aerosmith" }
    );
  ctx.BeginSaveChanges(
    (IAsyncResult asyncResult) => Dispatcher.BeginInvoke(() =>
      {
        MessageBox.Show("New Artist Saved");
      }), null
    );
}
|
Just as before, the code is exactly the same as the
.NET console application. The only difference is that the code is being
executed asynchronously because we are running in Silverlight. For
brevity I'm skipping mentioning the details being captured in Fiddler.
You should however have Fiddler running when you're done this example,
and you should examine the data being sent and received from SharePoint.
Finally let's give a quick examination to the delete code. The code for deletion can be seen inListing 6.
Example 6. Code to Delete an Artist Using ADO.NET Data Services
private void deleteItem_Click(object sender, RoutedEventArgs e)
{
  TestDataContext ctx = GetContext();

  var aeroSmithArtistQuery = (from artist in ctx.Artists
                where artist.Title == "Aerosmith"
                select artist) as DataServiceQuery<ArtistsItem>;

  aeroSmithArtistQuery.BeginExecute(
      (IAsyncResult asyncResult) => Dispatcher.BeginInvoke(() =>
      {
        var aeroSmithArtist =
          aeroSmithArtistQuery.EndExecute(asyncResult);
        ctx.DeleteObject(aeroSmithArtist.First());
        ctx.BeginSaveChanges(
          (IAsyncResult asyncResult2) => Dispatcher.BeginInvoke(() =>
          {
            MessageBox.Show("Artist Deleted");
          }), null
          );
      }), aeroSmithArtistQuery
    );
}
|
As before, deletion will require you to fetch the
entity you wish to delete first. Also you need to fetch this entity
asynchronously. The process of fetching this entity is exactly the same
as the process of querying that you've already seen. Once this entity
has been fetched, you will need to call the DeleteObject method, and
execute another call to SharePoint and call the BeginSaveChanges method
to persist the changes back into SharePoint.