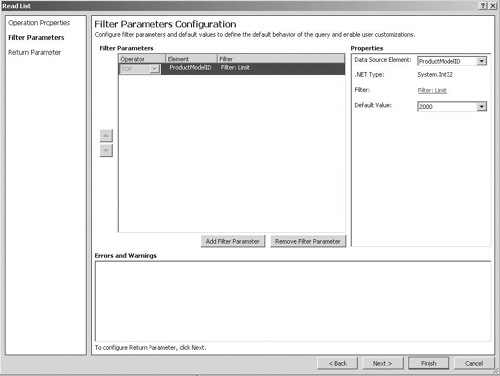
Add a Limit Filter
To add a limit filter, click the Add Filter Parameter button. A new filter will be added to the list of Filter Parameters.
From
the Data Source Element drop-down, select the field that contains the
data to be filtered. In this case, it doesn’t matter which column we
select since we’re applying a limit filter. Leave the default of
ProductModelID selected.
Next to Filter, click the Click To Add hyperlink to display the filter configuration dialog.
In the New Filter text box, enter Limit Filter
as the name. Select Limit from the Filter Type drop-down and
<<None>> from the Filter Field drop-down. Click OK to
create the filter.
In the Properties section of the Filter Parameters Configuration page, in the Default Value combo box, enter 2000 as the default. The completed page should look as illustrated next:
Click
Next to move on to the Return Parameter Configuration step. You’ll
notice that this page is similar to the Return Parameter page used when
creating a SpecificFinder method. However, there is one significant
difference: the inclusion of the Show In Picker checkbox in the
properties for each field. As you’ll see later, the External Data
Picker control allows the user to search for an item from an external
data source. Selecting the Show In Picker flag will include the
associated field as a column in the results displayed in the External
Data Picker control. Set the Show In Picker flag for the Name field
only. Click Finish to complete the wizard.
Tip
By default, none of the fields have Show In Picker
selected. Since the External Data Picker doesn’t know which fields to
include, it simply includes all of them. A much better user experience
can be gained by displaying only useful columns in the picker control.
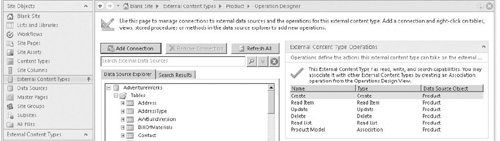
Create All Operations
We’ve now added the minimum operations required to
generate an external list. If we generate a list using only these
operations, users will be able to view data in a list but will not be
able to add, edit, or delete since we haven’t defined those operations.
We
manually created the Finder and the SpecificFinder to give us a chance
to review the various configuration options. Thankfully, in the real
world, you don’t need to go through the same steps for each operation;
you can simply select Create All Operations from the context menu. A
wizard will automatically generate the required operations to allow
users to read and write to the external data store.
Use
the Create All Operations wizard to add additional operations to the
Model content type. Once the wizard has completed, delete both the Read
Item 2 operation and the Read List 2 operation since these are
duplicates of the operations that we manually created. When using
SharePoint Designer, items can be deleted using the Remove command.
Save the changes by clicking the Save icon in the upper-left corner of the window.
Create an External List
Select the Model External Content Type, and then click the Create Lists & Form button in the ribbon.
In the dialog that appears, make sure that Create New External List is selected.
In the List Name text box, enter Product Models.
Read Item Operation should be set to Read Item and System Instance
should be set to AdventureWorks. You can add a List Description if
you’re feeling particularly conscientious.
Click OK to create a new external list based on our Model External Content Type.
Once the list has been created, navigating to
http://localhost/Chapter15 will show a link to the new list on the left
side of the page. When you open the list, you can see that it’s
populated with data from our AdventureWorks database, as expected.
Since the list is rendered directly from the
AdventureWorks database whenever the page is loaded, any changes made
in the database will have immediate effect. By the same token, any
changes made in SharePoint are applied directly to the database.
Create an Associated External Content Type
Now that you’re familiar with the tools used to
create external content types, you’re ready to create another external
content type for product information. Then we’ll define a parent-child
relationship between our new Product content type and our existing
Model content type.
Follow
the steps detailed earlier to create a new external content type named
Product based on the AdventureWorks Product table. Rather than manually
configuring each operation, select Create All Operations from the
context menu to allow the wizard to do most of the work. This time flag
the Name and ProductNumber fields to appear in the picker. Remember to
include a Limit filter to restrict the number of rows returned.
In
the Operations Design View, right-click the Product table to show the
operations context menu. This time, select New Association to create an
association between this entity and our Model entity.
In
the Association wizard, change the Association Name and the Association
Display Name to Product Model. The Association Display Name is shown in
any form as the label for the External Data Picker control.
Click
the Browse button and in the dialog that appears, select Model. When an
entity is selected, its identifiers are listed in the Related
Identifier column. To the right is a Field column that contains
drop-down lists, where we can select the field in our content type that
maps to the identifier in the associated entity. In effect, the Related
Identifier column contains the primary key columns of the entity that
we’re associating with, and by selecting a matching field in our
entity, we’re creating a foreign key relationship.
Click
Next to proceed to the Input Parameters page. Even though in the
preceding step we defined the relationships between the entities, in
the Input Parameters page we have to select the foreign key field from
the list of Data Source Elements, and then check the Map To Identifier
checkbox to create the foreign key relationship physically. Click
Finish to complete the wizard. The list of external content type
operations should be populated, as shown here: