2. Manual Installation
Although
manual client installation is probably not the method you will use to
install all clients, it is a method that all environments will use,
most often in service desk or on-site support scenarios. Having a
well-documented process for reinstalling a ConfigMgr client is
essential.
First, you must locate the installation files. By default, you will find these files in the %ProgramFiles%\Microsoft
Configuration Manager\Client folder. CCMSetup.exe is the file you will
use to initiate the installation, and depending on the operating system
version, additional windows components (XML Parser, Windows Update
Agent, BITS, and so on) are installed from this folder. ConfigMgr
requires these additional components for a healthy client. Fortunately,
you don’t have to manage the installation of each of these components.
There are three primary methods to install the client manually:
The
most basic method to install the ConfigMgr client is to copy the entire
Client folder (and subfolders) to the local system and then launch
CCMSetup.exe from the local drive. By using this method, CCMSetup
automatically obtains the dependent source files from the local source.
Alternatively, you could map a drive to a remote server and run
CCMSetup. Typically, running CCMSetup from a UNC path will be
unsuccessful.
Execute CCMSetup.exe (either remote or local) and specify the /source:
command-line switch. For example, if you have a share named
\\TUMBLEWEED\ConfigMgrClient that contains the client installation
files, you could execute the following statement:
\\TUMBLEWEED\ConfigMgrClient\CCMSETUP.EXE
/source:"\\TUMBLEWEED\ConfigMgrClient"
You can use the /source:
switch multiple times to give CCMSetup alternative locations to
download installation files. Also, verify the user account that
launches CCMSetup.exe has read access to the share.
Execute CCMSetup.exe (either remote or local) and specify the /mp:
command-line switch with a valid management point. Note that this
switch simply specifies access to client installation source files—it
has no impact on site assignment. For example, using the same share
mentioned in the previous bullet, you could execute the following
statement:
\\TUMBLEWEED\ConfigMgrClient\CCMSETUP.EXE /mp:TUMBLEWEED.SCCMUnleashed.com
Similar to the /source: switch, the /mp: switch can be specified multiple times for alternative download locations.
Now that you have seen these three options, you may ask which one is the best. As with all things technical, it depends. The authors prefer the /mp:
switch for almost all manual installation scenarios. Using this switch
means you need access to CCMSetup.exe (and of course a healthy
management point). ConfigMgr handles the source file folder, and the
files are accessed by the client via HTTP.
3. Client Push Installation
Enable
Client Push Installation to deploy the client agent automatically to
those systems discovered and assigned to the site. Before enabling
Client Push Installation, it is highly recommended you use the Client
Push Installation Wizard for testing individual systems and individual
collections. The only configuration difference between Client Push
Installation and the Client Push Installation Wizard is the first check
box in Figure 1. Figure 2 shows the General tab of the Client Push Installation Properties dialog box.
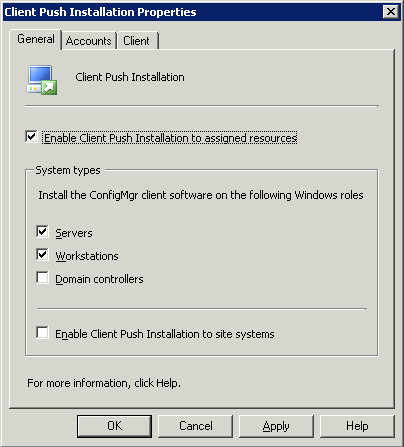
As you can see in Figure 1,
the Enable Client Push Installation to assigned resources box is
checked. When you enable this check box, you can then determine the
system types to target. Servers and workstations are enabled by
default; domain controllers and site systems are disabled. Click the
Accounts tab to configure Client Push Installation accounts, as
displayed in Figure 2.
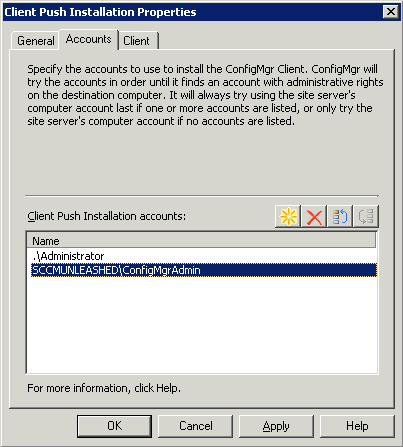
Use
the Accounts tab to add accounts to install the ConfigMgr client. To
add a local account, simply follow the same pattern shown in Figure 2. For the local administrator account, simply enter .\Administrator
and the appropriate password. Enter multiple accounts to ensure you
have at least one administrator account for each system you desire to
install. To configure installation settings, use the Client tab, as
shown in Figure 3.
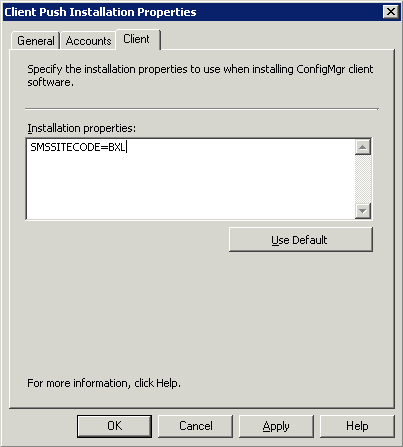
By default, the SMSSITECODE public property is visible. You can add Windows Installer command-line properties (see Table 2) to configure the client at install time. As an example, to modify the cache size, add the property SMSCACHESIZE=1024, where 1024 is the size (in MB) to configure. The ccm.log file on the site server provides client installation information.
If
the site is unable to install the client (because of rights, the system
not being on the network, and so on), the site attempts to install the
client every hour for 168 hours (1 week). See Microsoft’s document on
Client Push at http://technet.microsoft.com/en-us/library/bb632380.aspx
for additional information. Note that Client Push does not need to be
enabled to push clients, as discussed in the next section.