SHUTDOWN: Shutting Down or Restarting a Computer
You can use the SHUTDOWN command to restart
or shut down either the Windows Home Server computer or a remote
computer on your network. Here’s the syntax:
SHUTDOWN [[/R] | [/S] | [/L] | [/H] | [/I] | [/P] | [/E] | [/A]] [/F| [/T seconds]
 [/D [P:]xx:yy] [/M \\ComputerName] [/C "comment"]
| /R | Restarts the computer. |
| /S | Shuts down the computer. |
| /L | Logs off the current user immediately. |
| /H | Puts the computer into hibernation, if the computer supports hibernation mode. |
| /I | Displays the Remote Shutdown dialog box, which enables you to specify many of the options provided by these switches. |
| /P | Turns off the local computer immediately (that is, without the usual warning interval). |
| /E | Enables you to document the reason for an unexpected shutdown. (Note that this switch does not work in Windows Home Server.) |
| /A | Cancels the pending restart or shutdown. |
| /F | Forces
all running programs on the target computer to shut down without
warning. This, obviously, is dangerous and should only be used as a last
resort. |
| /D [P:]major:minor] | Specifies the reason for the shutdown. Include P: to indicate the shutdown is planned. Use values between 0 and 255 for major and between 0 and 65535 for minor. Windows Home Server also defines a number of predefined values for the major and minor parameters: |
| | major | minor | Reason |
| | 0 | 0 | Other (Planned) |
| | 0 | 5 | Other Failure: System Unresponsive |
| | 1 | 1 | Hardware: Maintenance (Unplanned) |
| | 1 | 1 | Hardware: Maintenance (Planned) |
| | 1 | 2 | Hardware: Installation (Unplanned) |
| | 1 | 2 | Hardware: Installation (Planned) |
| | 2 | 3 | Operating System: Upgrade (Planned) |
| | 2 | 4 | Operating System: Reconfiguration (Unplanned) |
| | 2 | 4 | Operating System: Reconfiguration (Planned) |
| | 2 | 16 | Operating System: Service Pack (Planned) |
| | 2 | 17 | Operating System: Hot Fix (Unplanned) |
| | 2 | 17 | Operating System: Hot Fix (Planned) |
| | 2 | 18 | Operating System: Security Fix (Unplanned) |
| | 2 | 18 | Operating System: Security Fix (Planned) |
| | 4 | 1 | Application: Maintenance (Unplanned) |
| | 4 | 1 | Application: Maintenance (Planned) |
| | 4 | 2 | Application: Installation (Planned) |
| | 4 | 5 | Application: Unresponsive |
| | 4 | 6 | Application: Unstable |
| | 5 | 15 | System Failure: Stop Error |
| | 5 | 19 | Security Issue |
| | 5 | 19 | Security Issue |
| | 5 | 19 | Security Issue |
| | 5 | 20 | Loss of Network Connectivity (Unplanned) |
| | 6 | 11 | Power Failure: Cord Unplugged |
| | 6 | 12 | Power Failure: Environment |
| | 7 | 0 | Legacy API Shutdown |
| /M \\ComputerName | Specifies the remote computer you want to shut down. |
| /T seconds | Specifies
the number of seconds after which the computer is shut down. The
default is 30 seconds, and you can specify any number up to 600. |
| /C "comment" | The comment text (which can be a maximum of 127 characters) appears in the dialog box and warns the user of the pending shutdown. This comment text also appears in the shutdown event that is added to the System log in Event Viewer. (Look for an Event ID of 1074.) |
For example, to restart the local computer in 60 seconds, use the following command:
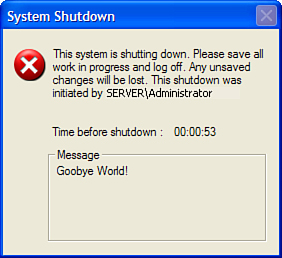
When you enter the SHUTDOWN command, a System Shutdown dialog box appears and counts down to the shutdown time (see Figure 19.4, later in this section).
To document the shutdown, add the /D and /C switches, as in this example:
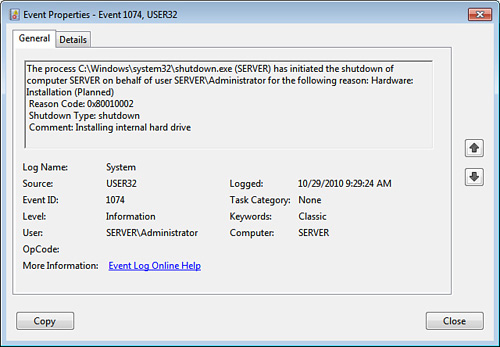
shutdown /s /d p:1:2 /c "Installing internal hard drive"
The reason code given by the /D switch and the comment specified by the /C
switch appear in the event that Windows Home Server generates for the
shutdown. You can see this event by launching Event Viewer (select
Start, Administrative Tools, Event Viewer), opening the System log, and
looking for a recent item with Event ID of 1074. Figure 1 shows an example.
To shut down or restart a remote computer, you must run SHUTDOWN using the remote computer’s Administrator account. This requires you to use the RUNAS command-line tool:
RUNAS /user:ComputerName\UserName cmd
| ComputerName | The name of the remote computer. |
| UserName | The name of the account under which you want to run cmd. |
| cmd | The command you want to run. |
For running SHUTDOWN with the /M switch, UserName will be Administrator and cmd will be the SHUTDOWN command, enclosed in quotation marks. Here’s an example that shuts down a remote computer named OFFICEPC in 120 seconds:
runas /user:officepc\administrator "shutdown /s /m \\officepc /t 120"
When you enter the RUNAS command, Windows Home Server prompts you for the account password:
Enter the password for officepc\administrator:
Type the password (it doesn’t appear onscreen), and press Enter.
Tip
If you need to embed a quotation mark in the cmd portion of RUNAS, precede it with a backslash (\). Here’s an example:
runas /user:officepc\administrator "shutdown /s /m \\officepc /c \"Comment\""
This works fine on XP machines but not on Windows 7
and Vista PCs, because the Administrator account is disabled by default
on Windows 7 and Vista systems. Here are the steps to follow to enable
this account and set its password:
1. | On
the Windows 7 or Vista machine, press Windows Logo+R (or select Start,
All Programs, Accessories, Run) to open the Run dialog box, type lusrmgr.msc, and click OK.
|
2. | If you see the User Account Control dialog box, enter your credentials to continue.
|
3. | In the Local User and Groups snap-in, click Users.
|
4. | Double-click the Administrator account to open its property sheet.
|
5. | Deactivate the Account Is Disabled check box, and then click OK.
|
6. | Right-click
the Administrator account, and then click Set Password. Windows warns
you that changing an account password can cause problems.
|
7. | You can ignore the warning in this case, so click Proceed to open the Set Password for Administrator dialog box.
|
8. | Type the password in the New Password and Confirm Password text boxes, and then click OK.
|
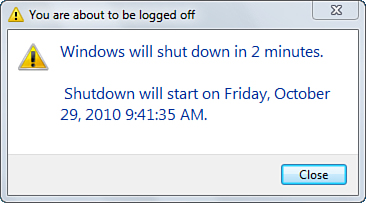
Figure 2 shows an example of the dialog box that Windows 7 users see when the shutdown event is launched. Figure 3 shows the XP dialog box, which is also what the dialog box looks like on Windows Home Server.
If you need to cancel a pending shutdown on a remote computer, run SHUTDOWN with the /A switch before the timeout interval is over:
runas /user:officepc\administrator "shutdown /a /m \\officepc"