Changing the View
The icons in Windows Explorer’s contents area
can be viewed in five or six different ways, depending on the type of
folder. To see a list of these views, either pull down the Views button
in the Task pane or click View in the Classic menus. You get four
choices for icon sizes: Extra Large Icons, Large Icons, Medium Icons,
and Small Icons. You also get two other choices:
| Tiles | Displays the icons in columns and for each one shows the filename, file type, and size. |
| Details | Displays
a vertical list of icons, where each icon shows the data in all the
displayed property columns (such as Name, Date Modified, Authors, Type,
and Tags). |
Note
To
change the folder type, right-click the folder, click Properties, and
then display the Customize tab. In the Use This Folder Type as a
Template list, choose the type you want: Documents, Pictures and Videos,
Music, or E-mail.
Viewing More Properties
Explorer’s Details view (click Views and then
select Details) is the preferred choice for power users because it
displays the most information about each object and it gives you a great
deal of flexibility. For example, here are some techniques you can use
when working with the Details view:
You can change the order of the property columns by dragging the column headings to the left or right.
You can sort on a column by clicking the column heading.
You
can adjust the width of a column by pointing the mouse at the right
edge of the column’s heading (the pointer changes to a two-headed arrow)
and dragging the pointer left or right.
You
can adjust the width of a column so that it’s as wide as its widest
data by double-clicking the right-edge of the column’s heading.
Tip
To adjust all the columns so that they’re
exactly as wide as their widest data, right-click any column header and
then click Size All Columns to Fit.
In addition, the Details view is informative
because it shows you not only the name of each file, but also other
properties, depending on the folder:
Documents— Name, Date Modified, Authors, Type, and Tags
Pictures and Videos— Name, Date Taken, Tags, and Rating
Music— Name, Artists, Album Title, Year, Genre, Length, and Rating
Contacts— Name, Full Name, Email, Business Phone, and Home Phone
These are all useful, to be sure, but Explorer
can display many more file properties. In fact, there are nearly 300
properties in all, and they include useful information such as the
dimensions of a picture file, the bit rate of a music file, and the
frame rate of a video file. To see these and other properties, you have
two choices:
To see the most common properties for
the current folder type, right-click any column header and then click
the property you want to add.
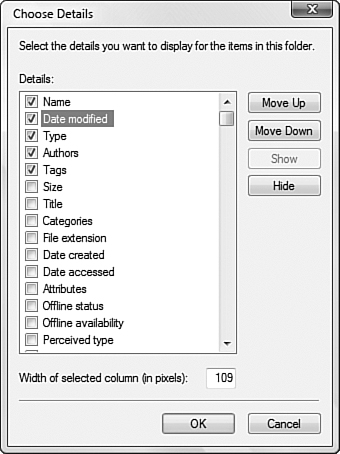
To
see the complete property list, right-click any column header and then
click More. The Choose Details dialog box that appears (see Figure 1) enables you to activate the check boxes for the properties you want to see, as well as rearrange the column order.
Running Explorer in Full-Screen Mode
If you want the largest possible screen area for
the contents of each folder, you can place Windows Explorer in
full-screen mode by pressing F11. (You can also hold down Ctrl and click
the Maximize button; if Explorer is already maximized, you first have
to click the Restore button.) This mode takes over the entire screen and
hides the title bar, menu bar, status bar, address bar, and search bar.
To work with the address bar or search bar, move your mouse pointer to
the top of the screen. To restore the window, either press F11 again or
display the address bar and search bar and then click the Full Screen
button.
Exploring the View Options
Windows Explorer boasts a large number of
customization options that you need to be familiar with. To see these
options, you have two choices:
In Windows Explorer, select Organize, Folder and Search Options
Select Start, Settings, Control Panel, Appearance and Personalization, Folder Options
Either way, the view options can be found, appropriately enough, on the View tab of the Folder Options dialog box, as shown in Figure 2.
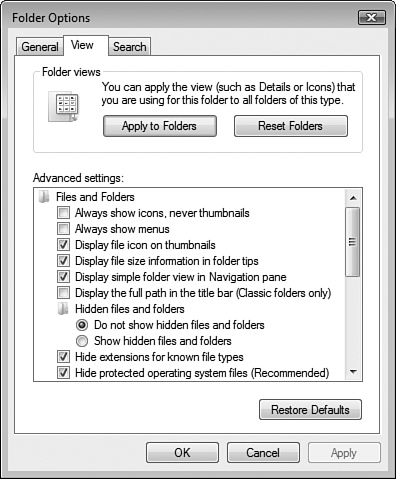
The Folder Views group contains just the Reset
All Folders button, which reverts all the Windows Vista folders back to
their default configuration.
Here’s a complete list of the various items in the Advanced Settings list:
| Always Show Icons, Never Thumbnails | Activate this check box to prevent Windows Explorer from displaying file thumbnails. |
| Always Show Menus | Activate this check box to display the Classic menu bar full-time in Windows Explorer. |
| Display File Icon on Thumbnails | When
this check box is activated, Windows Explorer superimposes the file
type icon on the lower-right corner of each file’s thumbnail. This is
usually a good idea because the extra icon allows you to figure out the
file type at a glance. However, if you find the icon getting in the way
of the thumbnail image, deactivate this setting. |
| Display File Size Information in Folder Tips | When
this setting is activated and you hover your mouse pointer over a
folder icon, Windows Explorer calculates the size of the files and
subfolders within the folder, and displays the size in a pop-up banner.
This is useful information, but if you find that your system takes too
long to calculate the file size, consider deactivating this setting. |
Note
If you activate the Display File Size
Information in Folder Tips setting, you must also activate the Show
Pop-Up Description for Folder and Desktop Items setting, described
later.
| Display Simple Folder View in Navigation Pane | If
you deactivate this setting, Explorer displays dotted lines connecting
folders and subfolders in the Folders bar. If you prefer not to see
these lines, leave this setting activated. |
| Display the Full Path in the Title Bar | Activate
this setting to place the full pathname of the current folder in the
Windows Explorer title bar. The full pathname includes the drive, the
names of the parent folders, and the name of the current folder. Note
that this only applies to Classic folders, which you activate by
clicking the Use Windows Classic Folders option in the General pane. |
| Hidden Files and Folders | Windows
Vista hides certain types of files by default. This makes sense for
novice users because they could accidentally delete or rename an
important file. However, it’s a pain for more advanced users who might
require access to these files. You can use these options to tell Windows
Explorer which files to display:
Do Not Show Hidden Files and Folders— Activate this option to avoid displaying objects that have the hidden attribute set. Show Hidden Files and Folders— Activate this option to display the hidden files.
|
Note
Files are hidden from view by having their
Hidden attribute activated. You can work with this attribute directly by
right-clicking a visible file, clicking Properties, and then toggling
the Hidden setting on and off.
| Hide Extensions for Known File Types | you’ll see that file extensions are one of the
most crucial Windows Vista concepts. That’s because file extensions
define the file type and automatically associate files with certain
applications. Microsoft figures that, crucial or not, the file extension
concept is just too hard for new users to grasp. Therefore, right out
of the box, Windows Explorer doesn’t display file extensions. To
overcome this limitation, deactivate this setting. |
Caution
If you elect not to display file extensions,
note that you won’t be able to edit the extension when you rename a
file. For example, if you have a text file named Index.txt, it will be displayed only as Index with the file extension hidden. If you edit the filename to Index.htm, Windows Vista actually renames the file to Index.htm.txt!To rename extensions, you must display them.
| Hide Protected Operating System Files | This
setting is activated by default, and it tells Windows Vista to hide
files that have the System attribute activated. This is not usually a
problem because you rarely have to do anything with the Windows system
files. However, if you do need to see one of these files, deactivate
this setting. When Windows Vista asks whether you’re sure, click Yes. |
| Launch Folder Windows in a Separate Process | Activating
this setting tells Windows Vista to create a new thread in memory for
each folder you open. This makes Windows Explorer more stable because a
problem with one thread won’t crash the others. However, this also means
that Windows Explorer requires far greater amounts of system resources
and memory. Activate this option only if your system has plenty of
resources and memory. |
| Remember Each Folder’s View Settings | Activate
this setting to have Windows Explorer View keep track of the view
options you set for each folder. The next time you display a folder,
Windows Explorer will remember the view options and use them to display
the folder. |
| Restore Previous Folder Windows at Logon | If
you activate this setting, Windows Vista makes note of which folders
you have open when you log off. The next time you log on, Vista displays
those folders again. This is a very useful option if you normally have
one or two particular folder windows open all day long: It saves you
having to reopen those folders each time you start Windows Vista. |
| Show Drive Letters | If
you deactivate this check box, Windows Explorer hides the drive letters
in the Computer folder and in the address bar when you open a drive. |
Note
If you hide drive letters, Windows Explorer displays drive names such as Local Disk - Unlabeled Volume 1.
This isn’t particularly useful, so consider renaming your drives.
Right-click the drive and then click Rename. Note that you must enter
administrator credentials to perform this operation.
| Show Encrypted or Compressed NTFS in Color | Files
When this setting is activated, Windows Explorer shows the names of
encrypted files in a green font and the names of compressed files in a
blue font. This is a useful way to distinguish these from regular files,
but you can deactivate it if you prefer to view all your files in a
single color. Note that this only applies to files on NTFS partitions
because only NTFS supports file encryption and compression. |
| Show Pop-Up Description for Folder and Desktop Items | Some
icons display a pop-up banner when you point the mouse at them. For
example, the default desktop icons display a pop-up banner that
describes each icon. Use this setting to turn these pop-ups on and off. |
| Show Preview Handlers in Reading Pane | When
this check box is activated, Windows Explorer includes controls for
previewing certain types of files in the Reading pane. For example, when
you display a video file in the Reading pane, Windows Explorer includes
playback controls such as Play, Pause, and Stop. |
| Use Check Boxes to Select Items |
|
| Use Sharing Wizard | When this check box is activated, you can share your files with other users on your computer. Deactivating this setting deactivates local file sharing. |
| When Typing Into List View | These options determine Windows Explorer’s behavior when you open a folder and begin typing:
Automatically Type Into the Search Box— Activate this option to have your typing appear in the Search box. Select the Typed Item in the View— Activate this option to jump to the first item in the folder with a name that begins with the letter you type.
|
Moving User Folders
By default, all your user folders are subfolders of the %USERPROFILE% folder, which is usually the following (where User is your username):
This is not a great location because it means
that your documents and Windows Vista are on the same hard disk
partition. If you have to wipe that partition to reinstall Windows Vista
or some other operating system, you’ll need to back up your documents
first. Similarly, you might have another partition on your system that
has lots of free disk space, so you might prefer to store your documents
there. For these and other reasons, moving the location of your user
folder is a good idea. Here’s how:
Tip
An ideal setup is to have Windows Vista and
your programs in one partition and your documents (that is, your user
folders) in a separate partition. That way your documents remain safe if
you have to wipe the system partition.
1. | Create the folder in which you want your user folder to reside.
|
2. | In
Windows Explorer or the Vista Start menu, right-click the user folder
you want to move, and then click Properties. The folder’s property sheet
appears.
|
3. | In
the Location tab, use the text box to enter the drive and folder where
you want your documents stored. (Or click Move to select the folder
using a dialog box.)
|
4. | Click
OK. If Explorer asks whether you want to create the new folder and then
to move your documents to the new location, click Yes in both cases.
|