1. Choosing Equipment
You
need to purchase equipment that is compatible with the particular type
of Internet service you’ll be using. Your computer might have come with
a modem preinstalled, so, if you will use dial-up service, you might
not have to make any decisions. If you will buy new connection
hardware, here are some points to consider:
Most
broadband services require specific hardware that your ISP provides
(you can sometimes buy a DSL or cable modem independently, but be sure
it will be compatible with the equipment your ISP uses). In addition,
broadband modems connect via USB or through an Ethernet network
adapter. If your service needs a network adapter, and your computer
doesn’t already have an Ethernet adapter, be sure to get one that’s
compatible with Windows 7.
If you will want to share your Internet connection with other computers via a LAN.
Above
all, be sure any hardware that you have to plug directly into the
computer (modem or LAN adapter) appears in the Windows Compatibility
Center list (www.microsoft.com/windows/compatibility).
This is important because not every vendor provides Windows
7–compatible drivers for all of their products. Therefore, check the
list before you make any purchases.
For
dial-up service, choose a modem that is compatible with the fastest
service level your ISP provides. Your ISP should be using V.90 modems
for 56Kbps service. If your ISP still uses X2 or K6Flex modems, it’s
way behind the times. Some ISPs support the V.92 call-waiting protocol.
If you have a modem that supports this feature, ask prospective ISPs
whether they support it and whether there’s an additional charge.
2. Ordering the Service
Ordering
standard dial-up modem Internet service is really quite simple. Just
call the ISP, talk to the sales department, and ask the sales
representative to mail or fax you instructions for configuring Windows
7. In fact, it’s easy enough that they might just talk you through it
over the phone.
Ordering cable, DSL, or
satellite service is also quite easy because the ISP takes care of all
the details. The provider first checks to see whether your neighborhood
qualifies for the service. Then a rep calls you back with the news and
either sends you a self-installation kit or schedules an installation
appointment.
When the service is installed,
you’re ready to configure your Windows 7 computer.
If you’re using dial-up Internet service, continue with the following section.
3. Installing a Modem for Dial-Up Service
Installing
a modem is a pretty painless process these days. Your modem should come
with straightforward installation instructions; follow those, and
you’ll be online in no time.
For an
internal modem, you’ll pop open your PC’s case and insert the modem
card into a free expansion slot inside the computer. For an external
modem, it’s a more simple matter of cabling it to a USB or serial port
on your PC. (Don’t forget to connect the power supply and turn it on.)
A PC card modem simply plugs into your portable computer.
From that point, here’s what you need to do.
If
your modem is Plug and Play–compatible, Windows 7 should automatically
detect it when you turn on your computer and log in. In many cases,
Windows already has the required software available and installs it.
If
Windows cannot find a set of drivers that matches your brand and model
of modem, you might be asked to insert a CD or floppy disk that the
modem manufacturer should have provided with your modem.
If you’re using an older modem, you might need to add it to the configuration manually by following these steps:
1. | Choose Start, Control Panel. In the search box in the upper-right corner, type the word modem. Then, click the phrase Phone and Modem.
|
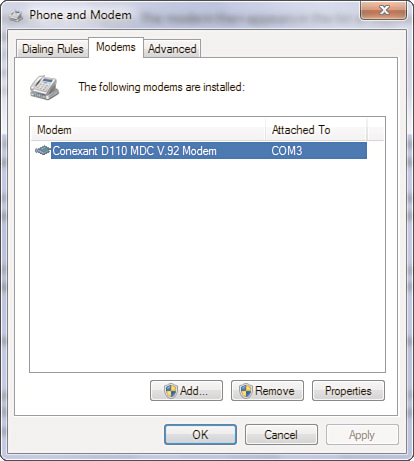
2. | Select the Modems tab, shown in Figure 1.
|
3. | If
Windows has already detected your modem, its name appears in the Modems
tab. If the correct modem type is listed, skip to step 8.
If no modem is listed, click the Add button to run the Add Hardware Wizard.
|
4. | Click
Next. Windows locates the COM port and determines the type of modem you
have. If this is successful, Windows tells you. In this case, continue
with step 7.
|
5. | If
Windows detects your modem incorrectly and doesn’t offer you the chance
to correct the mistake, skip to step 7 and then correct the problem
using the instructions in the next section. If you are given the
opportunity to correct the problem, click Change and locate the
manufacturer and model of your modem in the dialog box. If you find the
correct make and model, select them and click OK. If your modem came
with a driver disk for Windows 7, click Have Disk and locate the
installation file for the modem.
If your modem isn’t listed,
try to download the proper driver from Windows Update or from the modem
manufacturer (using another computer, of course). You also might try
selecting a similar model by the same manufacturer.
|
6. | After you select the modem type, click OK and then Next.
|
7. | Click Finish to complete the installation.
|
8. | Select the Dialing Rules tab.
|
9. | Select My Location and click Edit.
|
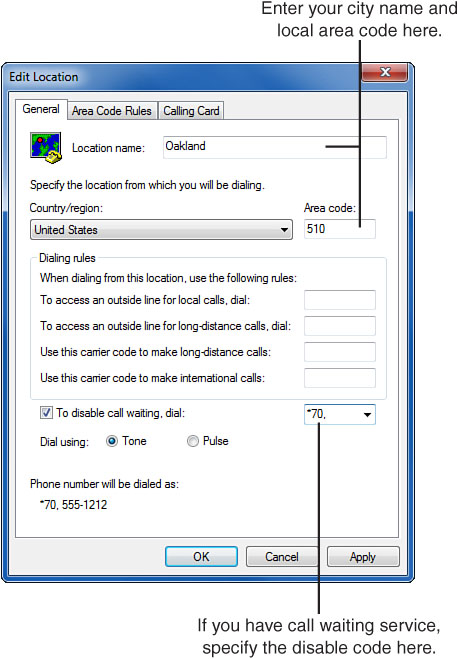
10. | Enter the General tab information for your current location, as shown in Figure 2.
|
11. | Enter a name for your location—for example, home,
the name of your city, or another name to distinguish the current
telephone dialing properties. Set the country, area code, and dialing
rules information.
For example, if your telephone system requires you to dial a 9 to make an outside local call, enter 9 in the box labeled To Access an Outside Line for Local Calls, Dial. Make a corresponding entry for long-distance access.
If your telephone line has call waiting, check To Disable Call Waiting, Dial and choose the appropriate disable code.
I assume here that your ISP access number is a local call in the same
area code. If this is not the case, you might want to fill in the Area
Code Rules tab for the ISP access number. (If you don’t know the number
yet, don’t worry; you can come back and fix it later.)
|
12. | Click OK.
|
Changing the Modem Type
If Windows incorrectly determines your modem type, you can change it by selecting the appropriate modem in the Modem list (see Figure 1) and clicking Properties. Then follow these steps:
1. | Select the General tab and click Change Settings.
|
2. | Select the Driver tab and click Update Driver.
|
3. | Select Browse My Computer for Driver Software.
|
4. | Click Browse to locate the proper INF setup file.
|
5. | Click Finish.
|
Alternatively, you could delete the modem and add it back in manually.