1. Using Group Policy Preferences for Windows
Like Group Policy settings, preferences are almost infinitely
configurable. In the next sections, we’ll discuss a sample of these
extensions, beginning with the Windows settings.
1.1. Drive Maps
The Drive Maps setting allows you to create, update, and
delete mapped drives and their properties. To create a
mapped-drive preference item, follow these steps:
Start Group Policy Management from the Administrative
Tools menu. Right-click the GPO that will contain the new preference
item, and then click Edit. In the console tree, navigate to User Configuration,
expand the Preferences folder, and then expand the Windows
Settings folder. Right-click the Drive Maps node, point to
New, and select Mapped Drive. In the New Drive Properties dialog box, select one of
the following actions for Group Policy to perform: Create Creates a new
mapped drive Replace Deletes an
existing mapped drive, and creates a new one Update Changes
specific settings of an existing mapped drive Delete Removes a
mapped drive
Enter drive-map settings, which are described in Table 2. Click the Common tab, and select the options you want.
Click OK. The new preference item displays in the
details pane.
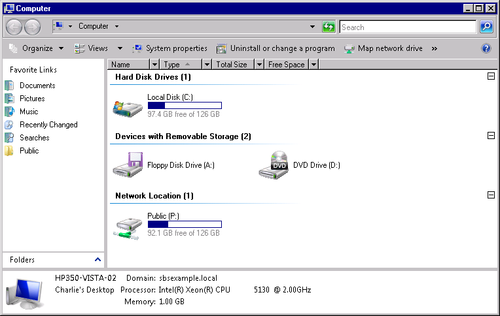
The new mapped drive will display when a user logs on. (See
Figure 3.)

Table 2. Drive-map settings| SETTING NAME | ACTION | DESCRIPTION |
|---|
| Location | Create, Replace, or Update | To create a mapped drive or replace an existing one,
type in a fully qualified UNC path. To modify an existing
drive mapping, leave this field empty. Note: This field
also accepts processing variables. Press F3 for a list of
acceptable variables. | | Reconnect | Create, Replace, or Update | Select this box to save the mapped drive in
the user’s settings and reconnect to it at subsequent
logons. | | Label As | Create, Replace, or Update | Provide a descriptive label. This field also
accepts preference processing variables. Press F5 for a
list. | | Drive Letter | Create, Replace, or Update | To assign the first available drive letter,
select Use First Available Starting At and choose a drive
letter. To assign a specific drive letter, select Use and
then select a drive letter. | | Drive Letter | Update | To change an existing drive mapping, select
Existing and then select the drive letter. | | Drive Letter | Delete | To delete all drive mappings, select Delete
All, Starting At and then select the beginning drive
letter. To delete a specific mapping, select Delete and
then select the drive letter. | | Connect As | Create, Replace, or Update | To map a drive using credentials other than
those of the currently logged-on user, type the name and
password to be used. | | Hide/Show This Drive | Create, Replace, or Update | To prevent the drive from being displayed in
Windows Explorer, select Hide This Drive. To allow it to
display, select Show This Drive. These settings take
priority over the Hide/Show All Drives setting. |
|