No matter how high the performance of your computer,
sooner or later it will start to slow down as newer programs demanding
faster hardware show up on your desktop. Chances are performance demands
will exceed your computer’s capabilities before you or your company is
ready to pop for a replacement computer.
The single most helpful thing you can do to make
your Windows 7 computer run at peak speed is to give it enough system
memory (or RAM, short for random access memory).
Just as a reminder, your computer uses two types of memory: hard disk
space and RAM. RAM holds Windows and the programs you’re actually using,
and Windows 7 wants more RAM than Windows XP, but is happy with what
works for Vista (if not even slightly less).
Now, if you’re already running Windows 7 on a
full-bore, state-of-the-art system, and your computer has a fast video
accelerator, a couple of gigs of fast memory, and fast SATA disks, there
isn’t much more you can do to
optimize its hardware. You might just adjust the page file sizes and
certainly convert all your partitions to NTFS (which is a requirement
for Windows 7), or you might add a ReadyBoost device .
By the same token, if you’re doing common,
everyday tasks such as word processing, and you’re already satisfied
with the performance of your computer as a whole, you probably don’t
need to worry about performance boosters. Your system is probably
running just fine, and the time you’d spend trying to fine-tune it might
be better spent doing whatever it is you use your computer for (like
earning a living).
ReadyBoost
Microsoft introduced ReadyBoost as part of
Windows Vista. Essentially, it allowed users to allocate all or part of
any single USB flash drive (which Microsoft abbreviates as UFD) or a
Secure Digital (SD, SDHC, or mini-SD) memory card as an extension to
cache memory available in system RAM. In Windows 7 several notable
changes are introduced, including
Vista limited ReadyBoost space to a
maximum of 4GB (which is all that 32-bit operating systems can handle
anyway) for both 32- and 64-bit versions. In Windows 7, 64-bit versions
can allocate up to 128GB for a ReadyBoost cache.
Vista
limited eligible memory devices to UFDs and SD cards; Windows 7 works
with those devices plus Compact Flash (CF), all forms of MemoryStick
(MS, MS Duo, MS Pro, and so on), and most other memory cards as well. As
with Vista versions, devices must meet minimum speed requirements (12.8
Mbps read/write speeds) for use as ReadyBoost cache devices.
Vista
limited ReadyBoost to a single memory device; in Windows 7 you can
allocate ReadyBoost cache on multiple memory devices at the same time.
When spread across multiple devices performance might not be as fast as
when ReadyBoost cache comes from a single device, however.
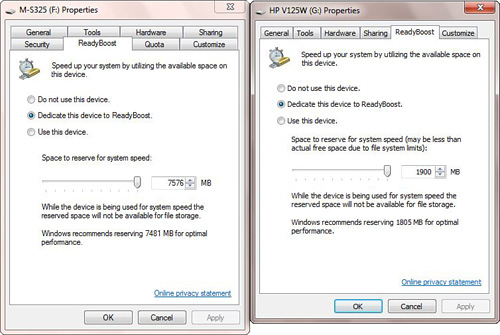
To allocate space on a memory device for
ReadyBoost, right-click the drive icon in Windows Explorer, and then
click the ReadyBoost tab in its Properties dialog box. Figure 1
shows two different UFDs in use on an x64 Windows 7 machine; the
Properties dialog box on the left comes from an NTFS-formatted UFD (NTFS
or exFAT are required to create a ReadyBoost cache file greater than
4GB in size), while the box on the right is from a FAT-32 formatted UFD
(mixing and matching works fine).
BIOS Settings
Windows
7 depends on proper BIOS settings to enable it to detect and use
hardware correctly. At a minimum, your drives should be properly
configured in the system BIOS, and your CPU type and speed should be
properly set (either in the BIOS or on the motherboard, depending on the
system). Thanks to some clever work by Microsoft’s engineers, Windows 7
boots faster than other 32-bit versions of Windows, but you can improve
boot speed further with these tips:
Set up your BIOS boot order to start with drive C: so that you can skip the floppy stepper motor test.
Disable floppy drive seek.
Turn
off any Quick Power-On Self Tests. Some BIOSs have such an option that
enables a quicker bootup by skipping some of the internal diagnostics
that would usually take place on startup. It makes bootup faster but
also leaves you susceptible to errors; some problems will not be
detected at startup.
Today’s
computer BIOSs include enough arcane settings that it’s possible to
alter one in a way that prevents proper booting. Before you mess with
advanced CMOS settings (not just simple things such as time, date, boot
order, power settings, ports, and so on), read the manual for the
computer or motherboard. If you decide to change anything, record the
old value before making the change. When in doubt, don’t alter advanced
CMOS settings that affect how the chipset works, whether and where BIOS
and video shadowing is used, and so on. By design, default settings from
the motherboard maker work under most situations and OSs. Because
Windows is the most popular PC OS, you can bet it has been tested and
configured for Windows 9x, NT, 2000, XP, Vista, or Windows 7 (unless
your motherboard is very old). That said, what do
you do if you’ve changed something in the CMOS and the computer won’t
boot? You can try the computer’s or motherboard’s manual or website for
information about Windows 7 settings. If you find nothing, reset all
settings to their factory defaults. Most CMOS setups have a Set to
Default or similar command you can issue. This should get you out of
most any jam. Using the Set to Default option
might also be a good course to take if you make CMOS settings that
prevent your computer from booting and you can’t remember how to undo
those changes. Default settings are usually conservative enough to work
under most circumstances. The BIOS in some systems may also have a
Fail-Safe Defaults option that sets your BIOS to its most conservative
settings. If what you’ve done has changed the hard
disk Type, or if you manually entered the number of sectors, tracks,
platters, and so on, and now it won’t boot, use the Auto Detect Hard
Disk BIOS setting to discover and enter those numbers automatically.
(This is known as drive autotyping.) |
|
Upgrading Your Hard Disk
One of the most effective improvements you can
make to a system is to get a faster or larger hard drive, or add another
drive. SCSI hard disks used to seriously one-up IDE drives, but the new
breed of Ultra DMA EIDE drives (which I call Old MacDonald
Disks—EIEIO!) and Serial ATA (SATA) drives are speedy and much cheaper
than SCSI. An EIDE bus supports four drives (two each on the primary and
secondary channels) and is almost always built in to your motherboard.
Adding an optical (usually a DVD±RW or a Blu-ray) drive claims one,
leaving you with a maximum of three EIDE hard drives unless you install a
separate add-on EIDE host adapter or have a motherboard with RAID
support. The EIDE spec tops out at 133MBps. SATA supports one drive per
channel, but the latest SATA II systems can reach top transfer speeds of
300MBps. Because optical drives also come with SATA connections these
days, many new systems skip EIDE in favor of SATA.
The following are some essential considerations for upgrading your hard disk system:
- Don’t put a
hard drive and an optical drive on the same channel unless you must.
(Put the hard drive on the primary IDE1 channel and the optical drive on
the secondary IDE2 channel.) On some computers, the IDE channel
negotiates down to the slowest device on a channel, slowing down a hard
disk’s effective transfer rate. Be sure that the hard drive containing
Windows is designated as the Primary Master drive.
- Defragment
the hard disk with the Defragmenter utility, which you can reach
through Computer. Right-click the drive, select Properties, Tools tab,
Defragment Now. Do this every week (or run Defrag and set up a schedule
so it runs weekly), and the process will take just a few minutes. But,
if you wait months before you try this the first time, be prepared to
wait a long time for your system to finish. You can also purchase
third-party defragmenting programs that do a more thorough job.
- Get
a faster disk drive (and possibly controller if necessary to support
the drive): Upgrade from standard Parallel ATA (PATA) to SATA drives if
possible. If you have slower (4,200- or 5,400RPM) drives, upgrade to
quicker ones such as the increasingly popular 7,200RPM or 10,000RPM
drives. The faster spin rate bumps up system performance more than you
might expect. Purchase drives with as large a cache buffer as you can
afford. Drive technology is quickly outdated, so do some web reading
before purchase.
Tip
Many recent motherboards
feature onboard IDE and even SATA RAID, which can perform either
mirroring (which makes an immediate backup copy of one drive to another)
or striping (which treats both drives as part of a single drive for
speed). Although the RAID features on these motherboards don’t support
RAID 5, the safest (and most expensive!) form of RAID, they work well
and are much less expensive than any SCSI form of RAID. Just remember
that mirroring gives you extra reliability at the expense of speed
because everything has to be written twice, and striping with only two
disks gives you extra speed at the expense of reliability—if one hard
disk fails, you lose everything. You can now find external terabyte
boxes with multiple drives in them that can be set up for striping or
mirroring (RAID 0 or 1) at amazingly affordable prices. |
Adding RAM
Perhaps the most cost-effective upgrade you can
make to any Windows-based system is to add RAM. This one is a
no-brainer: If your disk pauses and thrashes each time you switch
between running applications or documents, you need more RAM. Although
Microsoft says Windows 7 can run with as little as 512MB of RAM, we
found that this results in barely acceptable behavior. At least
Microsoft was realistic about it this time around. Microsoft had claimed
XP could run with 64MB, but that was a stretch. Running with 64MB
caused intolerably slow performance. Windows 7’s published minimum is
512MB, but if you run memory-intensive applications and want decent
performance, you’ll want to up it to 1GB, if not 2.
Windows automatically recognizes newly added RAM
and adapts internal settings, such as when to swap to disk, to take
best advantage of any RAM you throw its way. Upgrade to at least 1GB of
RAM if you can afford it, especially if your system uses the economical
synchronous dynamic RAM (SDRAM)
or double-data-rate (DDR) SDRAM dual in-line memory modules (DIMMs).
Memory prices fluctuate constantly, but these days 2GB DIMMs sell for
about $25. This is a cost-effective upgrade indeed. But be sure to get
the right memory for your motherboard. A huge variety of memory
technologies are out there. At the time this was written, common
technologies included SDRAM, Rambus DRAM (RDRAM), DDR, DDR2, and DDR3.
Memory speeds range from 100MHz (labeled PC100) to 2200MHz (labeled
DDR3-2200). Also, there are error-correction code (ECC) and
non-error-correcting RAM varieties (desktop and notebook PCs use non-ECC
RAM).
To find out what type of memory you need, check
with your computer manufacturer or the manual that came with your
computer or motherboard. Get the fastest compatible memory that your CPU
can use and that your motherboard supports. You can get RAM that’s
rated faster than you currently need, but you won’t gain any speed
advantage—just a greater likelihood of being able to reuse the memory if
you later upgrade your motherboard. Here’s a website with some good
information about RAM and even possibly what kind your computer uses: www.pcbuyerbeware.co.uk/RAM.htm.
The maximum amount of RAM you can use depends on
your computer’s hardware and the version of Windows 7 you are using.
The following table lists the version and maximum amounts. Many
last-generation computers cannot use more than 4GB of memory, and that’s
all that 32-bit versions of Windows can address, even if you could plug
it in without a BIOS upgrade. Check with the computer or motherboard
manufacturer’s data sheets or website to figure out whether you have to
flash upgrade the system board BIOS to support more than 4GB of RAM.
| Version | RAM Maximum |
|---|
| All 32-bit Windows 7 versions | 4GB |
| 64-bit Home Basic | 8GB |
| 64-bit Home Premium | 16GB |
| 64-bit all other versions | 128GB+ |
Tip
Microsoft has changed its
nomenclature with Windows 7. What used to be called the Windows
Compatibility List or Hardware Compatibility List (also abbreviated HCL)
is now called the Windows Logo’d Products List. If you want to make
life easy for yourself, before you purchase hardware for your Windows 7
system, check the lists on the Microsoft site (look for Windows 7 items
at https://winqual.microsoft.com/hcl/default.aspx. Or when looking on a box in a store or online, it should have a “Certified for Windows 7” or “Windows 7” logo on it. |