Remote Desktop is easy to
configure and use, but it does require a small amount of prep work to
ensure trouble-free operation. Let’s begin with the remote computer,
also called the host computer.
The first thing you need to know is that not all
versions of Windows 7, Vista, and XP can act as Remote Desktop hosts.
The only versions that support this are Windows 7 Professional, Windows 7
Enterprise, and Windows 7 Ultimate; Vista Business, Vista Enterprise,
and Vista Ultimate; XP Pro, and XP Media Center Edition 2005. Yes, you
read that right: The five versions of Windows most likely to be used in
the home and therefore most likely to be clients on a Windows Home
Server network—Windows 7 Starter, Windows Home Premium, Vista Home
Basic, Vista Home Premium, and XP Home—can’t
act as Remote Desktop hosts. This is a mind-numbingly shortsighted move
on Microsoft’s part, and it may prevent many home users from making the
move to Windows Home Server.
All that aside, on machines that can
act as hosts, by default the user currently logged on to the host
machine has permission to connect remotely to the host. Other users with
default remote connection permissions are members of the host’s
Administrators and Remote Desktop Users groups. (In all cases, only
users with password-protected accounts can use Remote Desktop.) If you
want to connect to the host remotely, you first need to set up an
account for the username with which you want to connect from the client.
(Again, you must assign a password to this account.)
Configuring a Windows 7 or Vista Host
If
the host machine is running Windows 7 Professional, Enterprise, or
Ultimate, or Vista Business, Enterprise, or Ultimate, you have to do two
things to prepare the computer for its Remote Desktop hosting duties:
Most Windows 7 and Vista machines are configured to
go into Sleep mode after one hour of inactivity. Sleep is a low-power
mode that turns everything off except power to the memory chips, which
store the current desktop configuration. When you turn the machine back
on, the desktop and your open programs and documents appear within a few
seconds. However, remote clients won’t be able to connect to the host
if it’s in Sleep mode, so you have to disable this feature. Here are the
steps to follow:
1. | Select
Start, Control Panel, click either System and Security (in Windows 7)
or System and Maintenance (in Windows Vista), and then under Power
Options click Change When the Computer Sleeps.
|
2. | In the Put the Computer to Sleep list, select Never.
|
3. | Click Save Changes.
|
Now follow these steps to activate the Remote Desktop service:
1. | Select Start, right-click Computer, and then click Properties to open the System window.
|
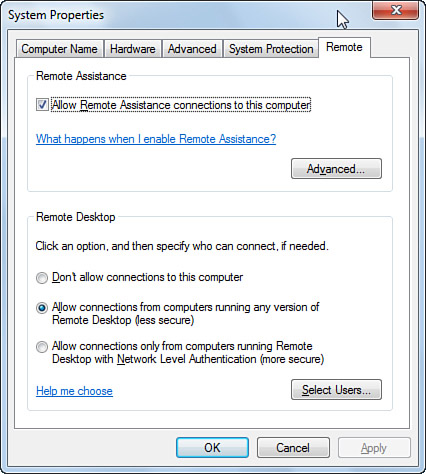
2. | Click
the Remote Settings link. (In Windows Vista, you must enter your UAC
credentials at this point.) Windows opens the System Properties dialog
box with the Remote tab displayed, as shown in Figure 1.
Tip
Another way to open the System Properties dialog box
with the Remote tab displayed is to press Windows Logo+R (or select
Start, All Programs, Accessories, Run), type systempropertiesremote (or control sysdm.cpl,,5), click OK, and (in Vista) enter your UAC credentials.
|
3. | In the Remote Desktop group, you have two choices:
Allow Connections from Computers Running Any Version of Remote Desktop—Select this option if you want people running previous versions of Remote Desktop to be able to access the host. Allow Connections Only from Computers Running Remote Desktop with Network Level Authentication—Select
this option if you only want the most secure form of Remote Desktop
access. In this case, Vista checks the client computer to see if its
version of Remote Desktop supports Network Level Authentication (NLA).
NLA is an authentication protocol that authenticates the user before
making the Remote Desktop connection. NLA is built into every version of Windows 7 and Windows Vista, but it is not supported on older Windows systems.
|
4. | If
you didn’t add more users earlier, skip to step 7. Otherwise, click
Select Users to display the Remote Desktop Users dialog box.
|
5. | Click Add to display the Select Users dialog box, type the username, and click OK. (Repeat this step to add other users.)
|
6. | Click OK to return to the System Properties dialog box.
|
7. | Click OK.
|
Configuring an XP Host
If the host machine is running XP Pro, here are the steps to follow to set it up to host Remote Desktop sessions:
1. | Log on to the host as an Administrator.
|
2. | Launch
Control Panel’s System icon to open the System Properties dialog box.
(Alternatively, click Start, right-click My Computer, and then click
Properties.)
|
3. | Display the Remote tab.
|
4. | In the Remote Desktop group, activate the Allow Users to Connect Remotely to This Computer check box, as shown in Figure 2.

|
5. | If
you didn’t add more users earlier, skip to step 8. Otherwise, click
Select Remote Users to display the Remote Desktop Users dialog box.
|
6. | Click Add to display the Select Users dialog box, type the username, and click OK. (Repeat this step to add other users.)
|
7. | Click OK to return to the System Properties dialog box.
|
8. | Click OK.
|
Restricting the Computers That Can Connect to the Host
When you configure a computer to be a host, Windows
adds the Remote Desktop service to Windows Firewall’s Exceptions list
and, in Windows 7 and Windows Vista, it creates a Windows Firewall rule
that allows incoming connections using the Remote Desktop Protocol (RDP)
on port 3389. You can increase the security of the Remote Desktop
connection by modifying this rule using Windows Firewall with Advanced
Security (WFAS), which is a Microsoft Management Console snap-in.
Specifically, you can specify the IP addresses of the computers that are
allowed to connect to the host. You might do this, for example, if you
want to be able to connect the host from your desktop computer and your
notebook, but you don’t want the kids’ computers to be able to connect.
Here are the steps to follow:
1. | Press Windows Logo+R (or select Start, All Programs, Accessories, Run), type wf.msc, and then click OK.
|
2. | In Windows Vista, enter your User Account Control credentials. The WFAS snap-in appears.
|
3. | Click Inbound Rules. After a few seconds, the list of Inbound Rules appears.
|
4. | Double-click
the Remote Desktop (TCP-In) rule. (If you see two of these rules,
double-click the one with the green check mark.) The rule’s property
sheet appears.
|
5. | Display the Scope tab.
|
6. | In the Local IP Address group, select These IP Addresses.
|
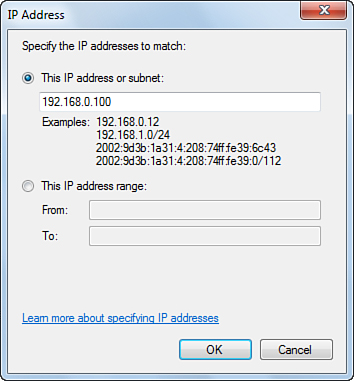
7. | Click Add to open the IP Address dialog box.
|
8. | In the This IP Address or Subnet text box, enter the IP address of a computer that can connect to the host, as shown in Figure 3.
(You can also enter a subnet address such as 192.168.0.0/24, which
allows any address in the 192.168.0.x subnet; alternatively, you can
click This IP Address Range and type the beginning address in the From
text box and the ending address in the To text box. Both of these
options are useful for networks that use Dynamic Host Configuration
Protocol (DHCP), where the client IP addresses may change over time.)
|
9. | Click OK.
|
10. | Repeat steps 7–9 to add other IP addresses to the Scope tab.
|
11. | If
you also want to restrict access to only wired or wireless connections,
display the Advanced tab, click Customize in the Interface Types group,
and then click These Interface Types. Activate the check box beside the
type you want to allow: Local Area Network (wired) or Wireless. Click
OK.
|
12. | Click OK. |