Outside the new features discussed in the previous
few sections, Windows Media Player still performs most of the tasks that
we’ve come to associate with the program, including playing media (of
course), ripping music from audio CDs, burning tracks to recordable
devices, and so on. The next few sections take you through a few tips
and pointers that I hope will help you get more out of this powerful
program.
Playing Media Files
Windows Vista gives you many indirect ways to play media files via Windows Media Player. Here’s a summary:
Open Windows Explorer, find the media file you want to play, and then double-click the file.
Note
To control the media file types that are
associated with Windows Media Player, select Start, Default Programs. In
the Default Programs window, click Set Your Default Programs, click
Windows Media Player, and then click Choose Defaults for this Program.
Activate the check boxes for the file types that you want to open
automatically in Windows Media Player. If you don’t want Windows Media
Player to handle a particular file type, deactivate its check box.
Insert an audio CD in your CD or DVD drive, or insert a DVD disc in your DVD drive.
If
you have a memory card reader, insert a memory card (such as a
CompactFlash card or a MultiMedia Card). If Windows Vista asks what you
want to do with this disk, select Play Using Windows Media Player. If
you don’t want to be bothered with this dialog box each time, activate
the Always Do the Selected Action check box. Click OK.
Download media from the Internet.
You
can also open files directly from Media Player by pressing Alt, pulling
down the File menu, and selecting either Open (to launch a media file
from your computer or from a network location) or Open URL (to launch a
media file from the Internet).
Tip
Many of today’s keyboards are media-enhanced,
which means they come with extra keys that perform digital media
functions such as playing, pausing, and stopping media, adjusting the
volume, and changing the track. In addition, here are a few Windows
Media Player shortcut keys that you might find useful while playing
media files:
|
|
|---|
| Alt+Enter | Toggle Full Screen mode |
| Ctrl+P | Play or pause the current media |
| Ctrl+S | Stop the current media |
| Ctrl+B | Go to the previous track |
| Ctrl+Shift+B | Rewind to beginning of the media |
| Ctrl+F | Go to the next track |
| Ctrl+Shift+F | Fast forward to the end of the media |
| Ctrl+H | Toggle shuffle playback |
| Ctrl+T | Toggle repeat playback |
| Ctrl+1 | Switch to Full mode |
| Ctrl+2 | Switch to Skin mode |
| Alt+1 | Display video size at 50% |
| Alt+2 | Display video size at 100% |
| Alt+3 | Display video size at 200% |
| F7 | Mute sound |
| F8 | Decrease volume |
| F9 | Increase volume |
Setting Windows Media Player’s Playback Options
Windows
Media Player comes with several options that you can work with to
control various aspects of the playback. To see these options, press Alt
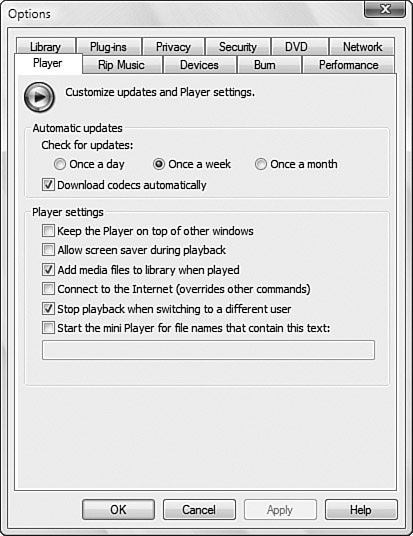
and then select Tools, Options. The Player tab, shown in Figure 1, contains the following settings:
|
|
|---|
| Check for Updates | Use these options to determine how often Windows Media Player checks for newer versions of the program. |
Tip
To prevent Windows Media Player from displaying a message that an update is available, create a string setting named AskMeAgain in the following Registry key and set its value to No:
HKLM\SOFTWARE\Microsoft\MediaPlayer\PlayerUpgrade
You can also prevent Windows Media Player from
automatically updating itself if it detects that a newer version is
available. Create the following key, add a DWORD value called DisableAutoUpdate and set its value to 1:
HKLM\SOFTWARE\Policies\Microsoft\WindowsMediaPlayer
|
|
|---|
| Download Codecs Automatically | When
this check box is activated, Media Player automatically attempts to
download and install a codec for any file type that it doesn’t
recognize. If you prefer to be prompted before the download occurs,
deactivate this check box. You can disable this check box using the
Group Policy editor. Select User Configuration,
Administrative Templates, Windows Components, Windows Media Player,
Playback and enable the Prevent Codec Download policy. |
| Keep the Player on Top of Other Windows | When
this check box is activated, Windows Media Player stays on top of other
windows. This is useful if you want to able to access Windows Media
Player’s playback controls while working in another program. |
Tip
Unless you have a large screen running at a
high resolution, an always-on-top Windows Media Player window is
probably going to get in the way. A better solution is to display the
Windows Media Player playback controls in the Windows Vista taskbar. To
do that, right-click an empty section of the taskbar and then select
Toolbars, Windows Media Player. Minimize the Windows Media Player window
and the Windows Media Player toolbar appears in the taskbar.
|
|
|---|
| Allow Screen Saver During Playback | When
this check box is activated, the Windows Vista screensaver is allowed
to kick in after the system has been idle for the specified number of
minutes. If you’re watching streaming video content or a DVD movie,
leave this check box deactivated to prevent the screensaver from
activating. |
| Add Media Files to Library When Played | When
this check box is activated, Windows Media Player adds files that you
play to the Library. For example, if you play a downloaded MP3 file,
Windows Media Player adds it to the Library. Note that, by default,
Windows Media Player doesn’t add media from removable media and network
shares to the Library (see the next setting). |
| Connect to the Internet | When
this check box is activated, Windows Media Player always connects to
the Internet when you select a feature that requires Internet access,
such as the Guide (windowsmedia.com) or MSN Music (music.msn.com). This connection occurs even if you have activated the File menu’s Work Offline command. |
| Stop Playback When Switching to a | When this check box is activated, Media Player Different User stops playing when you switch to a different user account. |
| Start the Mini Player for File Names That Contain This Text | When
this check box is activated, Media Player launches the mini Player when
it comes upon files that contain the text you specify. For example, if
you are sent podcasts or voicemail messages via email, you probably
don’t want to start up the full Media Player program to hear such files.
To hear them using the mini Player, type text that appears consistently
in the filenames. |
Copying Music from an Audio CD
Windows Media Player comes with the welcome capability to copy (rip
in the vernacular) tracks from an audio CD to your computer’s hard
disk. Although this process is straightforward, as you’ll see, there are
several options that you need to take into account before
you start copying. These options include the location of the folder in
which the ripped tracks will be stored, the structure of the track
filenames, the file format to use, and the quality (bit rate) at which
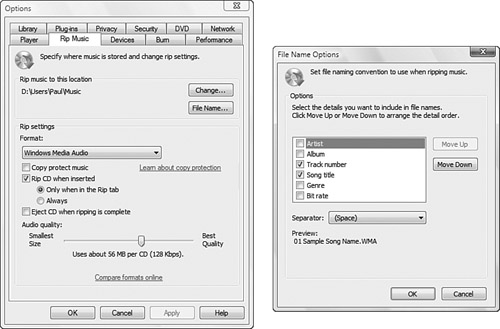
you want to copy the tracks. You control all these settings in the Rip
Music tab of the Options dialog box (press Alt and then select Tools,
Options to get there).
Selecting a Location and Filename Structure
The Rip Music to This Location group displays
the name of the folder that will be used to store the copied tracks. By
default, this location is %USERPROFILE%\Music. To specify a
different folder (for example, a folder on a partition with lots of free
space), click Change and use the Browse for Folder dialog box to choose
the new folder.
The default filenames that Windows Media Player generates for each copied track use the following structure:
Track_Number Song_Title.ext
Here, Track_Number is the song’s track number on the CD, Song_Title is the name of the song, and ext
is the extension used by the recording format (such as WMA or MP3).
Windows Media Player can also include additional data in the filename
such as the artist name, the album name, the music genre, and the
recording bit rate. To control which of these details the name
incorporates, click the File Name button in the Rip Music tab to display
the File Name Options dialog box, shown in Figure 2.
Activate the check boxes beside the details you want in the filenames,
and use the Move Up and Move Down buttons to determine the order of the
details. Finally, use the Separator list to choose which character to
use to separate each detail.
Choosing the Recording File Format
Prior to version 10, Windows Media Player
supported only a single file format: WMA (Windows Media Audio). This is
an excellent music format that provides good quality recordings at high
compression rates. If you plan to listen to the tracks only on your
computer or on a custom CD, the WMA format is all you need. However, if
you have an MP3 player or other device that may not recognize WMA files
(although most do, unless you’re one of the millions with an iPod), you
need to use the MP3 recording format. Windows Media Player 10 provided
MP3 encoding support right out of the box, and now Media Player 11
supports
Windows Media Audio (WMA)—
This is Windows Media Player’s default audio file format. WMA
compresses digital audio by removing extraneous sounds that are not
normally detected by the human ear. This results in high-quality audio
files that are a fraction of the size of uncompressed audio.
Windows Media Audio Pro (WMA Pro)— This
version of WMA can create music files that are smaller than regular WMA
and so are easier to play on mobile devices that don’t have much room.
Windows Media Audio (variable bit rate)—
This version of WMA is a bit “smarter” in that it changes the amount of
compression depending on the audio data: if the data is more complex,
it uses less compression to keep the sound quality high; if the data is
less complex, it cranks up the compression.
Windows Media Audio Lossless—
This version of WMA doesn’t compress the audio tracks at all. This
gives you the highest possible audio quality, but it takes up much more
space (up to about 400MB per CD).
MP3—
This is a popular format on the Internet. Like WMA, MP3 compresses the
audio files to make them smaller without sacrificing quality. MP3 files
are generally about twice the size of WMA files, but more digital audio
players support MP3 (although not many more, these days).
WAV— This is an uncompressed audio file format that is compatible with all versions of Windows, even going back to Windows 3.0.
Use the Format list in the Rip Music tab to
choose the encoder you want to use. Note that if you select any Windows
Media Audio format, the Copy Protect Music check box becomes enabled.
Here’s how this check box effects your copying:
If Copy Protect Music is activated,
Media Player applies a license to each track that prevents you from
copying the track to another computer or to any portable device that is
SDMI-compliant (SDMI is the Secure Digital Music Initiative; see www.sdmi.org for more information). Note, however, that you are allowed to copy the track to a writeable CD.
If
Copy Protect Music is deactivated, there are no restrictions on where
or how you can copy the track. As long as you’re copying tracks for
personal use, deactivating this check box is the most convenient route
to take.
Specifying the Quality of the Recording
The tracks on an audio CD use the CD Audio Track file format (.cda
extension), which represents the raw (uncompressed) audio data. You
can’t work with these files directly because the CDA format isn’t
supported by Windows Vista and because these files tend to be huge
(usually double-digit megabytes, depending on the track). Instead, the
tracks need to be converted into a Windows Vista–supported format (such
as WMA). This conversion always involves compressing the tracks to a
more manageable size. However, because the compression process operates
by removing extraneous data from the file (that is, it’s a lossy
compression), there’s a tradeoff between file size and music quality.
That is, the higher the compression, the smaller the resulting file, but
the poorer the sound quality. Conversely, the lower the compression,
the larger the file, but the better the sound quality. Generally, how
you handle this tradeoff depends on how much hard disk space you have to
store the files and how sensitive your ear is to sound quality.
The recording quality is usually measured in kilobits per second (Kbps; this is called the bit rate), with higher values producer better quality and larger files, as shown in Table 1.
To specify the recording quality, use the Audio Quality slider in the
Rip Music tab. Move the slider to the right for higher quality
recordings, and to the left for lower quality.
Table 1. Ripping Bit Rates and the Disk Space They Consume
| Kbps | KB/Minute | MB/Hour |
|---|
| 32 | 240 | 14 |
| 48 | 360 | 21 |
| 64 | 480 | 28 |
| 96 | 720 | 42 |
| 128 | 960 | 56 |
| 160 | 1,200 | 70 |
| 192 | 1,440 | 84 |
Tip
To save a bit of time, Media Player 11 offers a
faster way to choose the format and audio quality. Point your mouse at
the Rip tab and you’ll see a downward-pointing arrow appear. Click the
arrow to display a menu, and then select either Format (to select an
audio file format) or Bit Rate (to select an audio quality).
Copying Tracks from an Audio CD
After you’ve made your recording choices, you’re ready to start ripping tracks. Here are the steps to follow:
1. | Insert the audio CD.
|
2. | Click
Rip in the Windows Media Player taskbar. Windows Media Player displays a
list of the available tracks. To get the track names, connect to the
Internet and then click View Album Info.
|
3. | Activate the check boxes beside the tracks you want to copy.
|
4. | Click Start Rip.
|
Tip
You can save a step by selecting the Rip tab
before inserting the disc. After you insert the disc, Media Player
starts ripping the tracks automatically. If there are tracks you don’t
want ripped, deactivate their check boxes (note that this works even if
Media Player has already ripped or is currently ripping a track).
Copying Tracks to a Recordable CD or Device
Windows
Media Player can also perform the opposite task: copying media files
from your computer to a recordable CD or portable device.
Creating a Playlist
Most people find recording is easiest if it’s done from a playlist, a customized collection of music files. Here’s how to create a new playlist:
1. | Click Library in the Windows Media Player taskbar.
|
2. | Click Playlists, Create Playlist. Windows Media Player adds the new playlist.
|
3. | Type a name for the playlist and press Enter. Media Player displays the playlist pane on the right side of the window.
|
4. | For each song you want to include in the new playlist, drag it from the library to the playlist pane.
|
5. | Click Save Playlist.
|
After your playlist has been created, you can
edit the list by highlighting it in the Library’s Playlists branch and
then right-clicking the tracks.
Recording to a CD or Device
Here are the steps to follow to burn music files to a recordable CD or portable device:
1. | Insert the recordable CD or attach the portable device.
|
2. | Click Burn in the Windows Media Player taskbar. The Burn List appears on the right side of the window.
|
3. | For each playlist or song you want to burn, drag it from the library to the Burn List pane.
|
4. | Click Start Burn.
|