8.2 Install Remote Desktop Session Broker
Now that the Virtualization Host is set up, we need
to install and configure the Remote Desktop Connection Broker. The
Connection Broker manages the process of connecting the client
workstation to the virtual machine running on Hyper-V. To install the
Connection Broker, logon to the connection broker server and perform
the following:
1. | |
2. | Select the Roles node. Then click the Add Roles link launching the Add Roles Wizard. Click Next.
|
3. | Select the Remote Desktop Services role. Then click Next.
|
4. | Click Next on the Remote Desktop Services Introduction page.
|
5. | Select the Remote Desktop Connection Broker and then click Next.
|
6. | Verify the install selections, and then click Install.
|
7. | When the installation is complete, click Close.
|
8.3 Install Remote Desktop Session Host and Web Access
The next step is to install the Remote Desktop
Session Host and the Web Access role services. Logon to the server that
will be providing these services and perform the following:
1. | |
2. | Select the Roles node. Then click the Add Roles link launching the Add Roles Wizard. Click Next.
|
3. | Select the Remote Desktop Services role. Then click Next.
|
4. | Click Next on the Remote Desktop Services Introduction page.
|
5. | Select the Remote Desktop Session Host and Remote Desktop Web Access role options. If prompted, click Add Required Role Services. This will add Web access prerequisites including IIS. Click Next to continue.
|
6. | Click Next on the Application Compatibility Page.
|
7. | You now need to select the network authentication for support. If you are running older clients, you may need to choose Do not require Network Level Authentication;
however, if you are using a newer operating system such as Windows 7
with a newer version of the Remote Desktop client, choosing Require Network Level Authentication will provide a greater level of security. In this exercise, we will choose Require Network Level Authentication. After choosing the authentication level, click Next to continue.
|
8. | You
now need to select the licensing that you plan to use for your Remote
Desktop deployment. In this exercise, we will select the option Configure later (see earlier discussion in this chapter on Remote Desktop licensing). After selecting the licensing option, click Next to continue.
|
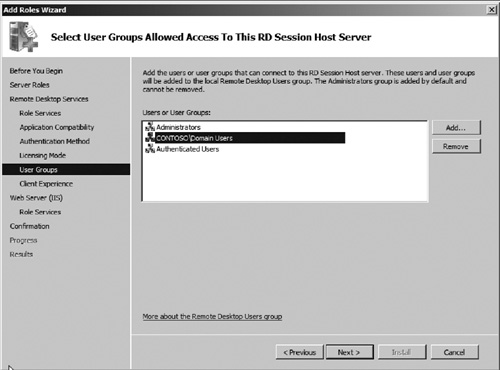
9. | You now need to select the initial groups that you want to provide Remote Desktop services to as seen in Figure 32. (Note, this can be changed post install). After selecting the initial groups that you want to provide access to, click Next to continue.

|
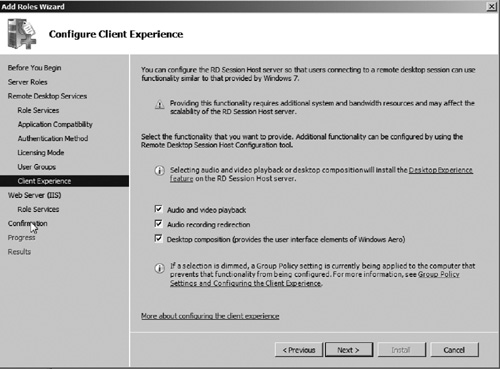
10. | Optionally, select any enhanced options you want to allow over Remote Desktop, including Audio/Video playback (see Figure 33). Then click Next.

|
11. | Click Next on the IIS Introduction page.
|
12. | Accept the default IIS role services and click Next.
|
13. | Verify your selections on the Confirmation page and then click Install.
|
14. | After the installation finishes, you will be prompted to restart the server. Click Yes to reboot.
|
15. | After the server comes back online, logon to complete the install process. Click Close when the installation is complete.
|