2. Level 2: Automating data protection
Make sure that you warn all users that Volume
Shadow Copies do not replace backups. It is always a best practice to
actually backup data as much as possible to enable multi-tiered
protection mechanisms. Of course, if you are relying on roaming profiles
and folder redirection, you will have enabled a networked backup
mechanism to protect profile data. But there are still occasions when
data may be at risk despite this strategy. For example, when users
travel with their mobile PCs, they may be disconnected from the office
for lengthy periods of time. When this occurs, their data is at risk
until they can link back to the network and perform a synchronization.
It is good practice to back up this data during this period to provide
another layer of protection.
Vista includes two backup technologies:
Automatic Backup and Complete PC Backup. Automatic Backup is available
in almost all versions of Vista while Complete PC Backup is only
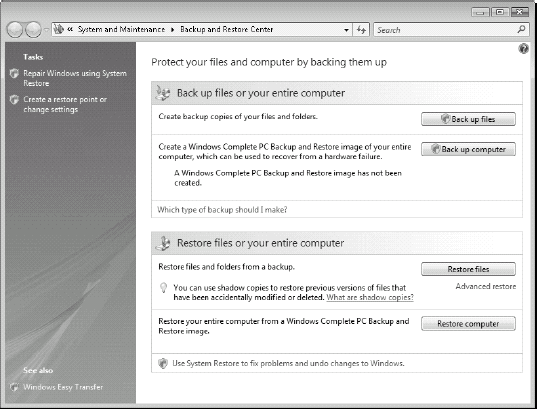
available in the more advanced editions. To make things simpler,
Microsoft has integrated both tools into one interface: the Backup and
Restore Center (BRC). Access the BRC by choosing Control Panel => System and Maintenance (see Figure 2). Note that you must have administrative access to create the backups through this interface.
Automatic Backup can also be accessed through
the Backup Status and Configuration (BSC) interface, which is accessed
by choosing Start Menu => All Programs => Accessories => System Tools (shown in Figure 3). Once again, administrative access is required to create the initial backup schedule.

You can target another hard drive, a writable CD
or DVD drive, or a network to store the backups. In an organization
using a network, the best bet is to target networks as much as possible
because then the backups are located on central storage. But, for users
who travel a lot, the ideal strategy is to ensure that there are two
hard disks in the notebook, or barring that, that there are two
partitions on the same hard drive. This way they do not need to carry
additional components to protect their data.
NOTE
Tape is not a supported backup destination in either Vista or Windows Server 2008.
There are also many other methods you can use to
protect mobile data. For example, today it is fairly inexpensive to
access large flash memory cards that can store 4 or more gigabytes of
data. Placing one of these flash cards within the mobile PC and running
backups against it is also painless for users. Barring this option, then
you can use USB thumb drives or even external USB disks.
Setting up a backup schedule on a single PC
To set up Automatic Backup, use the following procedure:
Launch the Backup Status and Configuration interface by choosing Start Menu =>
All Programs =>
Accessories =>
System Tools =>
Backup Status and Configuration.
Click Set up automatic file backup and accept the UAC prompt.
Select your target location and click Next.
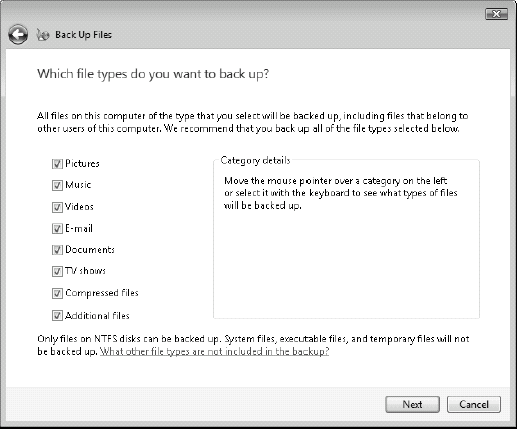
Select the type of files you want to back up. (By default, all file types are selected, as shown in
Figure 4.) Deselect those you do not want to protect and then click Next. Note that moving the mouse over any category will display the types of files that will be protected in this category.
Set the automated schedule.
Schedules can be Daily, Weekly, or Monthly and can be set for any time
of day. Use whatever is appropriate to support your service level
agreements.
After you have set the schedule, click Save settings and start the backup.
That's it. The backup process will start and
begin by creating a shadow copy and then using this shadow copy to
perform the backup. From that point on, you can rest easy because your
user files are doubly protected. Users will be notified by balloon
messages if they are logged on the system when backups are performed.
The backup will be stored within a folder that indicates the computer's
name. All user profiles will be backed up and stored within a compressed
ZIP file.
NOTE
Vista's Automatic Backup does not back up
files encrypted with the Encrypting File System. If you are using EFS
along with roaming profiles and folder redirection, then use the Windows
Server backup tool to back up these files on a regular basis from
central storage. You can however use Complete PC Backup to back up
encrypted files along with the entire operating system.
Restoring files on a single PC
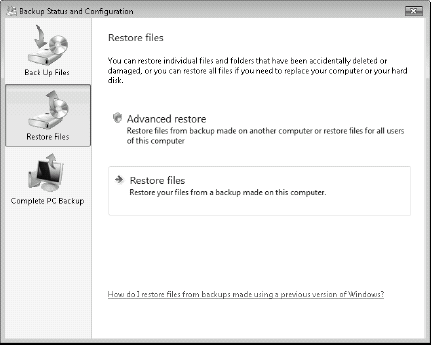
If you need to restore a file, or even if a user
needs to restore files, you can return to the BCS, but this time click
the Restore Files button. Individual users can restore their own files
by selecting Restore files (shown in Figure 5), but to access Advanced restore, you must have administrative access to the PC.
When you do access Advanced restore, you will have access to three choices:
You can restore files from the latest backup made on this computer.
You can restore files from an earlier backup made on this computer.
You can restore files from a backup made on another computer.
The Advanced restore interface also gives you
access to the Recycle Bin as well as System Restore. To restore files
after a backup set is selected, you have three options:
You can click Add files to select the files to restore.
You can click Add folders to select the folders to restore.
You can click Search to locate a specific file in the backup set.
Once the files or folders are selected, click
Next to begin the restore process. Now you can either select to restore
the files to their original location or select an alternate location.
When ready, click Start restore to begin the restoration process. Click
Finish when done.
It's as simple as that. Like all features in
Vista, you can control backup behavior through Group Policy settings.
The settings that apply to the entire PC are located under Computer
Configuration => Policies => Administrative Templates => Windows Components => Backup. Similarly, the settings controlling backup behavior on a user-per-user basis are located under User Configuration => Policies => Administrative Templates => Windows Components => Backup.
Setting up backup schedules on multiple PCs
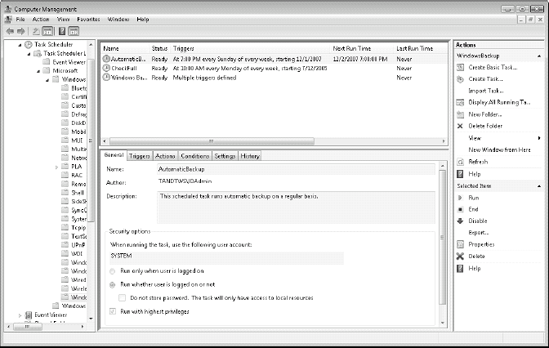
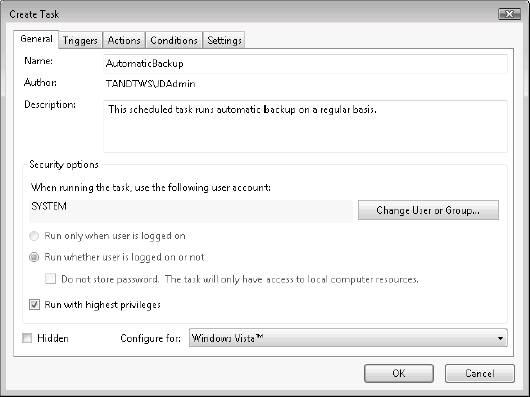
When you create a backup schedule on a single PC, you actually create three Scheduled Tasks (see Figure 6).
Because you don't want to go from PC to PC to enable backup schedules,
you should consider capturing these three tasks from one system,
exporting them, and then importing them into each of the PCs you want to
enable backup for. The three tasks are:
AutomaticBackup: This task controls the schedule of the backup and will perform incremental backups automatically.
CheckFull: This task is designed to verify if a full backup is required instead of an incremental backup.
Windows Backup Monitor: This task monitors the backup operation and determines if notifications are required due to backup errors.
To automate the process of turning automated backups, use the following procedure:
Prepare the backup schedule using BSC as outlined earlier. Wait until the first backup is created.
Launch the Task Scheduler by choosing Start Menu =>
Administrative Tools =>
Task Scheduler.
Choose Task Scheduler Library =>
Microsoft =>
Windows =>
Windows Backup. Three tasks appear.
Right-click each task to select Export. Name each task and store them on a network-shared folder.
To
enable the tasks on another Vista PC, move to the other PC, launch Task
Scheduler, and click on Import Task in the Action pane. Locate each
task and import it (shown in
Figure 7).
Repeat on each PC on which you want to enable Automatic Backup. From now on these PCs will automatically back up user data.
If you want to perform this in a more automated
fashion, you can use the schtasks command. Use the following commands to
import each task:
schtasks /create /TN AutomaticBackup /S systemname /XML
   automaticbackup.xml
schtasks /create /TN CheckFull /S systemname /XML checkfull.xml
schtasks /create /TN "Windows Backup Monitor" /S systemname /XML
   windowsbackupmonitor.xml
where systemname
is the name of the remote system to which you want to assign the task.
Repeat for each system. Also, make sure you launch an elevated command
prompt and you use an account with sufficient privileges on each remote
PC.
NOTE
The tasks you import in this fashion will
work, but will not be stored within the Windows Backup category of Task
Scheduler. For this reason, Automatic Backup will not display that
automatic backups are turned on in the BSC. Don't worry, though. Backups
will still run as expected.