Selecting Type
To select editable type characters, you must use the
Type tool. Click an insertion point in any text frame with the cursor,
and then highlight the characters by clicking and dragging over them
(see Figure 1).

You can also select editable text by clicking with the mouse:
- Double-clicking selects a single word.
- Triple-clicking
selects a line if the Triple-Click to Select a Line option is enabled
in Type Preferences; otherwise, it selects the entire paragraph.
- Clicking
four times selects the entire paragraph if the Triple-Click to Select a
Line option is enabled; otherwise, it selects the entire story.
- Clicking five times selects the entire story when the Triple-Click to Select a Line option is enabled in Type Preferences.
Working with Shapes
The shape tools in InDesign enable you to create
rectangles, ellipses, and polygons. You can also create lines with the
Line tool and draw freeform shapes with the Pencil tool. To create
custom paths and shapes, you can draw and edit points using the tools
available in the Pen toolset.
Drawing Lines with the Line Tool
You can access the Line tool by clicking its icon in
the Tools panel or by pressing the back slash key (\). InDesign enables
you to draw both diagonal and vertical or horizontal lines with the
Line tool. Hold down Shift as you draw to create a straight, horizontal
or vertical line, or to draw at 45° increments. To draw lines at other
angles, just click and drag in any direction.
Lines drawn with the Line tool are easy to work with
in that they have only two points (one on each end). You can adjust a
point by selecting it with the Direct Selection tool and repositioning
it. You can also add points to a line by clicking it with the Pen or
Pencil tools.
In addition, you can move lines with the Selection
tool, rotate them with the Rotate tool, and scale them with—yes, you
guessed it—the Scale tool.
|
The default stroke settings for all new lines that
you draw with the Line, Pen, or Pencil tool is 1 pt. stroke width and a
solid black stroke color. To change the application default setting,
close all documents and adjust the point size and stroke style in
either the Stroke panel or Control panel. All new lines that you draw
will then take on these characteristics.
|
Drawing Rectangles, Ellipses, and Polygons with the Shape Tools
To draw a rectangle, ellipse, or polygon, choose the
appropriate frame or shape tool and click and drag. If you hold down
the Shift key as you draw, it constrains the overall proportions of the
shape, making a rectangle a perfect square and an ellipse a perfect
circle (rather than an oval). Holding down Option (Mac) or Alt (Win)
enables you to draw the shape starting from its center point.
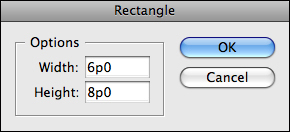
There are two ways to create rectangles, ellipses,
and polygons with the shape and frame tools—by drawing them with the
tool or by entering Width and Height settings into the respective
tool’s dialog box (see Figure 2).
You can access the settings dialog box by clicking once on the
Pasteboard with the tool. After you enter the preferred settings in the
dialog box, click OK for the shape to appear in the same spot that you
clicked with the tool.
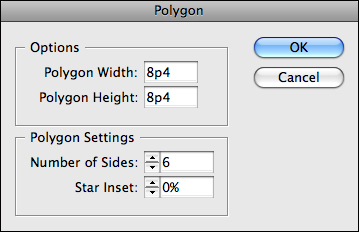
The Polygon dialog box (see Figure 3)
contains additional settings for specifying the Number of Sides and a
Star Inset value. Enter the number of sides and an inset percentage for
creating a star shape. You can access and adjust these default settings
by double-clicking the tool icon in the Tools panel. (The shape dialog
boxes are used to set parameters for a newly drawn shape, not for
adjusting a selected shape.)
|
You can also access the settings dialog box for the
Polygon or Polygon Frame tool by double-clicking the tool’s icon in the
Tools panel.
|
InDesign automatically applies default stroke
settings to your shape, but you can adjust them in either the Stroke
panel or the Control panel. You can also add a fill, place a graphic,
add some text, apply an object style, or use the Pathfinder controls to
merge with other shapes. If you’d like to change your shape entirely
without having to redraw it, use the Convert Shape commands located
under the Object menu or in the Pathfinder panel.
|
When drawing a polygon shape or frame, press the
up-arrow or down-arrow keys as you click and drag to increase or
decrease the number of shapes you create.
|
Drawing Custom Shapes with the Pen Tool
Using the Pen toolset, you can create custom drawn
shapes just as you would in applications such as Adobe Illustrator or
Corel Draw (see Figure 4).
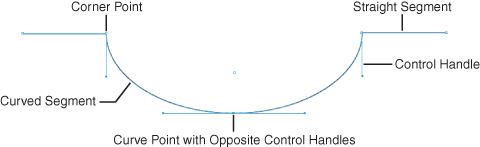
To start, press P to access the Pen tool, then click
and drag to create a series of connecting points that result in a
custom-drawn shape. Clicking with the Pen creates a point, and dragging
with the mouse creates its curve in relation to the previous and next
points placed on the path. Every curve contains its own set of control
handles that you can also adjust. Using the Direct Selection tool, you
can move and modify points, segments, and control handles.
You can create a corner point by clicking an anchor
point of a curved path with the Pen tool immediately after drawing it.
Then press the Option/Alt key and drag to create a new control handle
that is facing in a different direction. Click and drag again to create
the next curved segment of the path.
|
You can move an anchor point and its handles as you
are drawing with the Pen tool. To do so, click to create a new point,
hold the mouse button down, and then press the spacebar to move it.
|
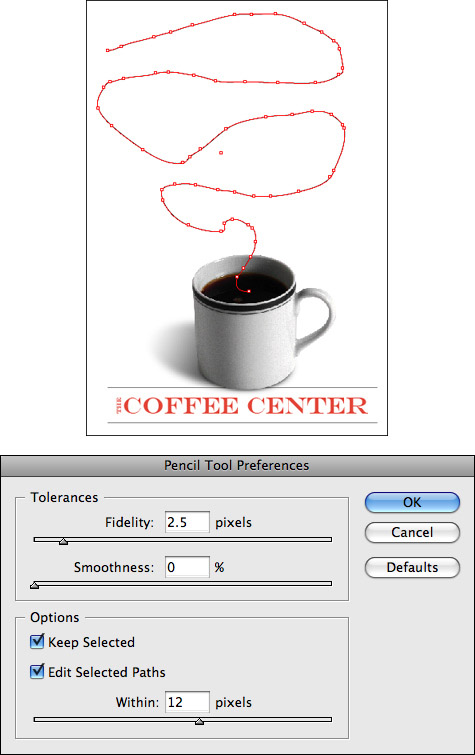
Drawing Freeform Shapes with the Pencil Tool
To create a freeform shape using the Pencil tool,
press N to access it from the Tools panel and begin drawing. As you
draw, InDesign calculates where the points should fall on the path and
places them for you. You can then switch to the Pen toolset and adjust
the placed points, or use the Smooth and Erase tools to edit the path.
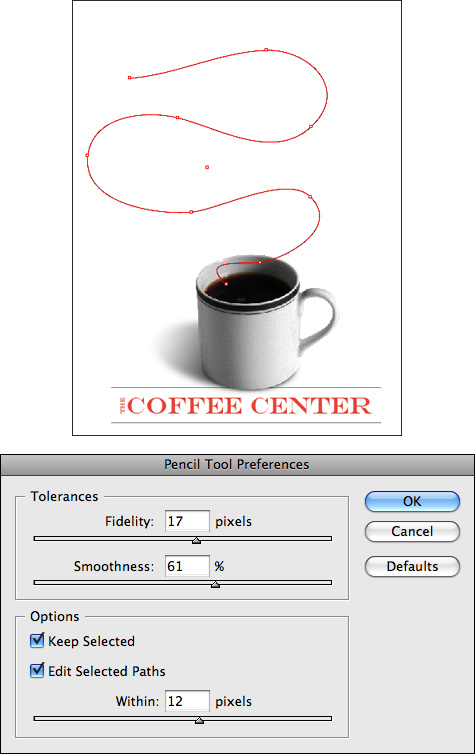
If you enter specific settings in the Pencil Tool
Preferences dialog box before you begin drawing, you can eliminate the
need for editing and smoothing of points later. To access the dialog
box, double-click the Pencil tool icon in the Tools panel (see Figures 5 and 6).
The Smooth tool has a similar set of preferences that you can access by double-clicking the Smooth tool icon in the Tools panel.
|
When drawing with the Pencil tool, you can temporarily access the Smooth tool by pressing Option (Mac) or Alt (Win).
|
By drawing with the Pencil tool, it’s easy
to create open path shapes. To close a path quickly, select it with
either selection tool and choose Object, Paths, Close Path, or click
the Close Path control located in the Pathfinder panel.