Using the Microsoft PowerPoint Web App
Microsoft Office 2010 introduces
web-based versions of its most popular applications, including
PowerPoint, Word, Excel, and OneNote. To use the PowerPoint Web App, you
need either Microsoft SharePoint 2010 (primarily for use in large
organizations) or a Windows Live ID and a SkyDrive account (for use by
anyone with web access).
With the Web App, you can view
and edit PowerPoint presentations from any computer. It’s important to
note, however, that the Web App’s editing features comprise just a small
subset of the features available in the desktop version of PowerPoint.
You should plan to perform only minor edits in the Web App.
This section focuses on
accessing the Web App on SkyDrive with a Windows Live ID. Installing and
deploying SharePoint is normally the domain of a corporate IT
department, and someone from that department would set up your access
rights to the Web App via SharePoint.
Setting Up SkyDrive
SkyDrive offers up to
25GB of free online storage that you can use to collaborate with
colleagues anywhere in the world. SkyDrive is part of Windows Live and
requires a Windows Live ID to access. If you have an existing account
with another Windows Live application such as Hotmail or Messenger, you
already have a Windows Live ID. If you don’t, you can sign up for a free
Windows Live ID. Be aware that, as a web application, SkyDrive could
change or include new features in the future.
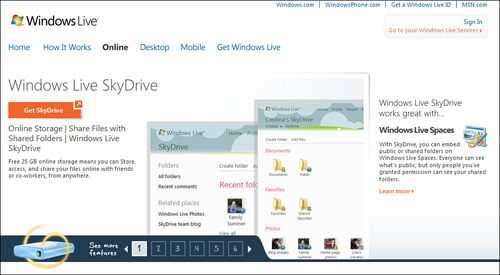
To set up SkyDrive, go to http://skydrive.live.com (see Figure 1),
click the Sign In link, and enter your Windows Live ID. If you don’t
have an ID, sign up for a free account by clicking the Sign Up button.
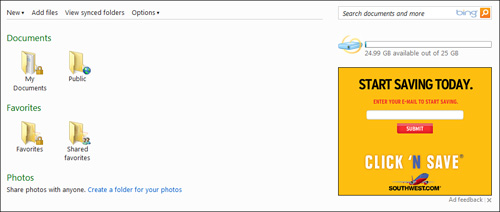
On SkyDrive (see Figure 2), you can
- Create new
folders by selecting Folder from the New drop-down list. You can share
folders with everyone (a public folder), only people in your network, or
selected people you have provided access to. Alternatively, you can
make your folder private so that only you can access it.
- Add
files to your folders by clicking the Add Files link. From here, you
can browse your computer and select the files you want to upload. You
can upload files up to 50MB each. See “Adding Files to SkyDrive” below for more information.
- Open individual files by clicking a folder icon and then clicking the file’s icon.
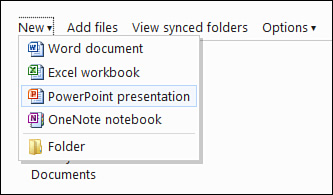
- Create
a new PowerPoint presentation by selecting PowerPoint Presentation from
the New drop-down list. You can also choose to create a new Word,
Excel, or OneNote file.
- View your available storage in the upper-right corner of the screen.
Adding Files to SkyDrive
If you want to work with an
existing PowerPoint presentation in the Web App, you must add it to
SkyDrive. You can do this directly in SkyDrive or save it from within
PowerPoint.
Adding an Existing File to SkyDrive
To add an existing file (such as a PowerPoint presentation) to SkyDrive, follow these steps:
1. | In the SkyDrive main window (refer to Figure 2), click the Add Files link.
|
2. | Select the folder where you want to store your presentation.
|
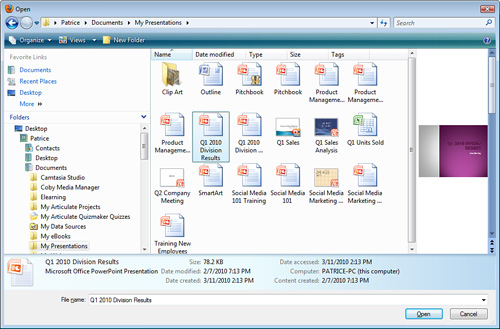
3. | Click the Select Documents from Your Computer link to access the Open dialog box, as shown in Figure 3.
|
4. | Navigate
to the file you want to upload, and click the Open button to return to
SkyDrive. Remember that SkyDrive limits individual file size to 50MB.
|
5. | Click the Upload button to finish the upload process.
|
Creating New Presentations in SkyDrive
Another
option is to create a new PowerPoint presentation directly in SkyDrive.
You can edit this presentation in the Web App or download it later for
use in the desktop version of PowerPoint.
Creating a New Presentation in SkyDrive
To create a new PowerPoint presentation in SkyDrive, follow these steps:
1. | In the SkyDrive main window (refer to Figure 2), select the folder where you want to store the presentation you create.
|
2. | From the New drop-down list (see Figure 4), select Microsoft PowerPoint Presentation.
|
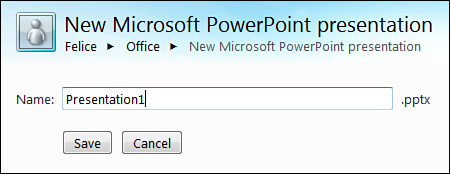
3. | Enter a presentation name, and click the Save button, as shown in Figure 5.
|