SmartArt is a collection of similar shapes,
arranged to imply a process, groups, or a hierarchy. You can add text to
SmartArt shapes, and for some shapes, include a small picture or logo.
Excel 2010 has more than 130 available diagrams, grouped into eight
categories of SmartArt:
List— Designs for nonsequential lists of information.
Process— Designs for sequential lists of steps.
Cycle— Designs for steps that repeat.
Hierarchy— Designs for organization charts, decision trees, and other hierarchical relationships.
Relationship— Designs for showing the relationships between items.
Matrix— Designs to show four quadrants of a list.
Pyramid— Designs to show overlapping, proportional, containment, or interconnected relationships.
Picture—
Designs for use with pictures in either sequential or nonsequential
layouts. The picture tools can be used to adjust the imported images.
|
You can’t insert SmartArt in Excel Starter, but you
can edit the text; editing options are available by right-clicking a
component and selecting Format Shape.
|
|
SmartArt diagrams are removed
when you open a workbook in the Excel Web App. In legacy versions of
Excel, SmartArt will be turned into Pictures.
|
Inserting SmartArt
To insert a SmartArt diagram, go to Insert, SmartArt,
and select the desired layout. Excel places the diagram in the middle
of the screen with the Text pane to the left, as shown in Figure 1. When you’re done entering text, click any cell on the sheet and the Text pane will disappear.
|
Do not click the x in the upper-right corner of the
Text pane to close it or the next time you place SmartArt, the Text pane
will not automatically appear. If this happens, you can manually open
the Text pane by going to SmartArt Tools, Design, Create Graphic, and
selecting Text Pane.
|
You should keep a few things in mind concerning the Text pane:
- Click a placeholder to enter the text.
- Navigate between bulleted items by using the mouse or arrow keys.
- The Tab key will not work to move between the placeholders. Instead, use the Tab key to demote an item.
- Press Enter to add a new item beneath the currently selected item.
- Deleting a bullet will promote the ones beneath it if they are of a lower level.
Inserting SmartArt
To insert a SmartArt layout and enter text, follow these steps:
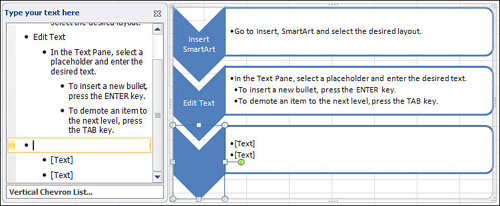
1. | Go to Insert, SmartArt, and select the desired layout.
|
2. | In the Text pane, select a placeholder and enter the desired text.
|
3. | Use the mouse to select the next placeholder or use the down-arrow key to move to the next placeholder for entering text.
- To insert a new bullet, press the Enter key.
- To demote an item to the next level, press the Tab key.
- To
add a new graphic, select the last bullet, press the Enter key to
insert a new bullet, and then click Promote, found under Tools, Design,
Create Graphic, as many times as necessary to make the bullet a level 1
item.
|
4. | Repeat step 3 as many times as necessary.
|
5. | When you are done entering information, click any cell on the sheet. |