The Contacts module is displayed when you click Contacts in the Navigation Pane.
1. Contacts Module Content
In the Contacts module,
the Navigation Pane displays your available address books. The Contacts
and Suggested Contacts address books appear by default, along with any custom address books you create and address books shared with you by co-workers.
We refer to the center pane
that displays content in the Contacts module as the Contacts pane. The
Contacts pane displays the contact records saved in the selected address
book. By default, the contact records are displayed as business cards,
but you can choose among several standard views, including text-only cards and various lists.
There are three standard Contacts module views:
Normal In this view, the Navigation Pane and To-Do Bar are maximized. Cards Only In this view, the Navigation Pane and To-Do Bar are minimized. No To-Do Bar In this view, the Navigation Pane is maximized and the To-Do Bar is minimized.
The ribbon in the Contacts module includes the File tab and the four standard module tabs:
Home
This tab includes the commands you need to create, manage, and view
contact records, and to initiate communication with contacts. You can
select contacts for a mail-merge process, send contact information to
Microsoft OneNote, share contacts with other Outlook users, and tag
contact records in ways that enable you to better locate or manage them.
The Home tab of the Contacts module ribbon.

Send/Receive This tab is identical to that in the Calendar and Tasks modules.
The Send/Receive tab of the Contacts module ribbon.

Folder This tab provides the same functionality as it does in the Calendar and Tasks modules, but is specific to contact records.
The Folder tab of the Contacts module ribbon.

View
This tab provides the same functionality as it does in the Mail and
Tasks modules. The content of the Arrangement gallery is specific to
contact records.
The View tab of the Contacts module ribbon.

Tip:
The Arrangement commands are available only when you display contact records in a list view.
2. Contact Record Windows
When you create a contact
record or display the contact record for a person or group of people, it
opens in a contact record window. The contact record window has its own
ribbon and Quick Access Toolbar, separate from those in the Outlook
program window and other types of item windows. You can insert, format,
and work with information in a contact record or contact group record by
using the commands on the contact record window ribbon.
A new contact record window.
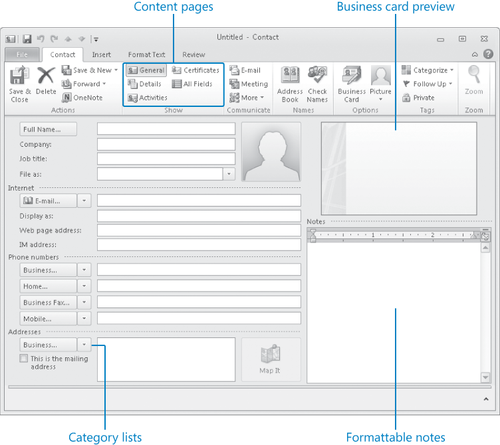
The contact record
window interface includes the Quick Access Toolbar, the ribbon, and the
People Pane, as well as the content area that displays the contact
record information.
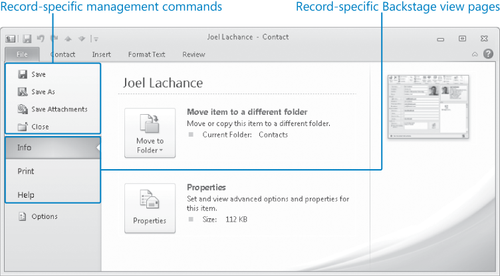
When opened from a contact record window, the Backstage view includes commands related to managing
contact records, such as saving contact records and contact record
attachments and closing, moving, and printing contact records.
The Backstage view of a contact record window.
Commands on the ribbon of a contact record window are organized on four tabs:
Contact
This tab includes commands that are specific to managing and working
with contact records. Commands include those for managing the contact
record, switching among the contact record pages, communicating with the
contact, accessing and verifying saved contact information, and
personalizing a con-tact's electronic business card. This tab also
includes commands for assigning a category or follow-up flag to a
contact record, preventing other Outlook users from viewing the contact
record when connected to your account, and changing the magnification
level of the Notes pane (not of the contact record window).
The Contact tab of the contact record window ribbon.

Tip:
The contact record–management commands are available on only the Contact tab.
Insert
This tab includes the same standard commands as the Insert tab of a
message composition window ribbon. The commands on the Insert tab of the
contact record window ribbon, other than those in the Include group,
apply only to the content of the Notes pane.
The Insert tab of the contact record window ribbon.

Format Text This tab includes the same standard commands as the Format
Text tab of a message composition window ribbon. The commands on the
Format Text tab of the contact record window ribbon, other than the
Paste commands and the Select command, apply only to the content of the
Notes pane.
The Format Text tab of the contact record window ribbon.

Review This tab includes the same standard commands as the Review
tab of a message composition window ribbon. The commands on the Review
tab of the contact record window ribbon, other than the Research and
Thesaurus commands, apply only to the content of the Notes pane.
The Review tab of the contact record window ribbon.

In this exercise, you'll familiarize yourself with the types of information you can store in a contact record and the customizations you can make to the way Outlook manages contact records.
Note:
SET UP You don't need any practice files to complete this exercise; just follow the steps.
 In the Navigation Pane, click the Contacts button.
Note:
Keyboard Shortcut Press Ctrl+3 to display the Contacts module.
Tip:
If you want to work in two
modules at the same time, you can open a module in a second instance of
Outlook by right-clicking the module button in the Navigation Pane and
then clicking Open In New Window.
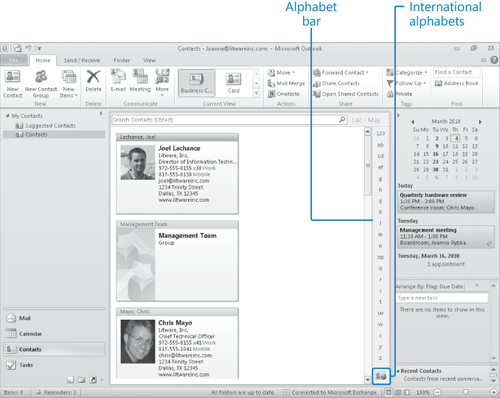
The Contacts module opens. The content pane, which in the Contacts module is called the Contacts pane, displays your main address book, with any contact records it contains displayed as business cards.
The Outlook program window displaying the Contacts module in Normal view.
Note:
Troubleshooting
If the contact records in your Contacts module aren't presented like
those shown here, click Business Card in the Current View gallery on the
Home tab.
Tip:
Clicking a letter or letter pairing on the alphabet bar scrolls the Contacts pane to
display contact records beginning with that letter. You can add a
second alphabet bar that displays the Arabic, Cyrillic, Greek, Thai, or
Vietnamese alphabet by clicking the International Contacts button and
then clicking the language you want.
 On the Home tab, in the New group, click the New Contact button.
Note:
Keyboard Shortcut
Press Ctrl+N to create a contact record from within the Contacts
module. Press Ctrl+Shift+C to create a contact record from any Outlook
module.
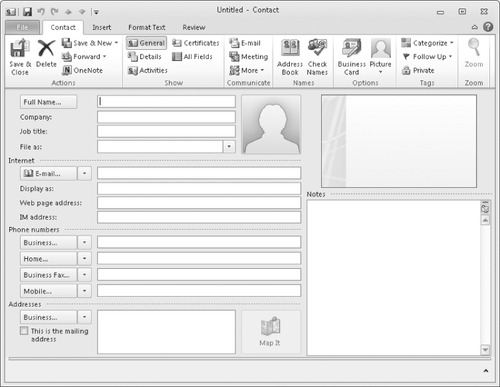
A
new, blank contact record window opens, displaying the General page of
the contact record. The cursor is automatically active in the Full Name
box, so you can immediately begin entering a contact's information.
The General page of a contact record window.
Tip:
An arrow to the right of a
field name indicates that the displayed field is one of a group of
related fields that you can display in that location, one at a time. For
example, the arrow next to the e-mail name indicates that there are
multiple e-mail address fields; clicking the arrow displays a list.
Clicking a field in the list displays it in place of the previous
related field.
The
Contact tab is active by default. Buttons that represent commands
related to creating and working with contact records are organized on
this tab in seven groups: Actions, Show, Communicate, Names, Options,
Tags, and Zoom.
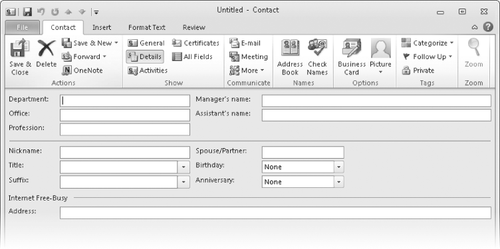
 On the Contact tab, in the Show group, click Details.
 The Details page appears in the content pane of the contact record window.
The Details page of a contact record window.
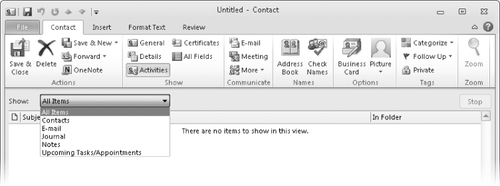
 In the Show group, click Activities. Then on the Activities page, click the Show arrow.
 Outlook displays the types of activities it tracks for each contact.
The Activities page of a contact record window.
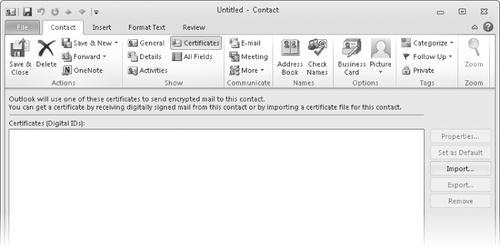
 In the Show group, click Certificates.
 The
Certificates page appears. This page displays digital IDs that are
installed on your computer, and commands for managing digital IDs.
The Certificates page of a contact record window.
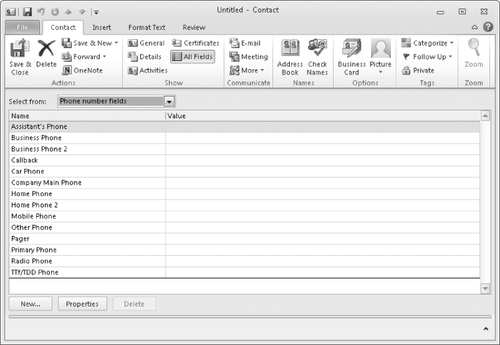
 In the Show group, click All Fields.
The
All Fields page of the contact record window appears. The default view
displays custom fields that you define yourself, none of which are
present in the default contact record window.
Click the Select from arrow, and scroll the list to note the many categories on which you can filter the information displayed on the All Fields page. Then in the Select from list, click Phone number fields. The All Fields page is filtered to display all the phone numbers that might be included in this contact record.
The All Fields page of a new contact record, displaying all available fields that are formatted to contain phone numbers.
You can
enter information into fields directly on the All Fields page of a
contact record by clicking in the Value cell for the field, and then
typing the associated entry.
 In the Show group, click General to return to the primary page of the contact record window.
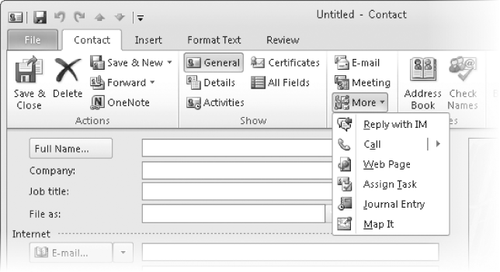
 In the Communicate group, click More.
 The More list expands to display types of communication you can initiate with a contact from his or her contact record.
From a contact record, you can initiate many types of electronic communication.
Note:
Keyboard Shortcut
Press Ctrl+F to create a message with the selected contact as the
subject. Press Ctrl+Shift+X to send a fax to the selected contact.
Tip:
Many of these
communication options are available from the Contact Card that appears
when you point to a contact in a message recipient box, or on the
context menu that appears when you right-click a contact record in an
address book.
Click to position the cursor in the Notes box of the contact record. Then click the Insert, Format Text, and Review tabs in turn to see the available commands.
Tip:
Many commands on the Insert,
Format Text, and Review tabs of a contact record window are unavailable
when the cursor is located anywhere other than in the notes pane.
The commands on these tabs are identical to those in the message window. Display the Backstage view, and then click Options. The Outlook Options dialog box opens, displaying the Contacts page.
The Contacts page of the Outlook Options dialog box.
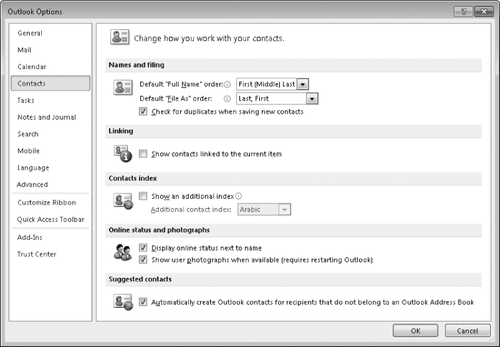
Note the types of changes you can make to the functionality of the Contacts module. Then in the Outlook Options dialog box, click Cancel. The dialog box closes and Outlook returns to the contact record window.
Display the Backstage view, and click Close. Then in the Microsoft Outlook message box that asks whether you want to save changes, click No. By
clicking Close in the Backstage view or on the Outlook menu that opens
when you click the Outlook icon at the left end of the title bar, or by
clicking the Close button at the right end of the title bar, you have
the option to not save changes to the contact record. Clicking the Save
& Close button in the Actions group on the Contact tab saves the
contact record without further prompting.
Note:
If you created a contact record while experimenting in the contact
record window that you don't want to keep, right-click the contact
record in the Contacts pane, and then click Delete.
|