Documenting Workbook Properties
Excel
automatically documents workbook properties while you work, such as
file size, save dates, and various statistics, and allows you to
document other properties, such as title, author, subject, keywords,
category, and status. You can view or edit standard document properties
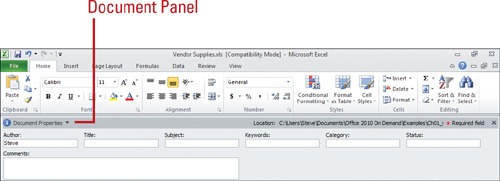
or create advanced custom properties by using the Document Information Panel,
which is actually an XML-based Microsoft InfoPath 2010 form hosted in
Excel. You can use document properties—also known as metadata—to help
you manage and track files; search tools can use the metadata to find a
workbook based-on your search criteria. If you associate a document
property to an item in the document, the document property updates when
you change the item.
View and Edit Document Properties
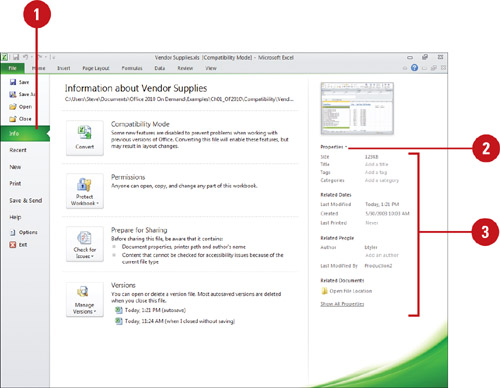
 Click the File tab, and then click Info.
 To display other properties, click the Properties button, and then select an option:
- Show Document Panel. Shows Document panel in the document.
- Advanced Properties. Displays the Properties dialog box.
 Enter the standard properties, such as author, title, subject, keywords, category, status, and comments.
- Show All Properties. Click the link to displays more options.


You can view or change document properties when you open or save a file.
In the Open or Save As dialog box, select the document you want, click
the arrow next to the Views, and then click Details to view file size
and last changed date, or click Properties to view all information. If
you want to insert or change author names or keywords, click the Authors
box or Tags box, and then type what you want.
Switching Views
Excel
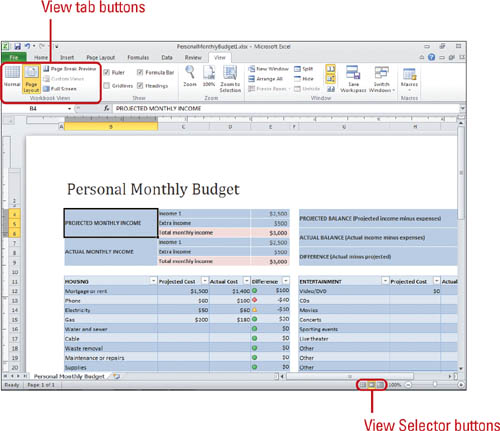
includes a view selector in the lower-right of the workbook window,
where you can use buttons to quickly switch between Excel views: Normal,
Page Layout, and Page Break Preview. Normal view is the main view in Excel. It lets you focus on entering, modifying, and managing your data. Page Layout view
is the printout related view. It lets you focus on how your worksheet
is going to look when you print it. You can work with page setup,
headers, footers, margins, and shapes in this view to make sure pages
look the way you want. You use Page Break Preview view along with Page
Layout view. Page Break Preview view
lets you see how your worksheet data appears on pages. In addition to
the view selector, you can also use the View tab to switch between
views. On the View tab, you can also switch to Full Screen view, which
allows you to see the maximum amount of worksheet data your screen can
display without the Ribbon, tabs, or Status bar.
Switch Between Views
- Use the View Selector. On the right-side of the Status bar, click any of the following view buttons: Normal View, Page Layout View, or Page Break Preview View.
- Use the View tab. Click the View tab, and then click any of the following view buttons: Normal View, Page Layout View, Page Break Preview View, or Full Screen.
To exit Full Screen View, press Esc.
