2. Calendar Item Windows
We
refer to the window in which you create or respond to an appointment as
the appointment window, to a meeting as the meeting window, and to an
event as the event window; collectively we refer to these windows as the
calendar item windows. Like the message windows, the calendar item
windows contain their own commands arranged on the ribbon.
The calendar item window
interface includes the Quick Access Toolbar, the ribbon, and the content
area that displays the appointment, message, or event information.
When opened from a calendar
item window, the Backstage view includes commands related to managing
tasks, such as saving tasks and task attachments and closing, moving,
and printing tasks.
Tip:
The commands available in the
Backstage view of a calendar item window are identical to those in the
Backstage view of a contact record window.
Commands on the ribbon of a
calendar item window are organized on four tabs: a main tab specific to
the type of calendar item and the Insert, Format Text, and Review tabs.
The latter three tabs are identical to those of other item windows.
The commands you use to
create and manage appointments are available on the main tab. The tab
name changes depending on the type of item you're creating
and whether you invite other people to attend. Regardless of the tab
name, commands are organized on the main tab in six groups: Actions,
Show, Attendees, Options, Tags, and Zoom. You can create a calendar item by using only the commands available on this tab.
Note:
SET UP You don't need any practice files to complete this exercise; just follow the steps.
 In the Navigation Pane, click the Calendar button.
Note:
Keyboard Shortcut Press Ctrl+2 to display the Calendar module.
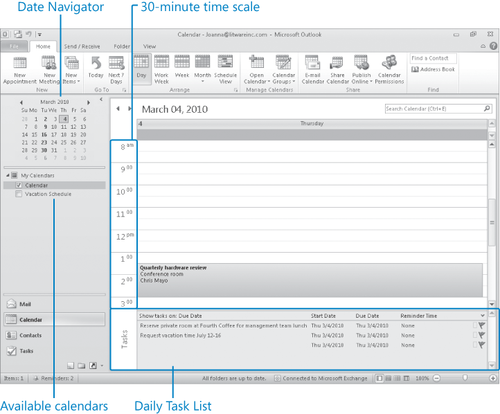
The Calendar module opens. The Calendar pane displays the calendar associated with your default e-mail account.
The Outlook program window displaying the Calendar module in Normal view.
 On the Home tab, in the New group, click the New Appointment button.
Note:
Keyboard Shortcut
Press Ctrl+N to create an appointment from within the Calendar module.
Press Ctrl+Shift+A to create an appointment from any Outlook module.
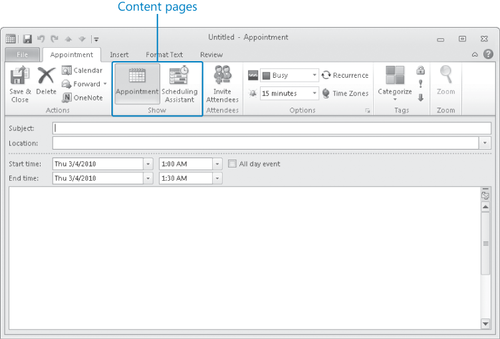
An untitled appointment window opens with the Appointment tab active.
The Appointment page of an appointment window.
 On the Appointment tab, in the Attendees group, click the Invite Attendees button.
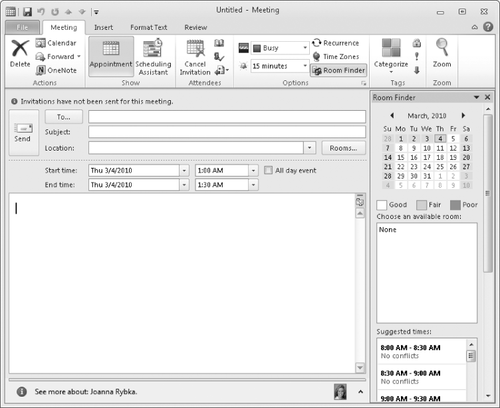
The appointment window changes to a meeting window, and the Appointment tab is replaced by the Meeting tab.
The Appointment page of a meeting window.
Tip:
The Insert, Format Text,
and Review tabs of the calendar item windows contain the same commands
as they do in other types of item windows.
The
meeting request header includes a To field in addition to the Subject
and Location fields present in the Appointment and Event windows. You
can invite attendees
by entering them in the To field, by clicking the To button and
selecting them from an address list, or by entering them in the All
Attendees list of the Scheduling Assistant.
 Enter one or more contact names or e-mail addresses in the To box. Then on the Meeting tab, in the Show group, click the Scheduling Assistant button.
The meeting window displays information about the available time of the requested meeting attendees.
The Scheduling Assistant page of a meeting window.
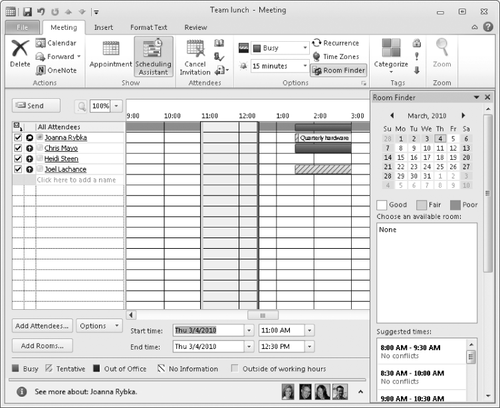
Familiarize yourself with the information in the Scheduling Assistant. Then close the meeting window.
 On the Home tab of the Calendar module, in the New group, click New Items, and then click All Day Event.
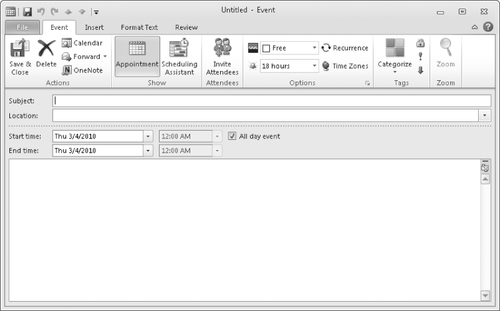
An untitled event window opens with the Event tab active.
The Appointment page of an event window.
Tip:
You can also open an Event window by selecting the All Day Event check box in the header of an appointment window.
The Event tab contents are nearly identical to
the Appointment tab contents—the only change is that on the Event tab,
in the Options group, your time is shown as Free by default rather than
Busy, and the reminder is set to display 18 hours prior to the event
rather than 15 minutes.
Tip:
You can invite people to an event in the same way you do to a meeting, by clicking the Invite Attendees button from within an event window.
In the Start time area, clear the All day event check box to change the event to an appointment.
 On the Appointment tab, in the Options group, click the Time Zones button.
A
new field displaying the time zone for each of the start and end times
appears. With this useful Outlook 2010 feature, you can schedule an
appointment that crosses time zones—for example, a flight from Los
Angeles to New York.
Display the Backstage view, and then click Options.
The Outlook Options dialog box opens, displaying the Calendar page.
The top half of the Calendar page of the Outlook Options dialog box.
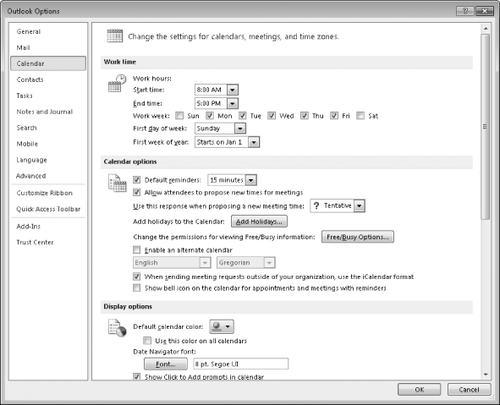
Note the types of customizations you can make in the Work time and Calendar options areas. Then scroll to the bottom of the page.
Additional Calendar module features that you can customize are displayed.
The bottom half of the Calendar page of the Outlook Options dialog box.
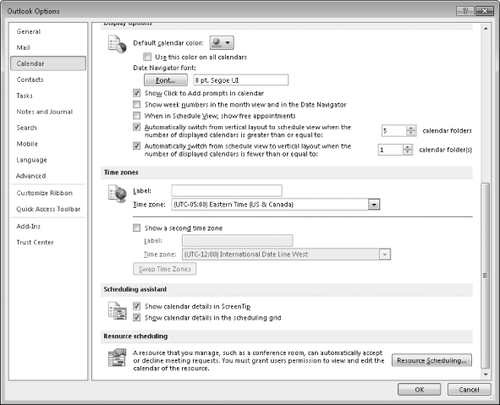
Note the types of customizations you can make in the Display options, Time zones, Scheduling assistant, and Resource scheduling areas. Then click Cancel to return to the appointment window.
Note:
Click the Time Zones button to hide the time zone settings, if you
don't want to display them. Then close the appointment window without
saving your changes.