In OneNote, display preferences include optional
settings that let you show or hide certain parts of the OneNote
interface or control how and where such elements appear.
Showing or Hiding the Ribbon
In OneNote 2010, the ribbon defaults to a minimized state, with only its tabs visible (see Figure 1). This setting allows for more of your
screen space to remain visible while taking or reading notes. This is
especially useful if you’re using OneNote on a laptop or netbook
computer with a small screen. To use the ribbon in this minimized state,
click any ribbon tab to temporarily reveal all of the commands
available on that tab. As soon as you click a command, the ribbon hides
itself again.

If you work on a desktop
computer with a large monitor, or if your laptop computer has a
decent-sized screen, you can opt to keep the full ribbon visible at all
times (see Figure 2).

To toggle the ribbon display, do either of the following:
Hold the Ctrl key and then press F1.
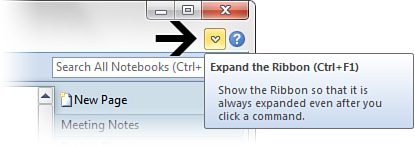
At
the far right of the ribbon tabs, next to the circular blue Help (?)
button, click the Expand the Ribbon (or Minimize the Ribbon) button (see
Figure 3).

Aside from showing or hiding its contents, you can fully customize the ribbon, including its commands, groups, and tabs.
Changing the Current Page View
The commands in the Views group let you change the appearance and dimension of the OneNote program window.
To change the current page view, do the following:
1. | Click the View tab.
|
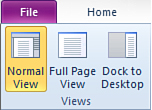
2. | In the Views group (see Figure 4), do any of the following:
Click the Full Page
View button (or press the F11 key) to remove most interface elements
from the OneNote program window. This gives you the most amount of
available screen space for reading and editing notes. The Quick Access
Toolbar and the ribbon tabs are still available, and keyboard shortcuts
that you know still work in this mode. To exit this view, click the View
tab and then click Normal View (or press F11 again). Click
the Dock to Desktop button (or press Ctrl+Alt+D) to shrink OneNote down
to a narrow vertical window that docks to the right side of the Windows
desktop. This view is useful for taking notes on something else you’re
looking at. To exit this view, click the View tab and then click Normal
View (or press Ctrl+Alt+D again). Click the Normal View button whenever you want to return the OneNote program window to its original appearance and dimensions.

|
|
If you choose to work in the
Dock to Desktop view, OneNote will automatically turn on Linked Notes
mode. If you take notes while looking at information in other windows
(for example, a web page in Internet Explorer or another Microsoft
Office document), OneNote will keep links to such information so you can
revisit it again later.
|
Displaying Rule Lines or Gridlines on All New Pages
f you want all new pages
that you create to have rule lines or gridlines, you can tell OneNote to
apply them automatically by doing the following:
1. | Open or create a blank, new page.
|
2. | Click the View tab.
|
3. | In
the Page Setup group, click the Rule Lines drop-down arrow and then
click the style of rule lines or gridlines you want to use for the
current page.
|
4. | Click
the Rule Lines drop-down arrow again, but this time, click Rule Line
Color and then select a color if you want the rule lines or gridlines
style you chose to appear differently from the default color of Light
Blue. If you don’t like a color selection you made, repeat this step
with another choice until you find a color you like, or reselect the
Light Blue setting at the top of the list.
|
5. | After
you’ve selected the line style and color in steps 3–4, click the Rule
Lines drop-down arrow once more and then click Create New Pages with
Rule Lines.
|
OneNote will now apply the
rule line or gridline style and color you selected in steps 3–4 and
automatically apply them to all future new pages when they are created.
|
If you want to turn this
setting off again, you can repeat step 4 in the previous procedure,
which will toggle the option off again. Alternately, you can also turn
this option off in the OneNote Settings dialog box. Click the File tab
and then click Options. Click the Display category on the left of the
dialog box and then uncheck the Create All New Pages with Rule Lines
option on the right. Be sure to click OK to save your changes.
|
Note that if you want any
existing pages in your notebook to have the same look, you’ll need to go
back to those pages and manually apply the same rule line or gridline
style.
One question that I’m
sometimes asked is why OneNote doesn’t provide a similar setting for
automatically applying a specific color to all new pages. One way to
achieve this is to create a blank, new page, applying your preferred
background color to the page (View tab, Page Setup group, Page Color
button) and then saving that page as a template. You then can have
OneNote automatically use that simple template as your default page
appearance for all of the new pages you’ll create from then on.