Changing the Microsoft Office Color Scheme
Though you can freely change
the colors of your notebook icons, your sections, and the background of
your pages, the default color scheme of certain elements of the OneNote
interface (for example, the surface of the ribbon) will appear as light
blue. If this clashes with your other Windows color preferences or
you’d simply prefer something more neutral, you can choose from two
other Microsoft Office color schemes that are built in to OneNote 2010.
To change the Microsoft Office color scheme in OneNote, do the following:
1. | Click the File tab and then click Options.
|
2. | In the OneNote Options dialog box, click the General category on the left side.
|
3. | On the right side, under the User Interface Options heading, click the Color Scheme drop-down menu.
|
4. | From
the list, select Silver to change the user interface from light blue to
a more neutral light gray. Alternately, select Black to choose a dark
gray contrast color scheme.
|
5. | Click OK to save your changes.
|
|
Though most of the controls
that you see in the OneNote Options dialog box apply only to OneNote
2010, any change you make to the user interface color scheme will
automatically apply to any other Microsoft Office 2010 programs that you
have installed. For example, if you change your OneNote color scheme
from Blue to Silver and then open Microsoft Word 2010, the ribbon and
other interface elements in Word will also appear Silver. Similarly, if
you change the color scheme in any other Office 2010 program and then
return to OneNote, you’ll see your last color scheme preference applied
to OneNote as well.
|
Turning the OneNote Taskbar Icon On or Off
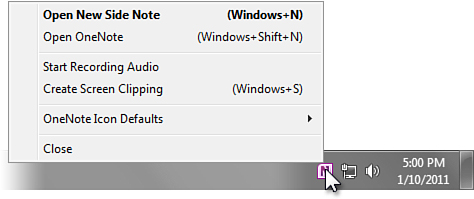
The
small OneNote icon that appears in the notification area of the Windows
taskbar (see Figure 9).
If you previously dismissed this icon and want it back, or if you want
to turn it off temporarily, you can set the appropriate option by doing
the following:

1. | Click the File tab and then click Options.
|
2. | In the OneNote Options dialog box, click the Display category on the left side.
|
3. | On the right side, under the Display heading, click the Place OneNote Icon in the Notification Area of the Taskbar check box.
|
4. | Click OK to save your changes.
|
The ability to turn this
feature off is provided in case you’re using other programs that use the
same Windows keyboard shortcuts, in which case you can resolve the
conflict by removing the OneNote taskbar icon.
If you have no keyboard
shortcut conflicts, turning this icon off is not recommended. Doing so
will disable several useful features and keyboard shortcuts.
|
On rare occasions, it’s
possible that the check box mentioned in step 3 of the previous
procedure appears selected, but the Screen Clipper and Launcher icon
isn’t available. This can happen if the program was manually terminated
in the Windows Task Manager, either by you or someone else using your
computer. In this case, you can easily restore the correct setting by
repeating steps 1–4 in the previous procedure twice in a row—first
deselecting the check box and clicking OK and then reselecting the check
box and clicking OK. This action restores the icon on your Windows
taskbar and puts it back in sync with the option check box.
|
Turning Screen Clipping Notifications On or Off
Whenever you insert a new screen
clipping into your notes, OneNote offers guidance by displaying helpful
messages whenever you begin and finish a new screen clipping (see Figure 10).

Although
these messages are quite helpful while you’re learning OneNote, you
might eventually prefer not to display them once you’ve gotten the hang
of working with screen clippings.
To turn off the notifications, do the following:
1. | Click the File tab and then click Options.
|
2. | In the OneNote Options dialog box, click the Display category on the left side.
|
3. | On the right side, under the Display heading, click the Disable Screen Clipping Notifications check box.
|
4. | Click OK to save your changes. |