3. Creating Custom Filters
Although Project comes
with many filter options, sometimes you may need to create and customize
your own filters. Filters are based on conditions that meet some
criteria defined by existing fields, including custom fields.
For example, if a
stakeholder only needs to see a few milestones and tasks, you can create
a filter for that need. If no field exists, you can create a custom
field, such as a flag field that you can subsequently use in a filter.
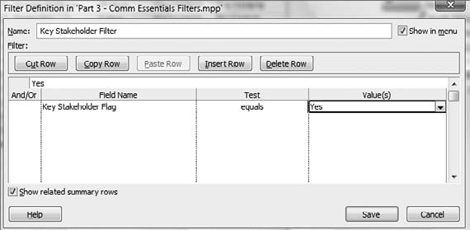
To create a custom filter, as shown in Figure 7, follow these steps:
Select View tab => Data group => Filter drop-down list => More Filters.
In the More Filters box, click New.
In the Filter Definition dialog box, in the Name field, enter the custom name for your filter. In this example, use Key Stakeholder Filter.
Select the Show in Menu check box if you want the filter to be displayed in the drop-down list.
Under
Field Name, click the first blank space, and click the drop-down list.
Select the field you want to filter with. In this example, choose the
custom field Key Stakeholder Flag.
Under Test, select the appropriate test. In this case, choose Equals.
Under Value, select the appropriate value. In this case, choose Yes (you can also type in a value).
Select the Show Related Summary Rows check box if you want the parent tasks to be displayed as well.
Click Apply (if you want to run the filter).

Because this filter example is
based on a custom flag field, it has tasks to display only if Yes
appears in the custom flag field and illustrated in Figure 8.

You can see that tasks with Yes in the Key Stakeholder Flag field are
included in the filter. But the summary tasks that have No in the field
are also included. Why? Because when I created the filter, I selected
Show Related Summary Rows.
To clear a filter, select Clear Filter or [No Filter] from the drop-down Filter list.
NOTE
Project
automatically separates custom filters from built-in filters in the
drop-down list. This makes it easy for you to decipher which filters you
created and which filters come with Project.
Review the built-in filters to
see how they're constructed, because filters can be complex. The
previous example is simple, but you can use And/Or functions to build
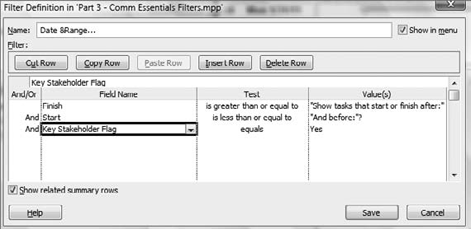
more complex filters. Figure 9 shows how the Date Range filter was built.
To edit an existing filter, you can follow these steps:
Select View tab => Data group => Filter drop-down list => More Filters.
In the More Filters dialog box, click Edit.
In the Filter Definition dialog box, edit or review the filter properties.

You can also create a new
custom filter by starting from an existing filter. For example, if you
want to create a custom filter that displays only specific tasks based
on a date range, you can start from the Date Range filter and add the
filter portion to it, as shown in Figure 10. Follow these steps to start from an existing filter:
Select View tab => Data group => Filter drop-down list => More Filters.
In the More Filters dialog box, click Copy.
In the Filter Definition dialog box, add the new criteria. In this example, add the Key Stakeholder Flag field.

Using an AND
statement narrows your filter, and using an OR statement expands your
filter criteria. For example, if you create a filter that shows tasks
that have David AND Robert assigned, the result may be very few tasks or
none at all. However, if you create the condition based on David OR
Robert, then the result will include many more tasks; the filter will
select all tasks to which David is assigned, all tasks to which Robert
is assigned, and all tasks to which both are assigned.