The Tasks module is displayed when you click Tasks in the Navigation Pane.
1. Tasks Module Content
The Navigation Pane in the Tasks module displays the task list variations you can display in the content
pane, including the To-Do List and Tasks folder created by Outlook, as
well as any custom folders you create to contain task items.
We refer to the center pane
that displays content in the Tasks module as the Tasks pane. The Tasks
pane displays either the To-Do List or a Tasks List.
The To-Do List is
displayed by default. This list of tasks is organized by default in
groups by due date. When the To-Do List is displayed, by default the Reading Pane is also displayed.
A
Tasks List is displayed in multiple columns with each task preceded by a
check box so that you can indicate when the task is complete. When a
Tasks List is displayed, by default the Reading Pane is hidden.
There are two standard Tasks module views:
Normal In this view, the Navigation Pane and To-Do Bar are maximized.
Reading In this view, the Navigation Pane, To-Do Bar, and ribbon are minimized.
The ribbon in the Tasks module includes the File tab and the four standard module tabs:
Home
This tab includes the commands you need to create, manage, and view
tasks, and to initiate communication with contacts. You can assign tasks
to coworkers and work with tasks assigned to you, send task information
to a OneNote notebook, and tag tasks in ways that enable you to better
locate or manage them.
The Home tab of the Tasks module ribbon.

Send/Receive This tab is identical to that of the Calendar and Contacts modules.
The Send/Receive tab of the Tasks module ribbon.

Folder This tab provides the same functionality as it does in the Calendar and Contacts modules, but is specific to task items.
The Folder tab of the Tasks module ribbon.

Tip:
The
Actions commands are available only when you select a custom folder (a
folder that you create, rather than the To-Do List or Tasks folders
created by Outlook).
View
This tab provides the same functionality as it does in the Mail and
Contacts modules. The content of the Arrangement gallery is specific to
tasks.
The View tab of the Tasks module ribbon.

2. Task Windows
The
window in which you create or manage a task is a task window. Like the
message, contact record, and calendar item windows, the task window
includes the Quick Access Toolbar, a unique set of commands arranged on
the ribbon, and the content area that displays the task information.
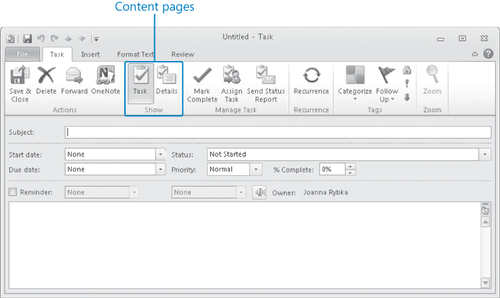
A new task window.

When opened from a task window,
the Backstage view includes commands related to managing tasks, such as
saving tasks and task attachments and closing, moving, and printing
tasks.
Tip:
The commands available in the
Backstage view of a task window are identical to those in the Backstage
view of a contact record window.
Commands on the ribbon of a task
window are organized on four tabs: The Task tab and the Insert, Format
Text, and Review tabs. The latter three tabs are identical to those of
other item windows.
The commands you use to
create and manage most tasks are available on the Task tab. Commands
include those for managing the task, sending the task to a OneNote
notebook, switching among the task pages, and managing task assignments
and frequency. This tab also includes commands for assigning a category
or follow-up flag to a task, preventing other Outlook users from viewing
the task details when connected to your account, and changing the
magnification level of the Notes pane (not of the task window).
In this exercise, you'll take a tour of the Tasks
module and look at features in the task window that differ from those
in the message, contact record, and calendar item windows.
Note:
SET UP You don't need any practice files to complete this exercise; just follow the steps.
In the Navigation Pane, click the Tasks button.
The Tasks module opens, displaying the To-Do List view of your task list.
The Outlook program window displaying the Tasks module in Normal view.

If the To-Do
Bar is expanded, you can see the contents of your task list in the To-Do
Bar Task List as well as in the Tasks pane. If the To-Do Bar is
minimized, the number of active tasks due today appears on the minimized
To-Do Bar.
 On the Home tab, in the New group, click the New Task button.
An untitled task window opens.
Note:
Keyboard Shortcut Press Ctrl+N to create a task from within the Tasks module. Press Ctrl+Shift+K to create a task from any Outlook module.
Familiarize yourself with the fields in the task window.
The
Subject field is the only field in which you must enter text to create a
task. If you enter an end date, Outlook adds the task to the
appropriate Due Date category (Today, Tomorrow, This Week, Next Week, or
a custom category based on the date). Leaving the Due Date set to None
adds the task to the No Date category.
Tip:
You can easily move a task to a
different Due Date category by clicking the task in the To-Do List,
tasks list, or To-Do Bar, and then clicking the timeframe you want in
the Follow Up group on the Home tab of the Tasks module.
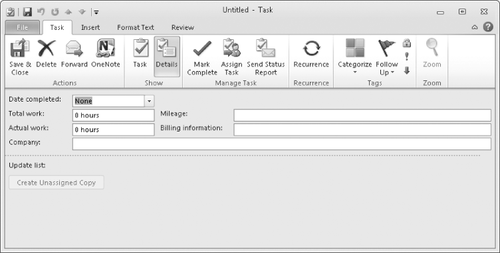
 On the Task tab, in the Show group, click the Details button.
The Details page appears in the content pane of the task window.
The Details page of a task window.

Notice the type of information you can track on the Details page. This could be useful when tracking billable tasks for clients.
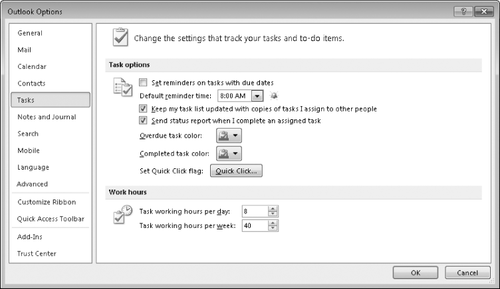
Display the Backstage view, and then click the Options button.
The Outlook Options dialog box opens, displaying the Tasks page.
The Tasks page of the Outlook Options dialog box.

Familiarize yourself with the customizations you can make to the way Outlook manages tasks. Then click Cancel to return to the task window.