As its name implies, Word’s AutoCorrect
feature can automatically correct errors in a document as soon as you
type them. For example, if you type siad, Word can instantly change it to said
because AutoCorrect works hand-in-hand with Word’s spelling dictionary.
When AutoCorrect runs the way you want it to, it can drastically reduce
the number of minor errors in your documents.
That said, AutoCorrect can also be a pain. Suppose, for example, that you frequently use the characters (c)
in your documents—perhaps for professional reasons. If so, you may get
annoyed if Word always changes those characters to the © symbol. This is
an example of a “correction” that isn’t exactly correct, and
AutoCorrect makes it by default.
Luckily, you aren’t stuck with AutoCorrect. When it
makes an on-the-fly correction you don’t like, you can reject the change
and keep moving. You can customize AutoCorrect by adding your own
common misspellings and typing errors to its list, and by removing items
from the list if you don’t want them to be changed. If you find that
AutoCorrect is just a headache, you can disable it completely.
|
If you’re new to Word, it’s a good idea to watch
AutoCorrect in action for a while before changing or disabling it. It’s
configured to catch and fix many of the most common typographical
errors. AutoCorrect also corrects certain oversights, such as
capitalizing the names of days when you forget to.
|
Rejecting a Change Made by AutoCorrect
Suppose you’re typing a list, and for stylistic
reasons you don’t want to capitalize the first letter of each sentence
in the list. (Hey, writers do stranger things than this on purpose.)
After you type the first word of a sentence and press the spacebar,
however, AutoCorrect flies into action and capitalizes the word’s first
letter. Here’s how to reject the change and restore the word to its
noncapitalized state:
1. | Hover the mouse pointer over the word that AutoCorrect changed. A small blue rectangle appears under the word’s first letter.
|
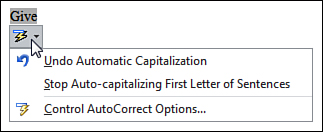
2. | Point to the blue rectangle. The rectangle changes to the AutoCorrect Options button, as shown in Figure 1.
|
3. | Click the button’s drop-down arrow to open a menu of options.
|
4. | Do one of the following:
- Click the Undo option to undo this instance of the change. Word will make the same type of change in the future.
- Click the Stop option to stop Word from making this change again. This creates an exception in AutoCorrect, which prevents Word from treating your original action as an error.
- Click Control AutoCorrect Options to open the AutoCorrect dialog box. (We’ll explore this dialog box in the next section, “Changing AutoCorrect Settings.”)
|
Word accepts your change, and you can resume typing.
|
To simply undo an AutoCorrect change without using
the options button, press Ctrl+Z to issue the Undo command. However, you
must use Undo immediately after the AutoCorrect change appears;
otherwise, you’ll undo any other action you took since the automatic
correction was made.
|
Changing AutoCorrect Settings
When you open the AutoCorrect dialog box, you see
that you can control many of the feature’s actions. Study the
AutoCorrect options to determine which ones you like and don’t like;
then turn them on or off accordingly. You can also add and delete
specific exceptions to some of AutoCorrect’s rules, which is handy if
you want to force Word to accept certain spellings or capitalizations.
Changing AutoCorrect’s Capitalization Settings
By default, AutoCorrect automatically capitalizes
words under several different circumstances. If you don’t like any of
these capitalization settings, here’s how to change them:
1. | Click the File tab.
|
2. | Click Options to open the Word Options window.
|
3. | Click Proofing to view Word’s proofing options.
|
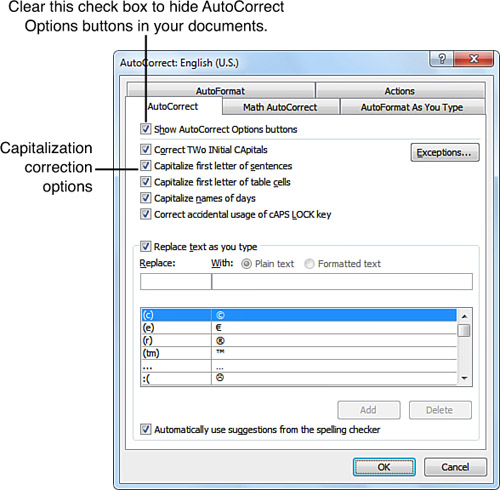
4. | Click the AutoCorrect Options button. The AutoCorrect dialog box opens with the AutoCorrect tab visible, as shown in Figure 2.
|
5. | Clear the Show AutoCorrect Options Buttons check box if you want Word to stop displaying these buttons in your documents.
|
6. | Clear
any of the next five check boxes to deactivate a capitalization
setting. For example, if you prefer that Word never automatically
capitalize the first letter of your sentences, clear the Capitalize
First Letter of Sentences check box.
|
7. | Click OK.
|
Creating Exceptions to AutoCorrect’s Rules
AutoCorrect is flexible about enforcing its rules for
capitalization and spelling. In fact, Word has dozens of predefined
exceptions to these rules. You can create your own exceptions or delete
existing ones. Here’s how:
1. | Open the AutoCorrect dialog box.
|
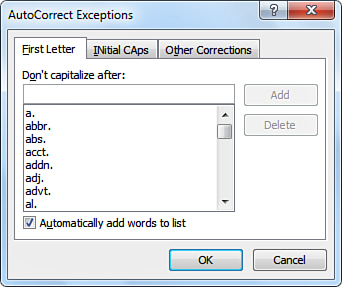
2. | Click the Exceptions button to open the AutoCorrect Exceptions dialog box, as shown in Figure 3.
This dialog box lets you create specific exceptions for Word’s
automatic capitalization rules. Here’s how the dialog box’s three tabs
work:
- The First Letter tab lists commonly used abbreviations that end
with a period, such as “approx.” and “etc.” Because you typically would
not capitalize a word immediately following one of these abbreviations,
Word does not do so automatically.
- The INitial CAps tab
lists abbreviations or words whose first two letters are typically
capitalized, such as “IDs.” When Word encounters a word or abbreviation
included in this list, AutoCorrect does not change the capitalization.
- The
Other Corrections tab provides a blank list where you can create your
own exceptions. Typically, you would use this tab to tell Word to accept
spellings that it would ordinarily correct. For example, if you want
Word to accept the British spelling “behaviour” instead of changing it
to the American “behavior,” you can add the British spelling to this
list.
|
3. | To
add your own abbreviation or word to any of the lists of exceptions,
type it in the Don’t Capitalize After box or the Don’t Correct box; then
click Add.
|
4. | To remove an entry from the list, click it, and then click the Delete button.
|
5. | Click OK twice to close both dialog boxes.
|
Adding and Deleting AutoCorrect Entries
If you frequently misspell a
word and Word doesn’t automatically correct it for you, your particular
misspelling might not be covered by AutoCorrect. If that’s the case, you
can create a new AutoCorrect entry to correct the misspelling for you.
You can also delete existing AutoCorrect entries.
Creating a New AutoCorrect Entry
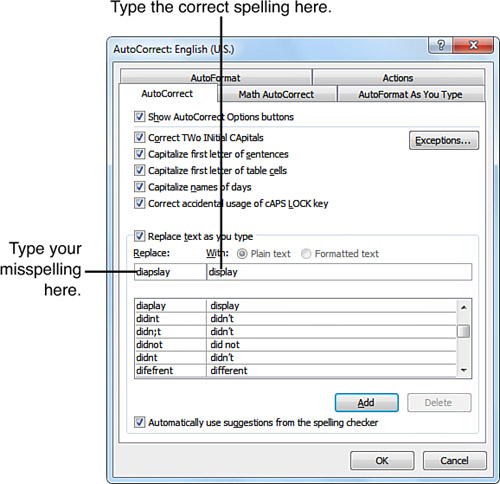
Suppose you often type diapslay when you mean to type display.
Word flags the misspelled word with a wavy red underline but does not
correct it automatically. Here’s how to create a new AutoCorrect entry
for this misspelling:
1. | Open the AutoCorrect dialog box, and click the AutoCorrect tab if necessary.
|
2. | Click in the Replace box to place the insertion point there.
|
3. | Type your misspelling (such as diapslay).
|
4. | Click in the With box.
|
5. | Type the correct spelling (such as display), as shown in Figure 4.
|
6. | Make sure that the Replace Text as You Type check box is checked. (It should be, by default.)
|
7. | Click the Add button to add your new entry to the list.
|
8. | Click the OK button to close the dialog box.
|
To make sure your new entry works, open a document,
purposely type the misspelled word, and press the spacebar. AutoCorrect
should replace the misspelled word with the correct spelling.
|
AutoCorrect doesn’t make a correction until you
“complete” the entry. That is, Word waits for you to press the spacebar,
Enter, some other key that causes the insertion point to move to a new
word, paragraph, table cell, and so on. At that point, AutoCorrect kicks
into gear and makes its change.
|
Deleting an AutoCorrect Entry
If you decide you don’t need a specific AutoCorrect
entry, you can remove it from the list of automatic corrections. Word
might still flag the text as a misspelling but should no longer apply
the AutoCorrect change. Here’s how to delete an entry:
1. | Open the AutoCorrect dialog box, and click the AutoCorrect tab if necessary.
|
2. | Scroll through the list of errors and corrections to find the entry you want to delete.
|
3. | Click the entry to select it.
|
4. | Click the Delete button.
|
5. | Click the OK button to close the dialog box.
|
Disabling AutoCorrect
If
you just can’t stand dealing with the whole AutoCorrect thing, turn it
off. To do this, open the AutoCorrect dialog box, clear all the check
boxes on the AutoCorrect tab—especially the Replace Text as You Type
check box—then click OK. Word won’t replace anything else you type, ever
again. To enable AutoCorrect again, just go back and recheck those
check boxes.