1. Creating a Notebook
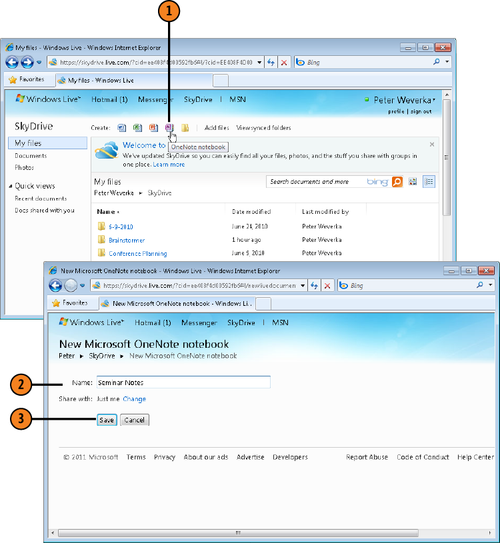
Starting in SkyDrive (click SkyDrive on the Windows Live taskbar), use one of these techniques to create a notebook:
Then enter a name for the
notebook and click the Save button. If you intend to share the notebook,
click the Change link and choose a Share With setting.
Click the File button and
choose Close to close a notebook. To open a notebook, open the SkyDrive
folder in which the notebook is stored and then click the notebook’s
name.
1.1. Create a Notebook
Click the OneNote Notebook icon.

2. Exploring OneNote Web App
OneNote Web App is an abridged version of OneNote 2010. If you are familiar with OneNote 2010, OneNote Web App looks familiar.
Unlike OneNote 2010, the Navigation bar in
OneNote Web App lists only section and page names. Click a page name to
open a different page. Click section names to expand and collapse
sections.
To write a note, double-click on the screen and start typing.
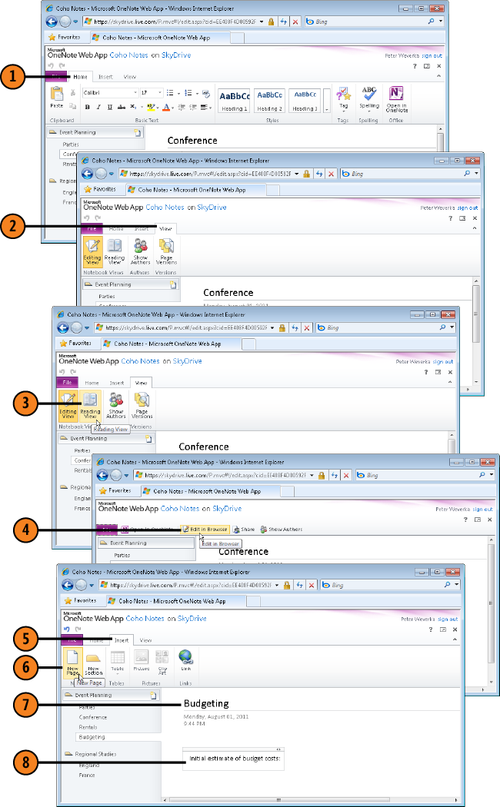
Instead of six tabs on the ribbon, OneNote Web App has three tabs:
Home: Offers commands for formatting text, tagging notes, and spell checking.
Insert: Offers commands for creating new pages and sections, creating a table, inserting pictures and clip art, and creating hyperlinks.
View: Offers commands for changing views, showing who wrote notes, and seeing different versions of a page.
Go to the Insert tab to
create a new page or section (you can also click the New Page button on
the Navigation bar to create a page).
2.1. Explore OneNote Web App
Click Edit in Browser to return to Editing View.
Click the New Page button.
Double-click on the screen and type a note.

Tip:
To rename a page or section,
right-click the name of the page or section and choose New Page or New
Section. Then enter a new name.
Tip:
To delete a page or section, right-click the name of the page or section and choose Delete.