2.1.1 Using the Backup Utility
One of the great improvements of the SharePoint
Backup utility is the increased flexibility offered in what can be
backed up (from a farm down to
a site). To complete a backup, click the Perform a backup link in the
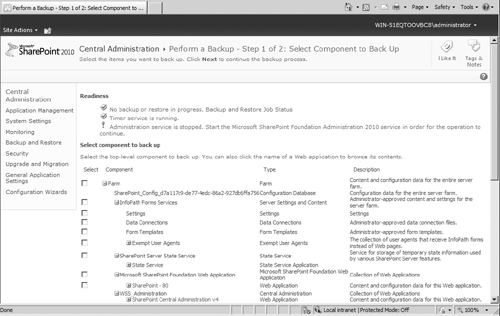
Backup and Restore screen within Central Administration. Figure 2
shows the interface for selecting the SharePoint components you wish to
back up. Each component is associated with a SharePoint database (and
ultimately, specific SharePoint content). It is possible to select an entire farm for backup or individual components.

Note
To perform a backup, you must be an administrator on
the farm. To run a restore, you must be a farm administrator and a
server administrator on the front-end machines.
Another interesting feature of the SharePoint backup
utility is the storage of backup history. SharePoint actually catalogs
full and differential backups. This is done by examining the backup
files on the file system and
identifying new content.
A full backup
backs up the selected content with all the history. Specifically, a
full backup backs up the entire database, including all file groups and
data files, providing a high degree of data integrity. The downside is
that full backups can take a long time for large data stores. We
recommend keeping your content databases to a reasonable size (under
100GB) so that backups (and restores) can be completed in a reasonable
amount of time.
A differential backup
backs up all changes to the selected content since the last backup
(either full or differential). This option allows IT administrators to
better manage disk space associated with SharePoint backup files. In
addition, the backups are faster. The key issue with differential
backups is that a restore requires the administrator to restore the
last full backup in addition to the differential backups that have
taken place.
Given the choice, which should you use? The idea is
to use a combination of the two as follows: Start with a full backup of
your data. Then perform a daily differential backup of all databases
during offline hours. Next, perform a full backup of all databases on a
weekly basis. Finally, perform a full restore (to an offline data
source such as a mirror server or disk) of your backup set roughly once
per month. This lets you to validate that your backup procedures are
working correctly.
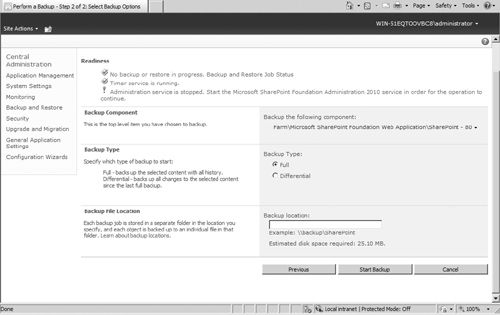
Figure 3
shows the Start Backup page for backing up a Site Collection. Enter a
backup file path to set the location where SharePoint backup files will
be stored. The Backup utility only accepts UNC file paths, and
permissions on the folder must be sufficient to allow SharePoint Backup
(running under the credentials of the logged in user) to write files to
that folder, and there must be sufficient space to hold the resulting
backup file.

Once the backup is completed, the Backup tool
provides diagnostic details on the backup files created and any errors
that may have occurred. As expected, the elapsed time associated with
the backup process is proportional to the amount of data being backed
up. A standard backup can take a few minutes (when content is light) to
several minutes (when the amount of content stored is large) to create
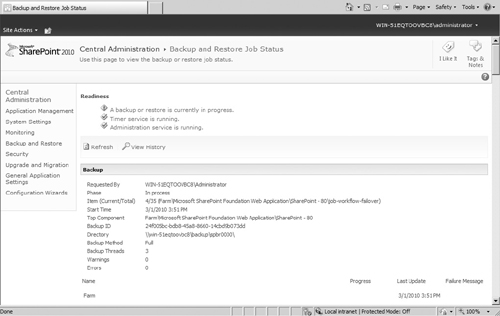
all associated files. Figure 4
shows a completed backup process. Diagnostic data includes status,
elapsed time, file directory path, and associated error messages.
