You will find an .sql script to
setup the NorthWind database in the associated code download, or you
can download it from Microsoft's website. Thus, at this time, go ahead
and run that script and setup NorthWind database on a SQL Server you
can access. I set it up on the same SQL Server that is on my
development virtual machine. The process of using BCS in SharePoint
involves setting up an External Content Type and then using that
content type inside of an external list. Thus, start SharePoint
designer 2010, and open the http://sp2010
site. Once the site is opened, the various categories of artifacts of
the site are shown in a navigation bar on the left side. One of those
is "External Content Types ", go ahead and click it. Because, as of now
you have no external content types setup in this SharePoint site
collection, you will see an empty pane on the right. Now, in the
ribbon, go ahead and click on the "New External Content Type" button.
What I intend to do is, setup an external content
type that shows all NorthWind customers. But these customers are very
similar to an existing content type in SharePoint called "Contacts". Is
it possible perhaps to show these customers as contacts, and thus be
able to do with NorthWind Customers (which are also my contacts), and
operate upon them like a regular SharePoint contact? Let's see!
After you click on the "New External Content Type"
button, SharePoint designer will show you a form that will let you
customize various properties of the new External Content Type you are
setting up. In this form, go ahead and specify the name to be
"NorthWind Customer", and choose to base it on the Office Item Type
"Contact". Also glance over the other choices available to you there.
Do these seem like something you might be able to use in Outlook?
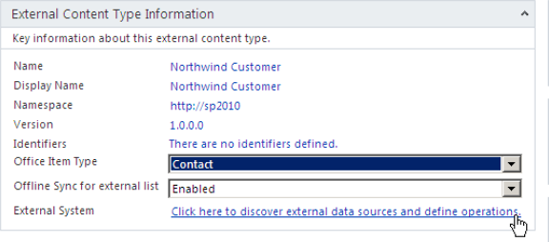
When you have filled out the form, click on the
"Click here to discover external data sources and define operations"
link as shown in Figure 1.
Clicking on that link will bring you to a screen
where you can add one or more data sources for this content type.
Clicking on the "Add connection" button will pop open a dialog box
asking you, what kind of data source you wish to add. There are three
choices.
.NET Type: Allows you to use a .NET component as your data source.
SQL Server: Allows you to use a backend SQL Server database as your datasource. This is the choice we will use for this example.
WCF
Service: Any WCF service can also act as a data source, this means
existing web services will also work, because they are effectively WCF
Services with basicHttpBinding.
In this example, choose SQL Server as the back-end
datasource. In the dialog box that pops up, you can specify the
datasource details along with the authentication mechanism used. As you
can see, there are three choices for SQL Server based connections. You
can choose to connect using the user's identity which is great for
development purposes but in production will cause a new connection pool
to be created for every user who uses this external content type -
hardly a good choice! Later on, once your external content type
datasource is setup, if you poke through the UI, you will discover a
checkbox that lets you completely disable connection pooling as well.
Bad or disabled connection pooling will severely negatively affect your
performance.
Once the connection has been added, look for the
"Customers" table under NorthWind, right click on it, and choose to
create all operations. You would note that BDC was designed to be
read-only, but in BCS you can create all sorts of read/write
operations. Also, from this screen you can choose to create
associations. Once you choose to create all operations, a dialog box
will pop-up, which will prompt you with any unresolved issues, both
warnings and errors, in your newly created operations. On this screen,
you should map a queried column to an Office Property. For instance, I
mapped CustomerID to Account, Customer Address to Business Primary
Address etc. Not everything needs to be mapped, but the identifier
fields do need to be mapped. Also, on this screen you should pick a
column or two that will show up in the picker in SharePoint. The picker
will otherwise show all columns, which is not such a great user
experience. I choose to show the ContactName in the picker.
The last screen in adding operations allows you to
add filters. Not adding filters will cause a large amount of data to be
fetched into SharePoint. Unlike BDC, BCS External Lists do not store
the information in the content database - they leave the information in
the back-end store, and bring it into SharePoint when it is needed. As
a result, very large amounts of data being brought into SharePoint may
not be too good for performance. It isn't as bad as it sounds though,
because BCS does have bulk load operation routines, so unless you are
fetching thousands of items, this shouldn't be such a problem. For the
NorthWind customers, I choose to not add any filters. Click on Finish
to complete adding the operations. You can double click on any
operation to further tweak the operations as necessary.
Now, glance at the ribbon! You will see two more
interesting buttons. First of all, both of these buttons will require
you to save the external content type first. So go ahead and save the
external content type first. You might wonder where this entity was
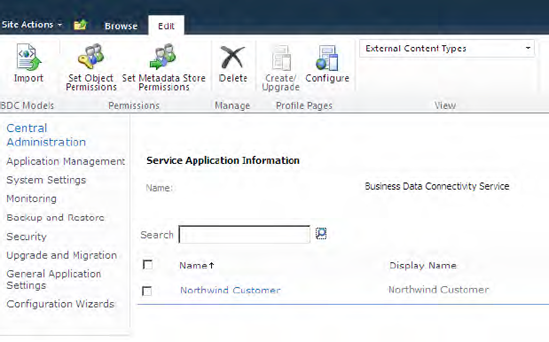
stored. If you visit central administration \manage service
applications, and click on the "Business Data Connectivity" service
application, you should see the NorthWind Customer saved as shown in Figure 2.
Once your entity is saved, come back to SharePoint designer and look at those two buttons enabled on the ribbon.
The first button deals with creating the profile
page! A profile page is what shows a single entity. This is a concept
carried over from BDC, behind the scenes you need a method instance of
"SpecificIdentifier" for the profile page to be created. Since you have
a "Read Item" operation created in the NorthWind Customers External
Content Type, you are able to create a profile page. But if you click
on this button, you will get the error shown in Figure 3.
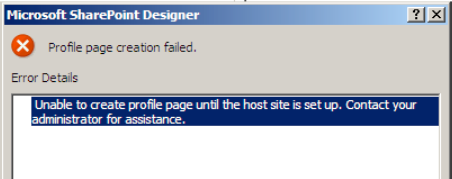
While this looks like an error, it is a huge
improvement over BDC. In BDC, the profile page ended up getting created
in the SSP - you are not going to give end users access to the SSP! So
in the real world, you ended up deleting that profile page, then
creating a new one. What a pain! In SharePoint 2010, you first specify
the profile page host URL, so you choose where the profile pages get
created! Thus go ahead and specify the host URL for profile pages. You
can do so by visiting the newly created external content type under
central administration \manage service applications \business data
connectivity, and clicking on the "Configure" button in the ribbon as
shown in Figure 4.

Once you have setup the profile page host URL, come
back to SharePoint designer, and click on the Create Profile page once
more time! Profile pages are also what the end user's will see as
search results when these external content type entities get crawled.
The second button is prompting you to create lists
and forms. Lists will be based on external content lists, and forms
will be the user interface through which you will be able to interact
with this external content type. Both of these can be done through the
browser, or from SharePoint designer. If you decided to create the
external list using the browser, you would create a new list using a
list definition called "External List". You would then specify which
External Content Type this external list is to be based upon. But for
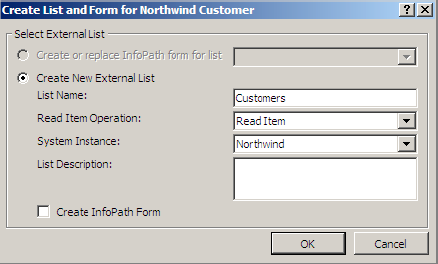
now, in SharePoint designer, go ahead and click on this button to
create the external list. This will pop up a dialog box as shown in Figure 5. Fill the dialog box, and choose to not create an InfoPath form yet.
Next, give yourself all permissions to the
"NorthWind Customers" BCS external content type in central
administration. All permissions are not required to simply use the
object, but at least one user should be given all permissions to the
BCS external content type. Do note that the BCS metadata is cached for
a minute, so if you don't see the results of your permission changes
immediately, try after a minute.
Finally, visit the list at http://sp2010/Lists/Customers.
You should see all NorthWind Customers pulled into the list. You are
probably looking at a lot of columns, but you can always modify the
view to show a subset of columns! Now go ahead and edit the first
database row, uhhh, I mean list item, with CustomerID "ALFKI". You
would note that editing the list item updates the SQL database row !
Now in the ribbon, click on the "Connect to Outlook" button under the
"List" tab, and SharePoint will generate a vstopackage at runtime and
prompt you to install it as shown in Figure 6.
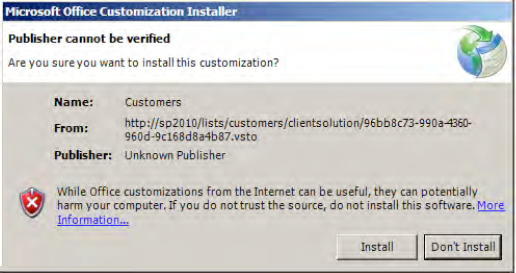
Choose to install the package, and then start
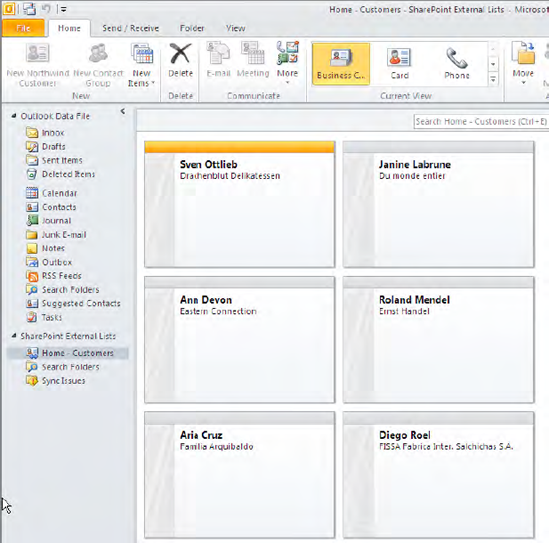
Outlook. You would note that all your NorthWind customers are now
available as "Contacts" in a separate .pst. This can be seen in Figure 7.
Remember when you had setup this external content
type, you had based it on the "Contact" Office type? What do you think
would happen if you had based this external content type on "Task " or
"Appointment" Office type?
Having content available as external content types,
and in external lists also opens up some other interesting
possibilities. For instance, you can use external content types as data
sources in your Word templates! Lets imagine that you want to compose a
Word document to a NorthWind customer. While you could start by typing
up a fresh document, it would be nice if such a document was based on a
template. Also, now that you have contact information available as an
external content type in your SharePoint site, it would be nice if
somehow my Word template was smart enough that typing in the CustomerID
would fill in all the rest of the details, such as their full name, and
their address.
All this is possible with BCS and external content
types. Let's see how! Start by creating a new document library called
"Customer Communication". In this document library, go ahead and add a
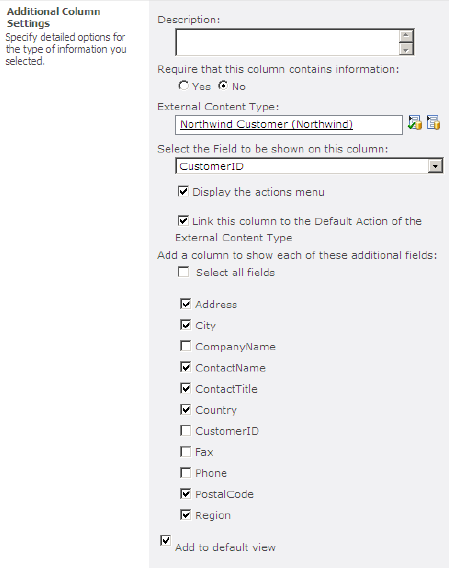
column based on the "External Data" column. Choose to import the
information as shown in Figure 8.
Now, visit the document library settings, and under
"Advanced settings " look for the document template. Click on the link
to "Edit Template", and Word should pop up allowing you to edit the
Template. Now, go ahead and craft up the template as shown in Figure 9.

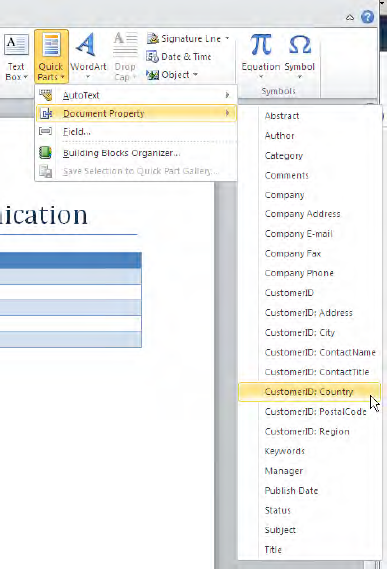
Those placeholders you see in the right column have
been picked from the Document Properties under Quick Parts under the
Insert Tab of the Word ribbon. This can be seen in Figure 10.
Particularly speaking, the first Quick Part you see
is "CustomerID". This will be editable in the final Word template,
allowing you to pick an individual customer; the other Quick Parts will
be read-only. To be sure that you dropped the right quick part, the
customer quick part will show two icons right next to the Quick Part as
shown in Figure 11.

Okay good, now go ahead and save your template,
close Word, and come back to the "Customer Communications" document
library. Choose to create a new document in the document library, and
once a new document is created for you using the template that you just
created. Use the picker icon (the second icon in Figure 11), and which should bring up a picker as shown in Figure 12.

You would note that the rest of the fields get populated for you as shown in Figure 13.
