1. Windows Internet Connection Sharing with a Dial-Up Connection
The
ICS feature provided with Windows 7 can share modem or broadband
connections that require a sign-on procedure. The connection is made
automatically whenever any user on the network tries to access the
Internet; this is called demand-dialing. The following section
describes how to set it up.
Setting Up the Shared Connection
To
set up a shared connection, first install and test your modem and ISP
information on the computer that will be used to share the connection.
To do this, set up a standard dial-up connection .
Be sure that you can access the Internet properly by viewing at least
one web page. When you know this is working, follow these steps:
1. | Click
Start, Control Panel, View Network Status and Tasks (under Network and
Internet). Select Change Adapter Settings. Right-click the icon for
your ISP connection and select Properties.
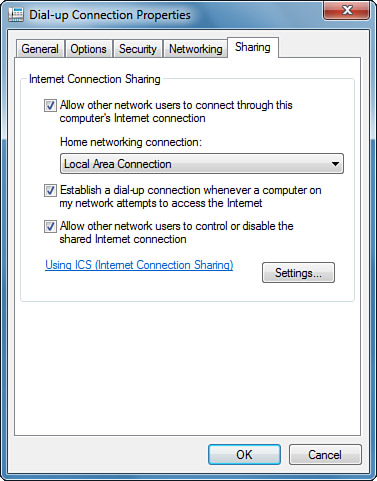
| 2. | Select the Sharing tab. Check all the boxes, as shown in Figure 1.

| 3. | Select
the Options tab. Uncheck Prompt for Name and Password and also Prompt
for Phone Number. This allows the connection to start up without user
intervention.
Note If
your computer has multiple network connections, the Home Networking
Connection selection will be present. Open the drop-down list and
select the network connection that leads to your network’s other
computers. |
| 4. | If
you want a dedicated, always-on 24×7 connection, check Redial If Line
Is Dropped, set the number of Redial Attempts to 99, set Time Between
Redial Attempts to 10 Seconds, and set Idle Time Before Hanging Up to
Never. Be aware that if you pay per-minute charges, this can result in
an astounding phone bill!
Caution Step
5 is a crucial part of protecting your computer and LAN from hacking
over the Internet. Omitting this step could make your computer
vulnerable to hacking. |
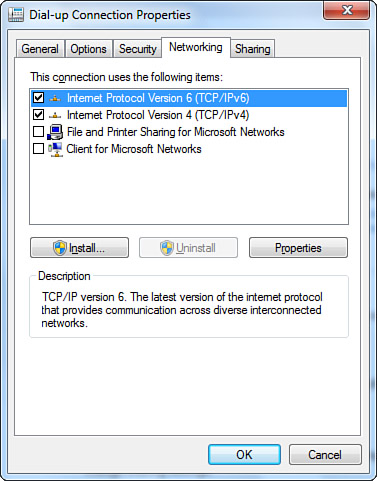
| 5. | Select
the Networking tab. In the list of components used by the connection,
be sure that only Internet Protocol Version 6 (TCP/IPv6), Internet
Protocol Version 4 (TCP/IPv4), and QoS Packet Scheduler (if present)
are checked, as shown in Figure 2.
This will prevent file sharing from being exposed to the Internet. The
firewall will do that, too, but it doesn’t hurt to be extra safe.

| 6. | | 7. | Restart your computer and try to view any web page (such as www.google.com). Your computer should automatically dial your ISP.
|
If
you attempt to view a web page on a network with a shared connection
and no Internet connection is established, first listen to the modem to
see whether it’s trying to establish the connection. If it is, you
might just need to wait a bit and try to view the page again. Sometimes
Internet Explorer gives an error message before the modem has had
enough time to make the connection. If the modem
is making a connection but web browsing still fails, the dial-up
connection on the shared computer might not be set up with a saved and
shared password. On that computer, open the Network and Sharing Center,
select Connect to a Network, and attempt to make the connection
manually. Be sure that you’ve checked Save This Username and Password
and selected Anyone Who Uses This Computer. |
|
Configuring the Rest of the Network
When the shared connection is set up, configuring the rest of your LAN should be easy. On each of your other computers (all except the connection-sharing computer), follow these steps:
1. | Open
Network and Sharing Center and select Change Adapter Settings.
Right-click the computer’s Local Area Network icon and select
Properties.
| 2. | Select Internet Protocol Version 4 (TCP/IPv4) and then select Properties.
Note When
you’re using a shared dial-up connection, it takes a while for the
dialer to go through its paces if the connection wasn’t already up.
Before it can finish, you might get an error from IE saying that it
can’t open the page. If this happens, just wait a few seconds and
Refresh (press F5) to try again. |
| 3. | Check Obtain an IP Address Automatically and Obtain DNS Server Address Automatically. Then, click OK.
| 4. | Repeat steps 2 and 3 for Internet Protocol Version 6 (TCP/IPv6).
| 5. | When
finished, you should be able to open Internet Explorer and view a
website. When you try, the connection-sharing computer should dial out
for you.
|
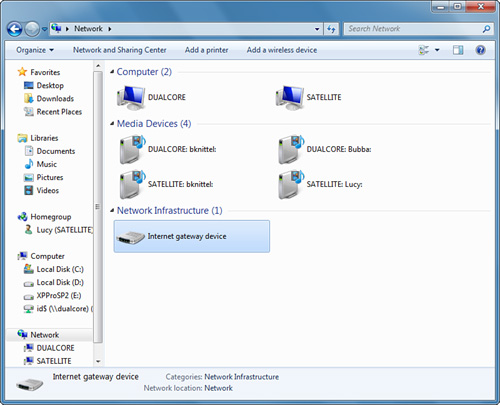
If
you are using Windows Internet Connection Sharing or a
connection-sharing router that supports Universal Plug and Play (UPnP),
the Network window of all the computers on your network should have an
icon that represents the shared Internet connection, as shown in Figure 3.
To display this window, select Network in any Windows Explorer window
(Computer, Documents, and so on). Or, open the Network and Sharing
Center and double-click the Network icon at the top.

Tip If
any of your other networked computers wants to dial an ISP itself,
perhaps because it had previously been set up to make its own
connection, just delete its dial-up connection icons. In Windows 7, you
can do that from the Network and Sharing Center. Select Change Adapter
Settings, then delete the now unneeded icon(s). |
If
you are using Windows Internet Connection Sharing, the shared
connection will be labeled “Internet Gateway Device.” To control a
dial-up or PPPoE DSL Internet connection shared by one computer from
your other networked computers, right-click this icon and select Enable
or Disable. (This works on all of the computers except the one that is
sharing its connection. On the computer that is sharing its connection,
you have to use the Network connection list that appears when you click
the Network icon in the taskbar.)
When
you first start using the Internet, a delay of 30 seconds or so is
normal while the dial-up connection is established. But, if the
connection doesn’t progress after 30 seconds, be sure of the following:
The sharing computer was turned on when you booted up your computer,
and your computer is set to obtain its IP address automatically. Try
to make the connection from the sharing computer to be sure the modem
is connecting properly.
|
|
If you attempt to view an Internet page from a LAN computer, but your web browser doesn’t get past “Looking up host www.somewhere.com,”
be sure that the sharing computer was turned on when you booted up your
computer, that the connection to the DSL or cable modem is the one
marked as shared, and that your computer is set to obtain its IP
address automatically. Try to view web pages from
the sharing computer to be sure the high-speed connection is
functioning.
If you are using a connection-sharing router, view the router’s built-in Status web page (usually by viewing http://192.168.0.1 or http://192.168.1.1
with IE). See if the router has been able to connect to your ISP. You
might have entered an incorrect password, or, for cable systems, you
might need to “clone” the MAC address of the computer that you
originally used to set up the Internet connection. |
|
|